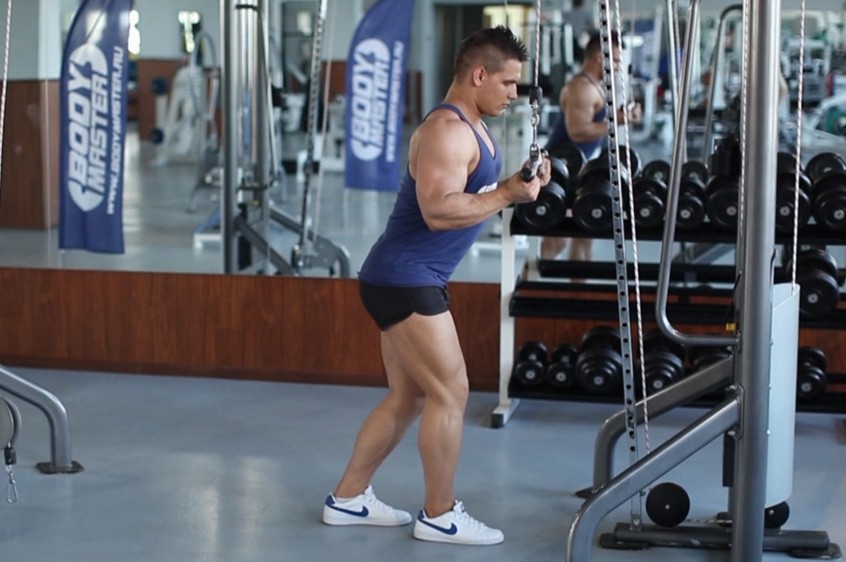
Reverse grip triceps push downs are an excellent exercise for targeting the triceps muscles. This exercise is also known as reverse grip cable push downs, and it involves using a cable machine to strengthen and tone the triceps muscles. The reverse grip push down exercise provides a different angle of tension on the triceps, which is why it is an effective exercise for triceps development.
How to Perform Reverse Grip Triceps Push Downs

To perform reverse grip triceps push downs, follow these simple steps:
- Start by attaching a straight bar to the cable machine.
- Stand facing the cable machine with your feet shoulder-width apart and your knees slightly bent.
- Grab the bar with an underhand grip (palms facing up) and place your hands shoulder-width apart.
- Slowly straighten your arms and bring the bar down to your thighs.
- Pause for a second and then slowly return to the starting position.
- Repeat for the desired number of repetitions.
Variations of Reverse Grip Triceps Push Downs

There are several variations of reverse grip triceps push downs that you can try to add variety to your triceps workout:
- Vary the width of your grip by using a wide or narrow grip.
- Use different attachments, such as a rope or V-bar, to target different areas of the triceps.
- Try doing the exercise with one arm at a time to isolate each triceps muscle.
- Change the angle of your body by leaning forward or backward slightly.
Tips for Performing Reverse Grip Triceps Push Downs

Here are some tips to keep in mind when performing reverse grip triceps push downs:
- Keep your elbows tucked in and close to your sides throughout the exercise.
- Make sure to use a weight that you can control throughout the entire range of motion.
- Avoid using momentum to lift the weight.
- Breathe out as you push the bar down and breathe in as you return to the starting position.
- Perform the exercise in a slow and controlled manner.
Benefits of Reverse Grip Triceps Push Downs

Here are some of the benefits of incorporating reverse grip triceps push downs into your workout routine:
- Targets the triceps muscles, which are important for arm strength and definition.
- Provides a different angle of tension on the triceps than other triceps exercises.
- Can be easily modified to target different areas of the triceps.
- Helps to improve overall upper body strength and stability.
- Can be done using a cable machine, which is found in most gyms.
Conclusion
Adding reverse grip triceps push downs to your workout routine is an excellent way to target and strengthen your triceps muscles. This exercise can be easily modified to target different areas of the triceps and provides a different angle of tension than other triceps exercises. Remember to perform the exercise in a slow and controlled manner and to use a weight that you can control throughout the entire range of motion. By incorporating reverse grip triceps push downs into your workout routine, you can improve your arm strength and definition and achieve your fitness goals.
Related video of Reverse Grip Triceps Push Downs

If you're looking to build bigger biceps, then you need to incorporate Ez bar curls into your workout routine. This exercise targets your biceps, forearms and shoulders, and is an excellent way to improve your upper body strength. In this article, we'll show you how to do Ez bar curls correctly, so you can get the most out of your workouts.
What is an Ez Bar?
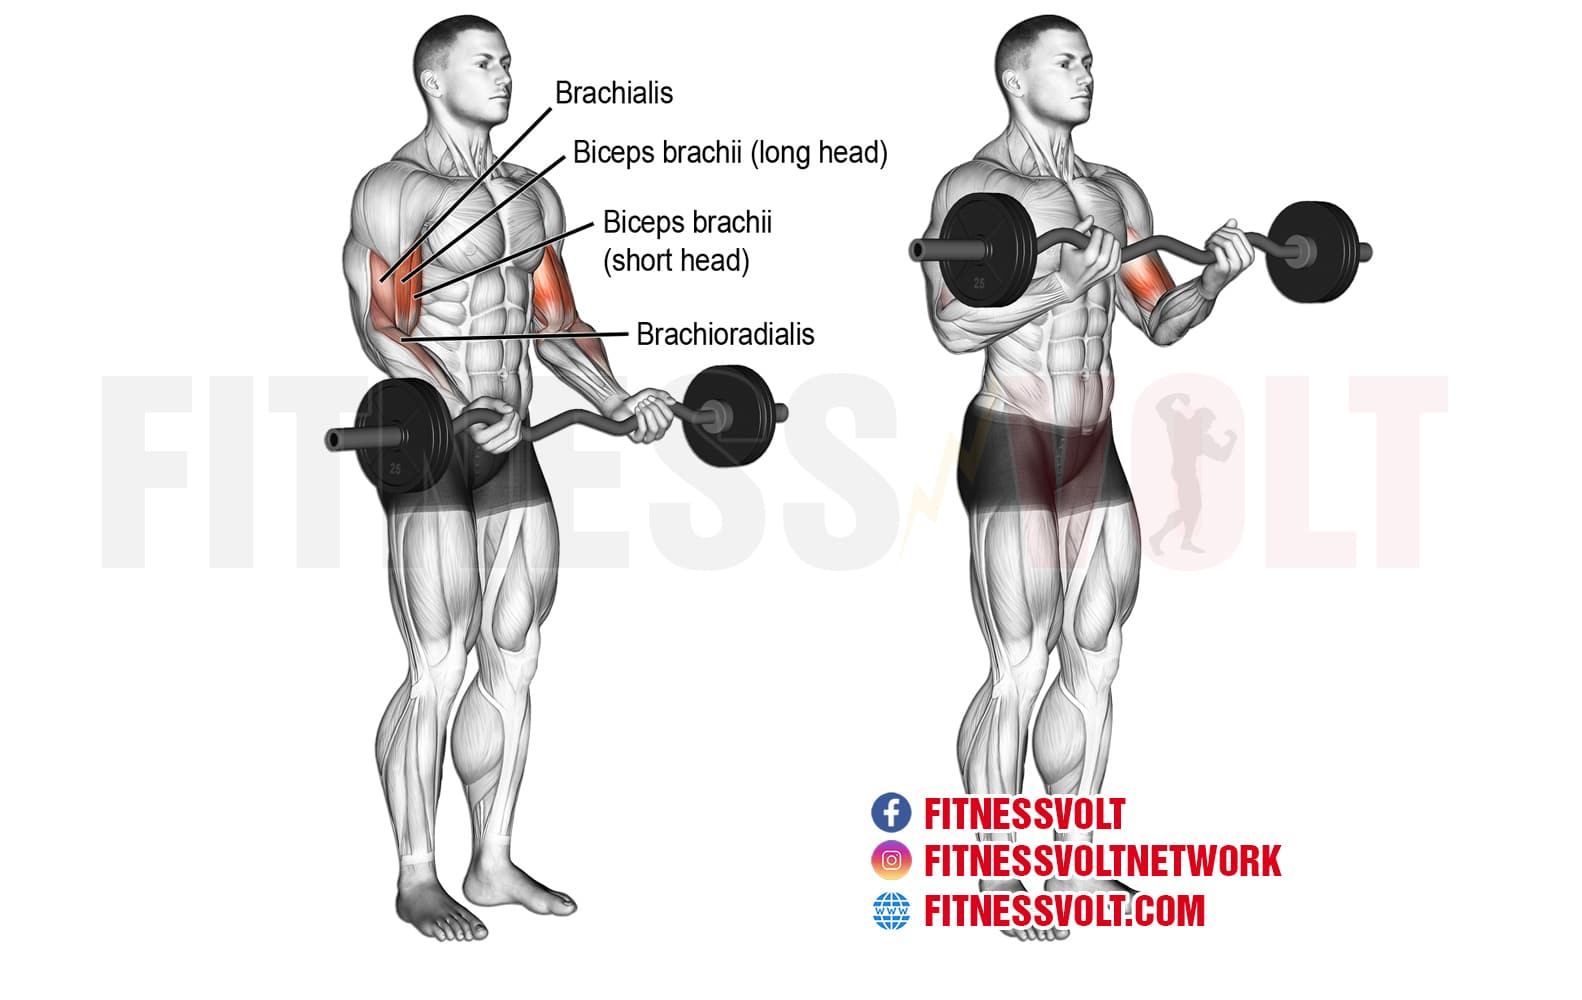
An Ez bar is a piece of weightlifting equipment that has a unique shape. Unlike a straight barbell, an Ez bar has a zigzag shape that is designed to reduce the amount of stress on your wrists and elbows. This makes it an ideal choice for exercises like bicep curls, where you want to isolate your biceps without putting too much strain on other parts of your body.
How to Do Ez Bar Curls

Follow these steps to perform Ez bar curls correctly:
- Stand up straight with your feet shoulder-width apart and your knees slightly bent.
- Grab the Ez bar with an underhand grip, with your palms facing up.
- Make sure your grip is shoulder-width apart, and your elbows are close to your sides.
- Curl the bar up towards your shoulders, keeping your elbows stationary.
- Squeeze your biceps at the top of the movement, then slowly lower the bar back down to the starting position.
- Repeat for your desired number of reps.
Tips for Doing Ez Bar Curls

Here are some tips to help you get the most out of your Ez bar curls:
- Don't swing your body or use momentum to lift the bar. Keep your movements controlled and deliberate.
- Focus on squeezing your biceps at the top of the movement.
- Don't let your elbows flare out to the sides. Keep them close to your body throughout the exercise.
- Breathe in as you lower the bar and exhale as you lift it back up.
- Start with a weight that you can comfortably lift for 8-12 reps, and gradually increase the weight over time.
Variations of Ez Bar Curls

Here are some variations of Ez bar curls that you can try to keep your workouts interesting:
- Close-grip Ez bar curls: Move your hands closer together on the bar to target your inner biceps.
- Wide-grip Ez bar curls: Move your hands wider apart on the bar to target your outer biceps.
- Ez bar preacher curls: Use a preacher bench to perform Ez bar curls, which isolates your biceps even further.
- Reverse-grip Ez bar curls: Use an overhand grip on the bar to target your forearms and biceps brachialis.
Conclusion
Ez bar curls are an excellent exercise for building bigger biceps, and with the right technique, you can get great results. Remember to start with a weight that you can handle and gradually increase the weight over time. Also, don't forget to try different variations of the exercise to keep your workouts interesting. By following these tips, you'll be well on your way to having stronger, more defined biceps in no time.
Related video of How To Do Ez Bar Curls: A Complete Guide

Are you looking for a way to build impressive biceps and forearms? Look no further than the alternating supinating dumbbell curl. This exercise targets both the biceps brachii and brachioradialis, creating a well-rounded arm workout. In this comprehensive guide, we'll take a look at the proper form, benefits, and tips for performing the alternating supinating dumbbell curl.
What are Alternating Supinating Dumbbell Curls?

Alternating supinating dumbbell curls involve lifting a dumbbell with one arm while keeping the other arm still, then switching to the other arm. As you lift the dumbbell, you supinate your wrist, which means you rotate your palm upward. This movement engages the brachioradialis, the muscle that runs along the outside of your forearm, in addition to the biceps brachii.
How to Perform Alternating Supinating Dumbbell Curls
Follow these steps to perform alternating supinating dumbbell curls:
- Stand up straight with your feet shoulder-width apart.
- Hold a dumbbell in each hand with your palms facing your body.
- While keeping your upper arms stationary, lift one dumbbell toward your shoulder by curling your forearm.
- As you lift the weight, rotate your wrist so that your palm faces upward.
- Pause for a second at the top of the movement, then slowly lower the weight back down.
- Repeat on the other arm.
- Continue alternating arms for the desired number of reps.
When performing alternating supinating dumbbell curls, it's important to maintain proper form. Keep your elbows close to your sides and avoid swinging the weights. Also, make sure to fully extend your arms at the bottom of each rep to get a full range of motion.
Benefits of Alternating Supinating Dumbbell Curls

There are several benefits to including alternating supinating dumbbell curls in your workout routine:
- Target multiple muscles: Alternating supinating dumbbell curls work both the biceps brachii and brachioradialis, creating a well-rounded arm workout.
- Improve grip strength: By rotating your wrist as you lift the weight, you engage your forearm muscles and improve grip strength.
- Prevent muscle imbalances: By alternating arms, you ensure that both sides of your body are getting equal work, preventing muscle imbalances.
- Variety: If you've been doing traditional bicep curls for a while, alternating supinating dumbbell curls can add some variety to your workout routine.
Tips for Performing Alternating Supinating Dumbbell Curls
Here are some tips to help you get the most out of your alternating supinating dumbbell curls:
- Start with a light weight until you get the hang of the movement.
- Don't swing the weights or use momentum to lift them.
- Focus on squeezing your biceps at the top of the movement.
- Use a full range of motion by fully extending your arms at the bottom of each rep.
- Don't forget to breathe! Exhale as you lift the weight and inhale as you lower it.
Conclusion
Alternating supinating dumbbell curls are an effective way to build biceps and forearms. By following proper form and incorporating them into your workout routine, you can target multiple muscles and improve grip strength. Remember to start with a light weight, focus on squeezing your biceps, and use a full range of motion. With consistency and dedication, you'll see progress in no time!
Related video of Alternating Supinating Dumbbell Curls: A Comprehensive Guide
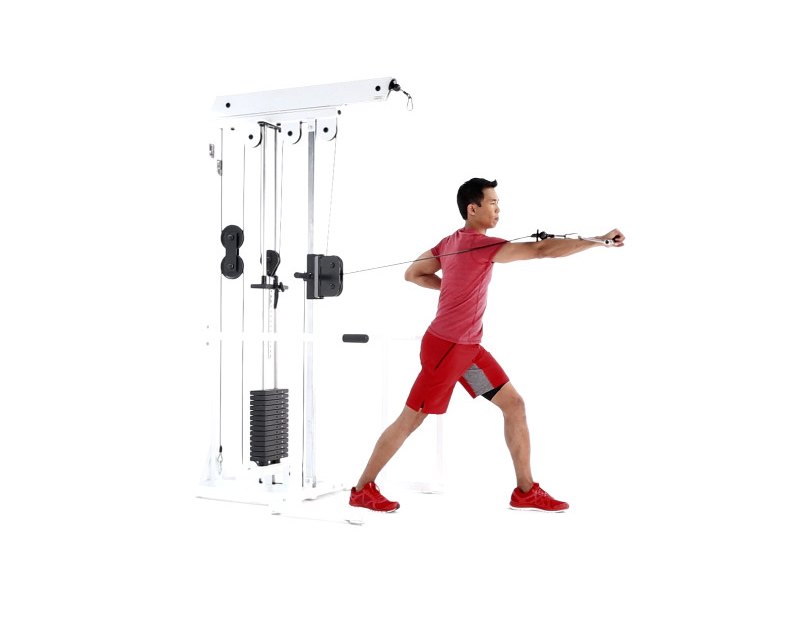
The single arm cable chest press is an exercise that targets the chest muscles. It is performed using a cable machine, with the exerciser attaching an adjustable handle to the machine. The exercise is done by pulling the handle across the chest, using one arm at a time.
Benefits of the Single Arm Cable Chest Press
The single arm cable chest press is a great exercise for building strength and muscle in the chest. It also helps to improve stability in the shoulder joint, as well as the core. Performing the exercise with one arm at a time allows for greater focus on each side of the chest, helping to correct any imbalances that may exist.

How to Perform the Single Arm Cable Chest Press
To perform the single arm cable chest press, start by attaching the handle to the cable machine at chest height. Stand facing away from the machine and grab the handle with your right hand. Step forward with your left foot, keeping your core engaged and your back straight.
Push the handle across your chest until your arm is fully extended, then slowly bring it back to the starting position. Repeat for the desired number of repetitions, then switch sides and repeat with your left arm.

Tips for Performing the Single Arm Cable Chest Press
To get the most out of the single arm cable chest press, it's important to maintain proper form throughout the exercise. Keep your core engaged and your back straight, and avoid using momentum to pull the handle across your chest.
It's also important to use a weight that is appropriate for your fitness level. If the weight is too heavy, you may end up compensating with other muscles, which can lead to injury.

Variations of the Single Arm Cable Chest Press
The single arm cable chest press can be modified in a number of ways to increase or decrease the intensity of the exercise. One variation is to perform the exercise while standing on one leg, which increases the demand on the core muscles.
Another variation is to perform the exercise with both arms at the same time, which allows for greater overall chest activation.

Conclusion
The single arm cable chest press is a great exercise for building strength and muscle in the chest. It can be modified in a number of ways to suit different fitness levels and goals. By maintaining proper form and using an appropriate weight, you can get the most out of this exercise and achieve your fitness goals.
Related video of Single Arm Cable Chest Press

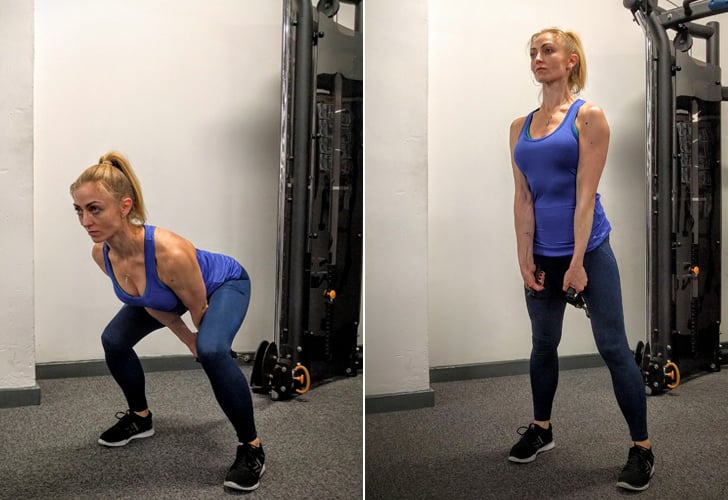
Sumo squat form dumbbell is a popular exercise in the fitness world that targets multiple muscle groups, including the quads, hamstrings, glutes, and calves. This exercise is an excellent way to build lower body strength, improve your posture, and increase your overall fitness level.
What is a Sumo Squat Form Dumbbell?

A sumo squat form dumbbell is a variation of the traditional sumo squat that involves the use of dumbbells. It is called "sumo" because the stance resembles that of a sumo wrestler, with a wide stance and toes pointing outwards.
To perform this exercise, you will need a set of dumbbells and enough space to stand with your feet shoulder-width apart. Start by holding the dumbbells with both hands and standing with your feet wider than shoulder-width apart. Your toes should be pointing outwards at a 45-degree angle.
How to Perform a Sumo Squat Form Dumbbell

Here are the steps to perform a sumo squat form dumbbell:
- Stand with your feet shoulder-width apart, and hold the dumbbells with both hands.
- Step your feet out wide, so your toes are pointing outwards at a 45-degree angle.
- Lower your body down into a squat position, keeping your chest up and your back straight. Make sure your knees are tracking over your toes.
- Pause at the bottom of the squat, then push through your heels to return to the starting position.
- Repeat for the desired number of reps.
Benefits of Sumo Squat Form Dumbbell

There are several benefits of including the sumo squat form dumbbell in your workout routine:
- Targets multiple muscle groups: The sumo squat form dumbbell targets the quads, hamstrings, glutes, and calves, making it an excellent exercise for building lower body strength.
- Improves posture: This exercise can help improve your posture by strengthening the muscles in your lower back and core.
- Increases fitness level: The sumo squat form dumbbell is an excellent cardiovascular exercise that can help increase your overall fitness level.
- Easy to perform: This exercise is relatively easy to perform, making it an excellent choice for beginners.
Tips for Performing Sumo Squat Form Dumbbell

Here are some tips to help you perform the sumo squat form dumbbell correctly:
- Keep your chest up and your back straight throughout the exercise.
- Make sure your knees are tracking over your toes to avoid putting unnecessary strain on your joints.
- Use a weight that is challenging but allows you to maintain proper form.
- Breathe in as you lower your body down into the squat and exhale as you push through your heels to return to the starting position.
Conclusion
The sumo squat form dumbbell is an excellent exercise for building lower body strength, improving your posture, and increasing your overall fitness level. By following the correct form and incorporating this exercise into your workout routine, you can achieve better results and reach your fitness goals faster.
Related video of Sumo Squat Form Dumbbell

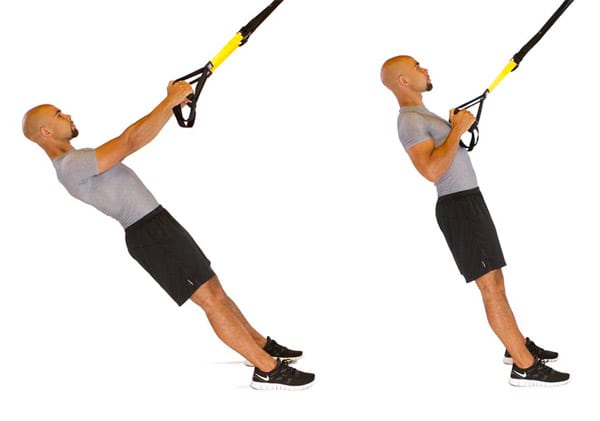
TRX Rows are a great exercise to work your back muscles. They are easy to perform and can be done almost anywhere. The TRX suspension trainer is a piece of equipment that is used to perform the exercise. It consists of two straps that are attached to an anchor point, which can be a door frame or a sturdy object.
What Muscles are Worked?

The TRX Rows work several muscles in your upper body, including your back, shoulders, and arms. The primary muscles worked are the latissimus dorsi, which are the large muscles that run down the sides of your back. These muscles are responsible for pulling your arms towards your body and are important for many daily activities, such as pulling open a door or lifting heavy objects.
In addition to the latissimus dorsi, TRX Rows also work the posterior deltoids, which are the muscles located on the back of your shoulders. These muscles help to stabilize your shoulder joint and are important for maintaining good posture. The biceps and forearms are also worked during this exercise, as they help to grip the straps and pull your body up.
How to Perform TRX Rows
To perform TRX Rows, follow these steps:
- Adjust the TRX straps so that they are hanging down to about waist height.
- Grip the handles of the straps with your palms facing inwards.
- Walk your feet forward until your body is at a slight angle and your arms are fully extended.
- Keep your core tight and your body straight as you pull your chest towards the handles.
- Lower yourself back down to the starting position and repeat for the desired number of reps.
It's important to keep your core tight throughout the exercise to prevent your body from sagging or arching. You should also try to keep your elbows close to your body to engage your back muscles more effectively.
Variations of TRX Rows

There are several variations of TRX Rows that you can do to target different muscles or add more challenge to the exercise. Here are a few:
- Single-arm TRX Rows - Perform the exercise with one arm at a time to work each side of your back independently.
- TRX Y Rows - Pull your body up towards your hands, forming a Y shape with your arms and body. This variation targets the upper back and rear deltoids more effectively.
- TRX T Rows - Pull your body up towards your hands, forming a T shape with your arms and body. This variation targets the middle back more effectively.
- TRX Inverted Rows - Lie underneath the TRX straps and pull your chest towards the handles. This variation is more challenging as you are lifting more of your bodyweight.
Benefits of TRX Rows

TRX Rows offer several benefits for your upper body and overall fitness:
- Strengthens your back muscles - The primary muscles worked during TRX Rows are the latissimus dorsi, which are important for many daily activities.
- Improves posture - TRX Rows can help to strengthen the muscles that support your shoulders and spine, leading to better posture.
- Increases grip strength - Holding onto the TRX straps requires a strong grip, which can improve your grip strength over time.
- Convenient and portable - TRX equipment is easy to set up and can be used almost anywhere, making it a great option for people who travel frequently or don't have access to a gym.
- Can be modified for all fitness levels - TRX Rows can be modified to make them easier or more challenging, depending on your fitness level.
Conclusion
TRX Rows are a simple yet effective exercise for strengthening your back muscles and improving your overall fitness. By using the TRX suspension trainer, you can perform the exercise almost anywhere and modify it to suit your fitness level. By incorporating TRX Rows into your workout routine, you can improve your posture, increase your grip strength, and reduce your risk of injury.
Related video of Trx Rows Muscles Worked

If you are looking for an exercise that can help you strengthen your glutes and hamstrings, the single leg cable kickback is worth trying. This exercise is simple, yet highly effective in targeting the muscles in your lower body. In this article, we will be discussing the benefits of the single leg cable kickback and how to perform it correctly.
Benefits of Single Leg Cable Kickback

There are several benefits of incorporating the single leg cable kickback into your workout routine. Here are some of them:
1. Targets Glutes and Hamstrings: The single leg cable kickback specifically targets your glutes and hamstrings, helping you to strengthen and tone these muscles.
2. Improves Balance and Stability: This exercise requires you to balance on one leg, which can help improve your overall balance and stability.
3. Increases Hip Mobility: The single leg cable kickback requires you to move your hip joint, which can help increase your hip mobility.
4. Works Core Muscles: To maintain your balance during this exercise, you need to engage your core muscles, which can help strengthen them.
How to Perform Single Leg Cable Kickback

Here are the steps to perform a single leg cable kickback:
Step 1: Attach an ankle cuff to a cable machine and adjust the pulley to the lowest setting.
Step 2: Stand facing the cable machine and attach the ankle cuff to your right ankle.
Step 3: Balance on your left leg and keep your left knee slightly bent.
Step 4: Lean forward slightly and extend your right leg back, keeping it straight.
Step 5: Squeeze your glutes as you extend your leg back.
Step 6: Slowly return your right leg to the starting position.
Step 7: Repeat for the desired number of repetitions and then switch legs.
Tips for Performing Single Leg Cable Kickback

Here are some tips to help you perform the single leg cable kickback correctly:
1. Keep Your Core Engaged: To maintain your balance during this exercise, it's important to keep your core muscles engaged.
2. Keep Your Leg Straight: Make sure to keep your leg straight throughout the movement to target your glutes and hamstrings.
3. Avoid Arching Your Back: Keep your back straight and avoid arching it during the exercise.
4. Control the Movement: Make sure to control the movement and avoid swinging your leg.
Conclusion
The single leg cable kickback is a simple yet effective exercise that can help you strengthen your glutes and hamstrings. Incorporating this exercise into your workout routine can help improve your balance, stability, and hip mobility. Remember to engage your core muscles, keep your leg straight, and control the movement to perform this exercise correctly.
Related video of Single Leg Cable Kickback: Strengthen Your Glutes and Hamstrings
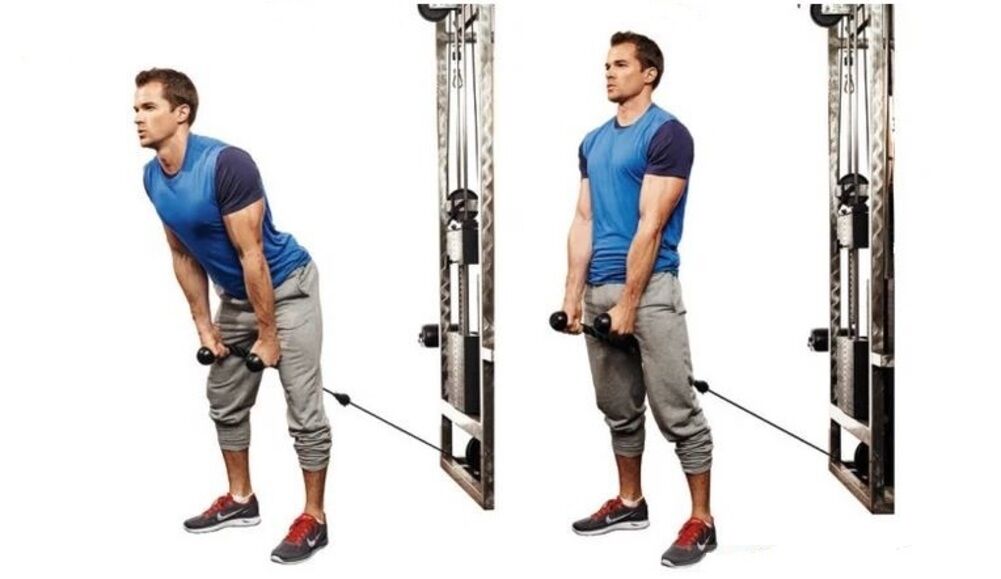
The cable glute pull through is a popular exercise for strengthening the glutes, hamstrings, and lower back muscles. It is a compound exercise that targets multiple muscle groups at once, making it an efficient way to build strength and improve overall fitness.
How to Perform Cable Glute Pull Through
To perform the cable glute pull through, follow these steps:
- Attach a rope handle to the low pulley cable machine.
- Stand facing away from the machine with your feet shoulder-width apart.
- Grab the rope handle and walk forward until your arms are fully extended in front of your hips.
- Bend at the waist and hinge your hips back, keeping your knees slightly bent.
- Lower the rope handle between your legs until it touches the ground.
- Contract your glutes and hamstrings to raise your body back up to the starting position.
- Repeat for the desired number of repetitions.
It is important to maintain proper form throughout the exercise. Keep your back straight and your core tight to protect your lower back. Use a weight that challenges you but allows you to maintain control throughout the movement.
Benefits of Cable Glute Pull Through
The cable glute pull through offers several benefits for your fitness routine:
- Strengthening the glutes: The glutes are one of the largest muscle groups in the body and play a key role in many everyday movements. Strengthening the glutes can improve posture, reduce back pain, and enhance athletic performance.
- Targeting the hamstrings: The hamstring muscles are also involved in many movements, including walking, running, and jumping. Strengthening the hamstrings can improve knee stability and reduce the risk of injury.
- Building core stability: The cable glute pull through requires a stable core to maintain proper form. Improving core stability can enhance overall balance and coordination.
- Burning calories: The cable glute pull through is a compound exercise that engages multiple muscle groups at once, making it an effective way to burn calories and improve cardiovascular fitness.

Variations of Cable Glute Pull Through
There are several variations of the cable glute pull through that can add variety to your workout routine:
- Single-leg cable glute pull through: This variation involves performing the exercise with one leg at a time, which can increase the challenge and target each glute separately.
- Banded glute pull through: Using a resistance band in place of the cable machine can provide a different type of resistance and target the glutes in a slightly different way.
- Weighted glute pull through: Adding weight to the exercise can increase the challenge and help you build strength over time.
Conclusion
The cable glute pull through is a versatile and effective exercise for building strength in the glutes, hamstrings, and lower back muscles. By adding it to your fitness routine, you can improve your overall fitness and reduce the risk of injury. Try different variations of the exercise to keep your workouts challenging and enjoyable.
Related video of Cable Glute Pull Through: How to Perform and Its Benefits

A strong core is essential for overall fitness and athletic performance. Kettlebell exercises are an effective way to strengthen the core muscles while also improving overall strength and endurance. Here are some of the best kettlebell exercises for core:
1. Kettlebell Swing

The kettlebell swing is a classic exercise that targets the core muscles, as well as the glutes, hamstrings, and lower back. To perform the swing, stand with your feet shoulder-width apart and hold the kettlebell with both hands between your legs. Bend your knees slightly and swing the kettlebell back between your legs before explosively swinging it forward to chest height. Repeat for several reps.
2. Turkish Get-Up

The Turkish get-up is a full-body exercise that requires coordination and core strength. Starting on your back with the kettlebell in one hand, roll onto your side and press the kettlebell overhead. Push up onto your elbow, then your hand, and finally your knee to stand up. Reverse the movement to return to the starting position.
3. Russian Twist

The Russian twist is a great exercise for targeting the obliques and improving rotational power. Sit on the floor with your knees bent and feet flat. Hold the kettlebell with both hands and lean back slightly. Twist your torso to one side and then the other, tapping the kettlebell on the floor each time.
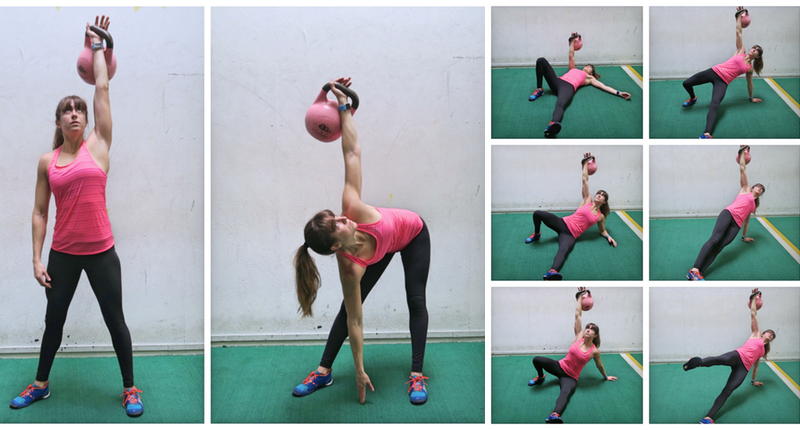
4. Windmill
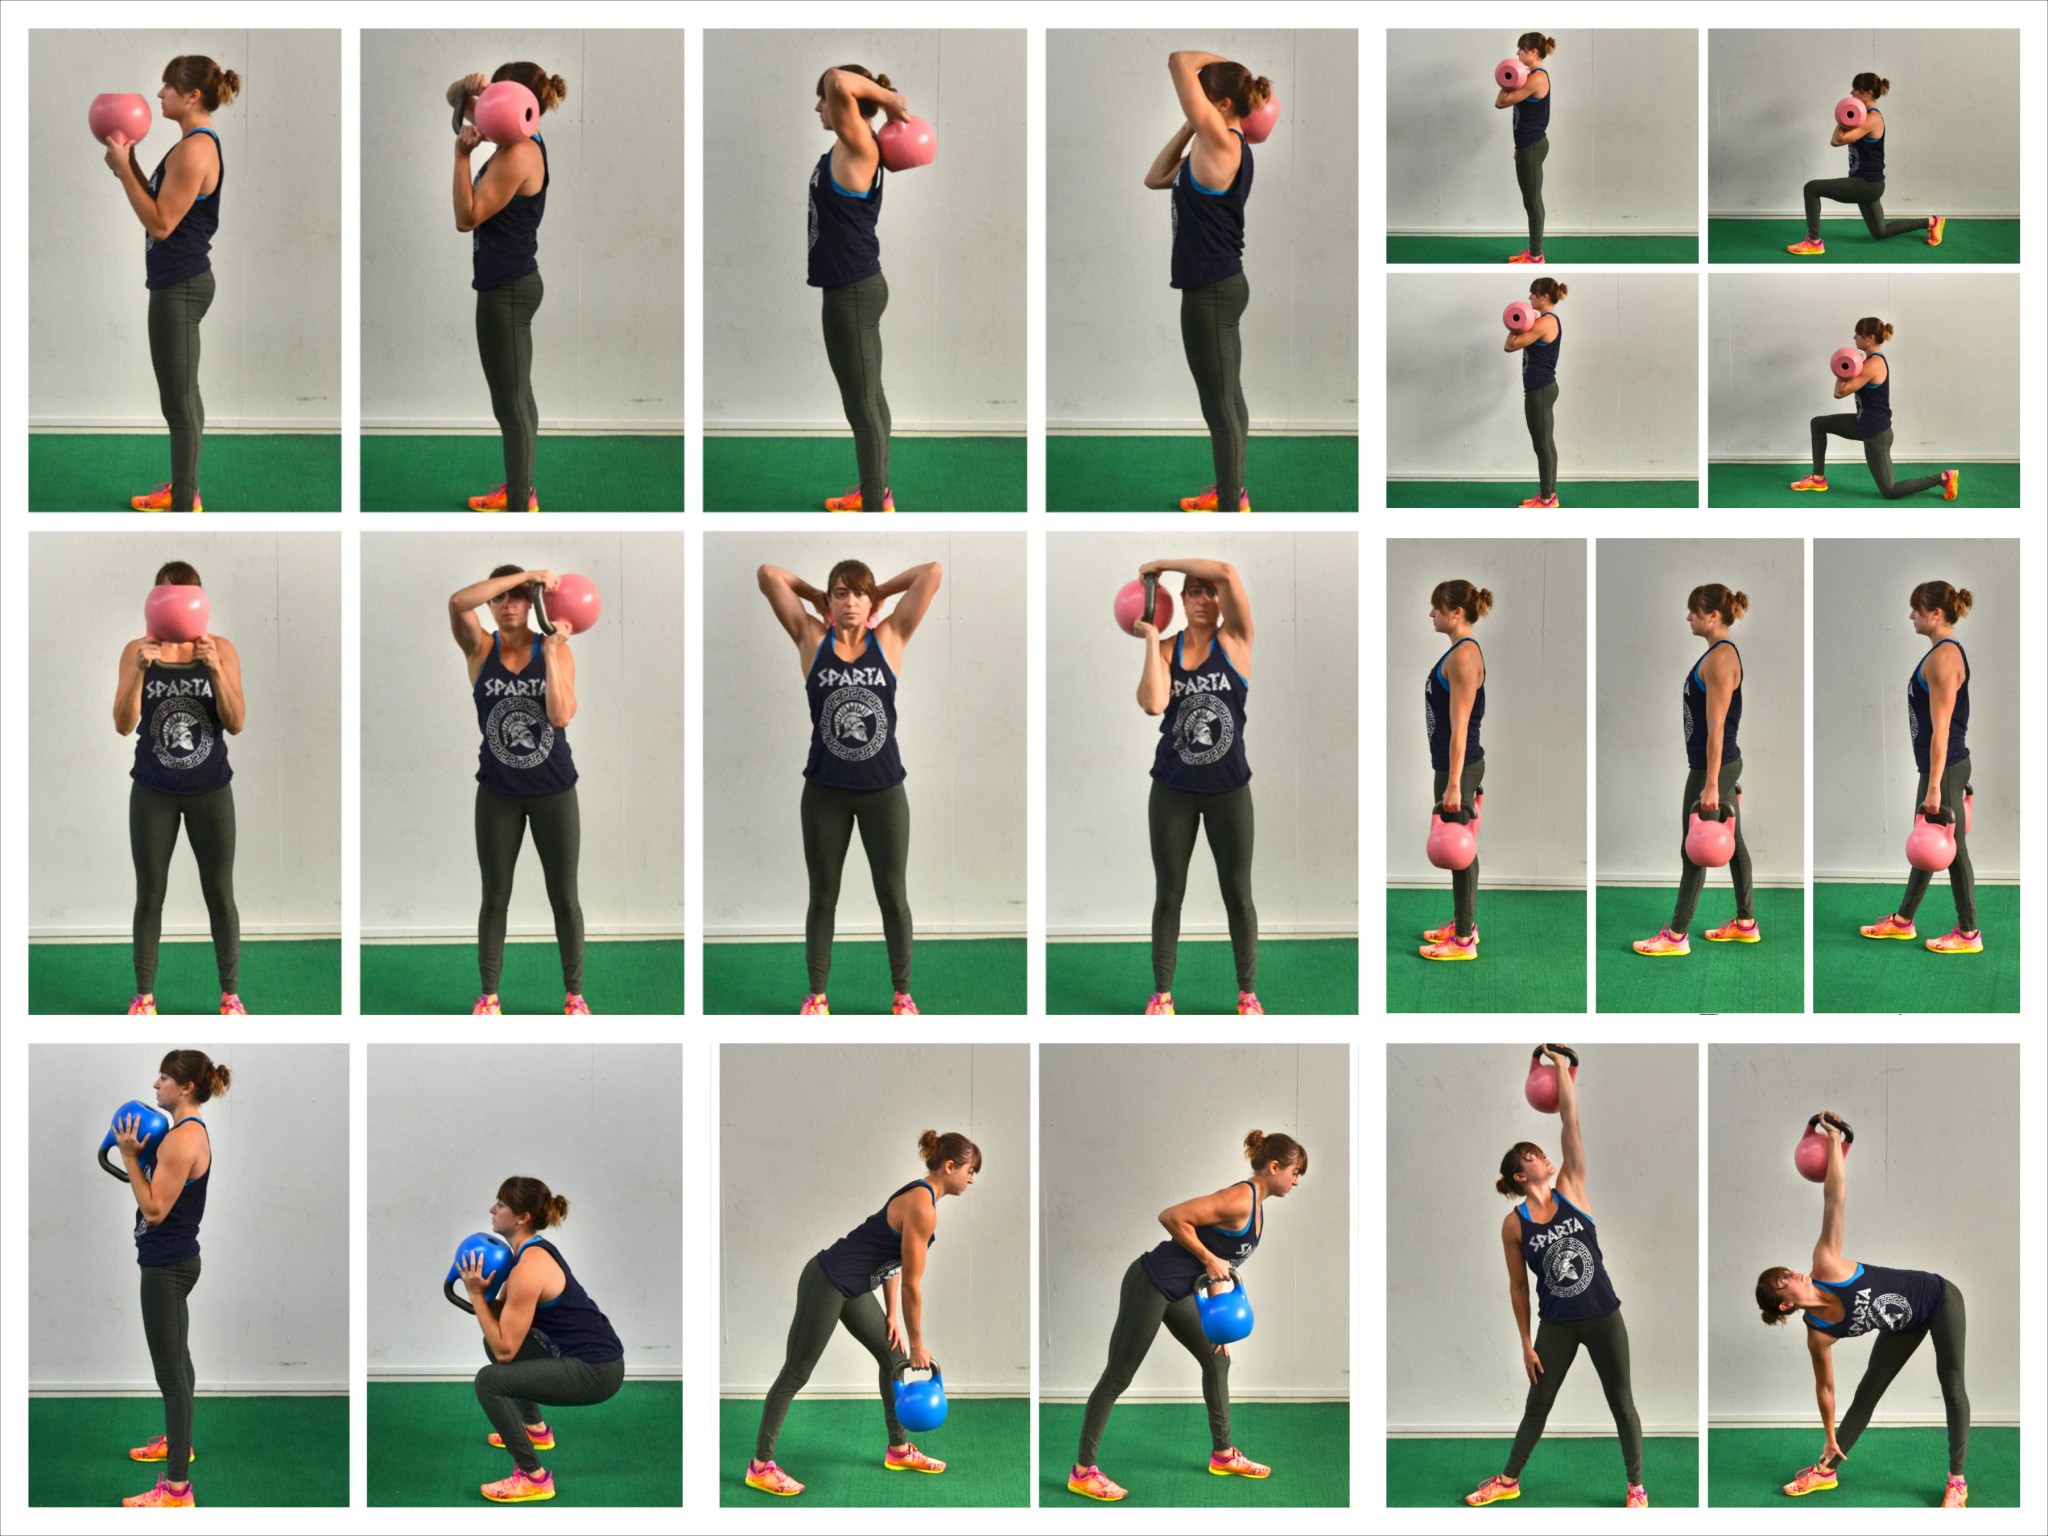
The windmill is a challenging exercise that targets the obliques, shoulders, and hips. Hold the kettlebell in one hand and press it overhead. Stand with your feet wider than shoulder-width apart and turn your feet out to the side of the kettlebell. Bend at the waist and touch your opposite foot with your free hand. Return to the starting position and repeat for several reps before switching sides.
5. Plank with Kettlebell Pull-Through

The plank with kettlebell pull-through is a challenging exercise that targets the entire core. Start in a plank position with the kettlebell on one side of your body. Reach under your body with your free hand and pull the kettlebell across to the other side. Repeat for several reps before switching sides.
6. Goblet Squat

The goblet squat is a great exercise for strengthening the quads, glutes, and core muscles. Hold the kettlebell close to your chest with both hands and stand with your feet shoulder-width apart. Squat down until your thighs are parallel to the floor, then stand back up. Repeat for several reps.
7. Kettlebell Deadlift
The kettlebell deadlift is a great exercise for strengthening the lower back, glutes, and hamstrings. Stand with your feet shoulder-width apart and hold the kettlebell with both hands between your legs. Keeping your back straight, hinge forward at the hips and lower the kettlebell to the ground. Stand back up and repeat for several reps.
8. Kettlebell Sit-Up

The kettlebell sit-up is a challenging exercise that targets the abs and hip flexors. Lie on your back with your knees bent and hold the kettlebell with both hands. Sit up, lifting the kettlebell overhead, and then lower yourself back down. Repeat for several reps.
9. Kettlebell Side Bend

The kettlebell side bend is a great exercise for targeting the obliques. Hold the kettlebell in one hand and stand with your feet shoulder-width apart. Lean to the side, keeping your arm straight and the kettlebell close to your leg. Return to the starting position and repeat for several reps before switching sides.
10. Kettlebell Figure-8

The kettlebell figure-8 is a fun exercise that targets the core, shoulders, and hips. Hold the kettlebell with both hands and stand with your feet shoulder-width apart. Pass the kettlebell between your legs and around one leg before passing it back between your legs and around the other leg. Repeat for several reps.
These kettlebell exercises for core are a great way to improve overall strength, endurance, and athletic performance. Incorporate them into your workout routine to see the best results.
Related video of Kettlebell Exercises For Core

The side plank with hip abduction is a challenging exercise that targets the obliques, glutes, and hips. It's a great way to strengthen your core and improve your overall balance and stability. In this article, we'll take a closer look at how to perform the side plank with hip abduction correctly and safely.
Benefits of the Side Plank With Hip Abduction

Before we dive into the details of how to perform the side plank with hip abduction, let's take a look at some of the benefits of this exercise:
- Strengthens the obliques and glutes
- Improves core stability and balance
- Targets the hips and improves hip mobility
- Can alleviate lower back pain
- Helps to prevent injuries
How to Perform the Side Plank With Hip Abduction

To perform the side plank with hip abduction, follow these steps:
- Start by lying on your side with your elbow directly under your shoulder and your legs straight out.
- Lift your hips off the ground and hold your body in a straight line from your head to your feet.
- Engage your core muscles and lift your top leg up, keeping it straight.
- Hold for a few seconds, then slowly lower your leg back down.
- Repeat for the desired number of reps, then switch sides.
Tips for a Successful Side Plank With Hip Abduction

Here are some tips to help you perform the side plank with hip abduction safely and effectively:
- Keep your body in a straight line from your head to your feet throughout the exercise.
- Engage your core muscles and squeeze your glutes to maintain stability.
- Avoid letting your hips sag or your shoulders collapse forward.
- Breathe deeply and avoid holding your breath during the exercise.
- Start with a low number of reps and gradually increase as you get stronger.
Variations of the Side Plank With Hip Abduction

Once you've mastered the basic side plank with hip abduction, you can try some variations to challenge yourself even more. Here are a few to consider:
- Add a leg lift: Instead of just lifting your top leg, lift both legs at the same time.
- Hold a weight: You can hold a weight in your top hand to add extra resistance.
- Use a stability ball: Place your feet on a stability ball to make the exercise more challenging.
Conclusion
The side plank with hip abduction is a challenging but effective exercise for strengthening your core, glutes, and hips. By following the tips and variations outlined in this article, you can safely and effectively incorporate this exercise into your fitness routine.
