
Introduction
Hanging Weighted Knee Raises is an advanced exercise that targets the abs and helps to build strength and definition in the core muscles. This exercise is considered one of the most challenging abdominal exercises because it requires a lot of strength and stability to perform it correctly.How to Perform Hanging Weighted Knee Raises
To perform Hanging Weighted Knee Raises, you will need a pull-up bar and a weight plate. Here are the steps to perform the exercise:1. Hang from a pull-up bar with a pronated grip (palms facing away from you).2. Place a weight plate between your feet.3. Engage your core muscles and lift your knees toward your chest.4. Pause for a moment at the top of the movement, then lower your legs back down to the starting position.5. Repeat for the desired number of repetitions.Benefits of Hanging Weighted Knee Raises
Hanging Weighted Knee Raises is an effective exercise that offers numerous benefits, including:- Increased core strength: This exercise targets the abs, which helps to build strength and definition in the core muscles.- Improved stability: The exercise requires a lot of stability to perform it correctly, which helps to improve overall stability and balance.- Improved posture: This exercise helps to strengthen the muscles that support good posture.- Improved athletic performance: A strong core is essential for many athletic activities, including running, jumping, and lifting.
Variations of Hanging Weighted Knee Raises
Here are some variations of Hanging Weighted Knee Raises that you can try:- Hanging Leg Raises: This exercise is similar to Hanging Weighted Knee Raises, but instead of bending your knees, you lift your legs straight up.- Hanging Oblique Raises: This exercise targets the oblique muscles by twisting your legs to one side as you lift them.- Hanging Windshield Wipers: This exercise targets the oblique muscles by moving your legs from side to side as you lift them.Tips for Performing Hanging Weighted Knee Raises
Here are some tips to help you perform Hanging Weighted Knee Raises correctly:- Engage your core muscles throughout the exercise to maintain stability.- Avoid swinging your legs or using momentum to lift them.- Keep your movement controlled and slow.- Exhale as you lift your legs and inhale as you lower them.
Precautions and Contraindications
Hanging Weighted Knee Raises is an advanced exercise that requires a lot of strength and stability. Here are some precautions and contraindications to keep in mind:- Avoid this exercise if you have any back or shoulder injuries.- If you experience any pain or discomfort during the exercise, stop immediately.- Always warm up before performing this exercise to prevent injury.- If you are a beginner, start with easier exercises before attempting Hanging Weighted Knee Raises.Conclusion
Hanging Weighted Knee Raises is an advanced exercise that offers numerous benefits for building strength and definition in the core muscles. However, it is essential to perform the exercise correctly and safely to avoid injury. By following the tips and precautions outlined in this article, you can safely perform Hanging Weighted Knee Raises and enjoy its many benefits.Related video of Hanging Weighted Knee Raises: A Complete Guide
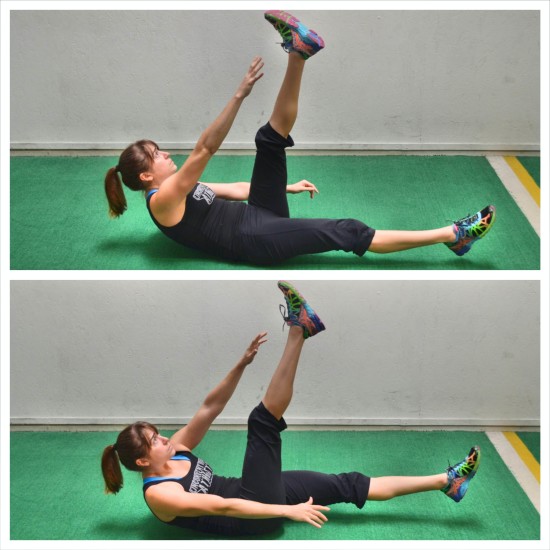
If you are looking for an exercise that will challenge your core strength, then Alternating Leg V Ups might be just what you need. This exercise is not easy, but it is highly effective at working your abs, back, and hips. In this article, we will explain what Alternating Leg V Ups are, how to do them correctly, and the benefits that they offer.
What Are Alternating Leg V Ups?

Alternating Leg V Ups are a variation of the V Up exercise. To do this exercise, you start by lying flat on your back with your arms extended above your head. Then, you lift your legs and upper body off the ground at the same time, forming a "V" shape with your body. From there, you lower your legs and upper body back down to the ground, and then lift them up again, this time raising one leg while keeping the other one straight. You alternate legs with each repetition, hence the name Alternating Leg V Ups.
How to Do Alternating Leg V Ups Correctly

While Alternating Leg V Ups may look simple, they can be quite challenging to do correctly. Here are the steps to follow to perform this exercise with proper form:
- Lie flat on your back with your arms extended above your head.
- Lift your legs and upper body off the ground at the same time, forming a "V" shape with your body.
- Lower your legs and upper body back down to the ground.
- Lift your legs and upper body off the ground again, this time raising one leg while keeping the other one straight.
- Lower your legs and upper body back down to the ground.
- Repeat steps 4-5, alternating legs each time.
Make sure to keep your core engaged throughout the exercise and to breathe deeply. It is also important to use controlled movements, rather than swinging your legs and upper body around.
The Benefits of Alternating Leg V Ups

Alternating Leg V Ups offer a variety of benefits, including:
- Improved core strength: Alternating Leg V Ups target your abs, back, and hips, which are all important muscles for core strength.
- Better balance and stability: This exercise requires you to balance on your tailbone, which can improve your overall balance and stability.
- Increased flexibility: Alternating Leg V Ups require a good range of motion in your hips, which can help to increase your flexibility over time.
- Enhanced athletic performance: A strong core is essential for many athletic activities, and Alternating Leg V Ups can help to improve your overall athletic performance.
Tips for Making Alternating Leg V Ups Easier or Harder

If you are struggling to do Alternating Leg V Ups, there are a few modifications that you can make to make the exercise easier:
- Start by doing regular V Ups without alternating your legs.
- Place your hands under your lower back for extra support.
- Bend your knees slightly to make the exercise less challenging.
If you find that Alternating Leg V Ups are too easy, here are some ways to make the exercise more challenging:
- Hold a weight or medicine ball in your hands while doing the exercise.
- Add a twist to the exercise by touching your opposite hand to your opposite foot when you lift your legs.
- Do the exercise on an unstable surface, such as a balance ball or BOSU ball.
Conclusion
Alternating Leg V Ups are a challenging exercise that can help to improve your core strength, balance, flexibility, and athletic performance. By following the proper form and making modifications as needed, you can make this exercise work for your fitness level. Give it a try and see how it feels!
Related video of Alternating Leg V Ups: A Challenging Exercise for Core Strength

Alternating cross body hammer curls are a great exercise for building bicep and forearm muscles. Not only do they target different parts of the bicep, but they also engage the forearms and improve grip strength. In this article, we will go over the proper form, benefits, and variations of alternating cross body hammer curls.
Proper Form

Before we dive into the benefits and variations of alternating cross body hammer curls, it's important to understand proper form. Here are the steps to perform this exercise correctly:
- Stand with your feet shoulder-width apart and hold a dumbbell in each hand.
- Start with your palms facing your body, and then rotate them so that they face each other.
- Lift one arm towards the opposite shoulder in a curling motion.
- Lower the arm back down to the starting position and repeat with the other arm.
- Continue alternating arms for the desired number of reps.
It's important to keep your elbows close to your body and avoid swinging the weights. You should also make sure to fully extend your arms at the bottom of each rep.
Benefits of Alternating Cross Body Hammer Curls

There are several benefits to adding alternating cross body hammer curls to your workout routine:
- Bicep growth: This exercise targets both the long and short heads of the bicep, leading to overall growth and definition.
- Forearm development: The twisting motion engages the forearms, leading to improved strength and size.
- Improved grip strength: Since this exercise requires you to hold onto the weights, it can help improve grip strength over time.
- Variation in routine: If you're used to regular bicep curls, alternating cross body hammer curls can provide a new challenge and variation in your routine.
Variations

There are several variations of alternating cross body hammer curls that you can try to change up your workout:
- Single arm cross body hammer curls: Instead of alternating arms, perform all reps on one arm before switching to the other.
- Seated cross body hammer curls: Sit on a bench or chair while performing the exercise to isolate the biceps even further.
- Reverse grip cross body hammer curls: Hold the dumbbells with a reverse grip (palms facing down) for a different angle on the biceps and forearms.
Incorporating Alternating Cross Body Hammer Curls into Your Routine

Alternating cross body hammer curls can be incorporated into your bicep and forearm workout routine in several ways:
- As a standalone exercise: Perform 3-4 sets of 8-12 reps as a standalone exercise in your workout routine.
- As part of a superset: Pair alternating cross body hammer curls with another bicep or forearm exercise for a superset.
- As part of a full body workout: Incorporate alternating cross body hammer curls into a full body workout routine for overall muscle growth and development.
Conclusion
Alternating cross body hammer curls are a great exercise for targeting the biceps and forearms. By using proper form and incorporating variations, you can add this exercise to your routine for increased muscle growth, improved grip strength, and variation in your workout. Give it a try during your next bicep and forearm workout!
Related video of Alternating Cross Body Hammer Curls: A Complete Guide

Introduction
When it comes to building a strong and well-defined chest, there are two exercises that are often debated: the incline dumbbell press and the bench press. Both exercises have their advantages and disadvantages, and it can be difficult to decide which one is best for your workout routine. In this article, we will compare and contrast the incline dumbbell press and the bench press to help you make an informed decision.
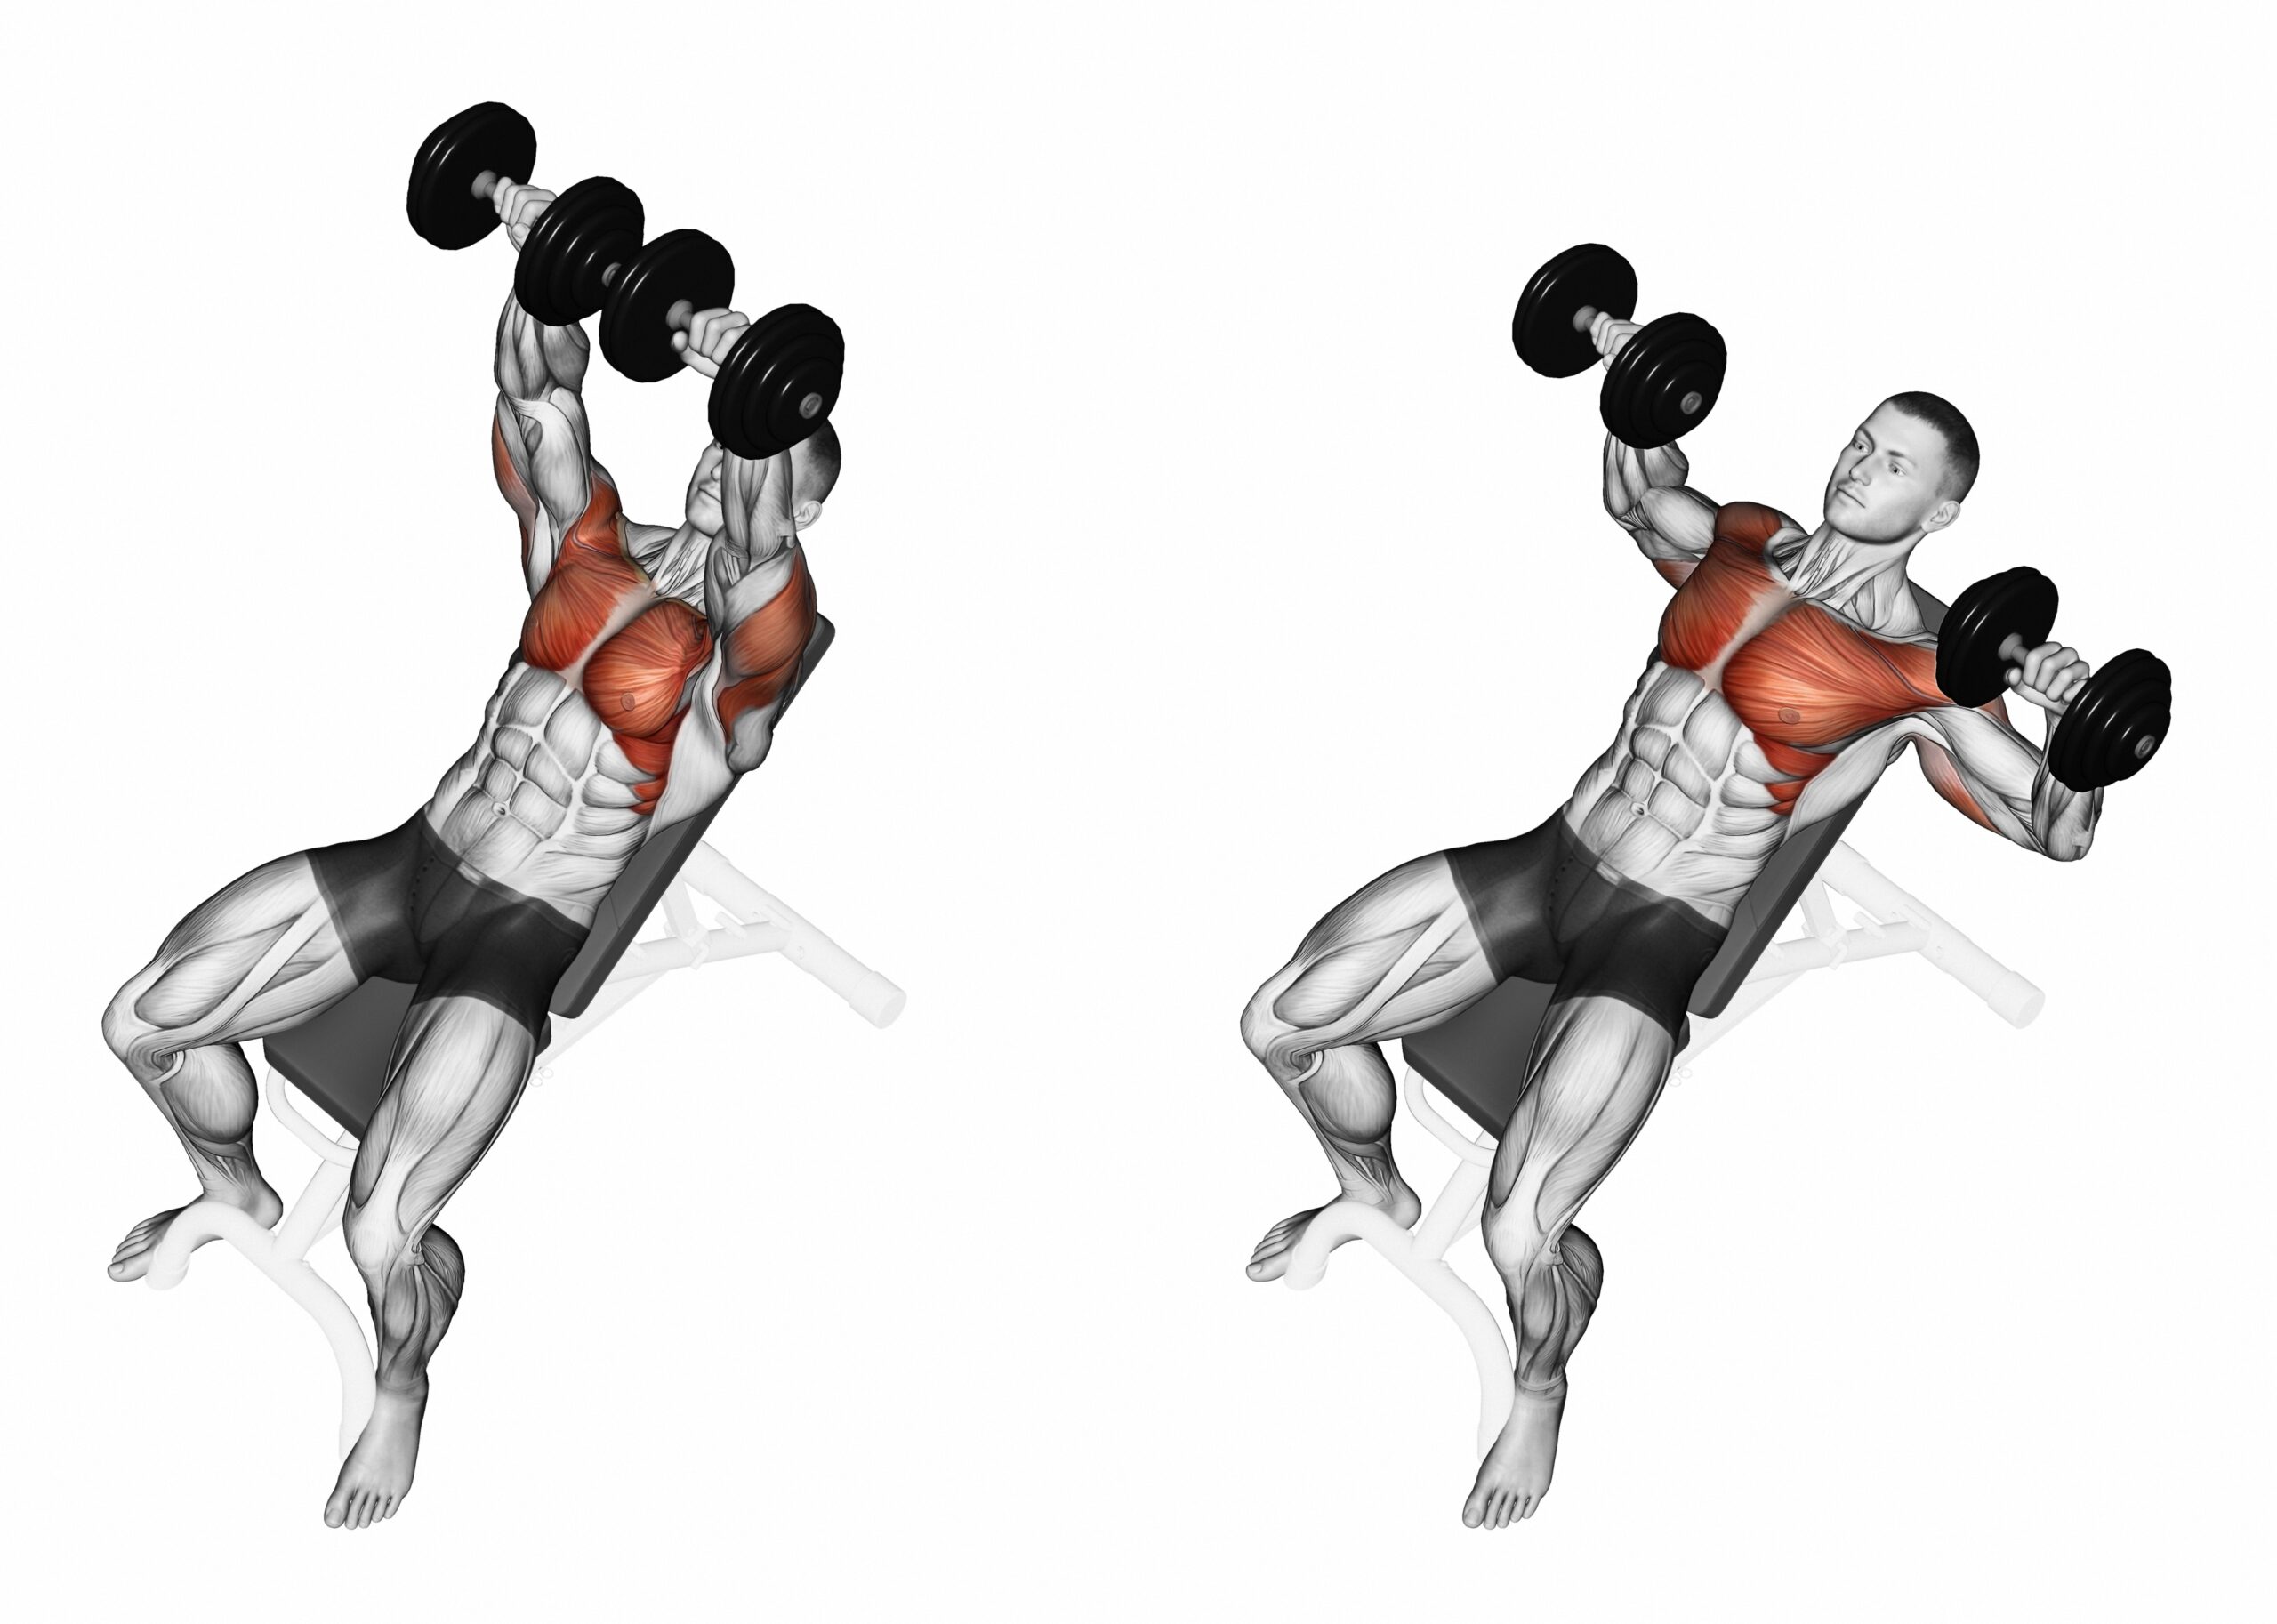
The Incline Dumbbell Press

The incline dumbbell press is an exercise that targets the upper portion of the chest. To perform this exercise, you lie on an incline bench with your feet flat on the floor. Hold a dumbbell in each hand and position them at shoulder height, with your palms facing forward. Lower the dumbbells down to your chest, then push them back up to the starting position.
The incline dumbbell press is a great exercise for targeting the upper portion of the chest, as well as the shoulders and triceps. It is also a great alternative to the bench press for those who may have shoulder or back problems, as it places less stress on those areas of the body.
The Bench Press

The bench press is one of the most popular exercises for building a strong and well-defined chest. To perform this exercise, you lie on a flat bench with your feet flat on the floor. Hold a barbell with your hands slightly wider than shoulder-width apart, and lower the bar down to your chest. Push the bar back up to the starting position.
The bench press is a great exercise for targeting the entire chest, as well as the shoulders and triceps. It is also a compound exercise that can help you build overall strength and power.
Comparison
When it comes to comparing the incline dumbbell press and the bench press, there are a few key differences to consider.
The incline dumbbell press targets the upper portion of the chest, while the bench press targets the entire chest. The incline dumbbell press places less stress on the shoulders and back, making it a great alternative for those with shoulder or back problems. The bench press is a compound exercise that can help you build overall strength and power, while the incline dumbbell press is more isolated and focused on the chest.
Ultimately, the best exercise for you will depend on your fitness goals and personal preferences. If you are looking to build overall strength and power, the bench press may be the better choice. If you are looking to target the upper portion of your chest or if you have shoulder or back problems, the incline dumbbell press may be the better choice.
Tips for Performing these Exercises

Before you perform either exercise, it is important to make sure you are using proper form and technique. Here are some tips to help you perform these exercises correctly:
- Keep your back flat on the bench
- Keep your feet flat on the floor
- Keep your elbows tucked in
- Use a spotter for the bench press
- Start with a weight that you can handle comfortably
- Gradually increase the weight over time
Conclusion
When it comes to building a strong and well-defined chest, the incline dumbbell press and the bench press are two of the most effective exercises you can do. Both exercises have their advantages and disadvantages, and it is important to choose the one that is best for your fitness goals and personal preferences. By using proper form and technique and gradually increasing the weight over time, you can achieve the chest you have always wanted.
Related video of Incline Dumbbell Press vs Bench Press
Push ups are a classic exercise that have been around for decades. They are great for building upper body strength and endurance, and can be done anywhere without any equipment. However, for beginners or those with weaker upper body strength, push ups from knees can be a good starting point before progressing to full push ups. In this article, we will discuss how to do push ups from knees correctly and safely, as well as their benefits and variations.
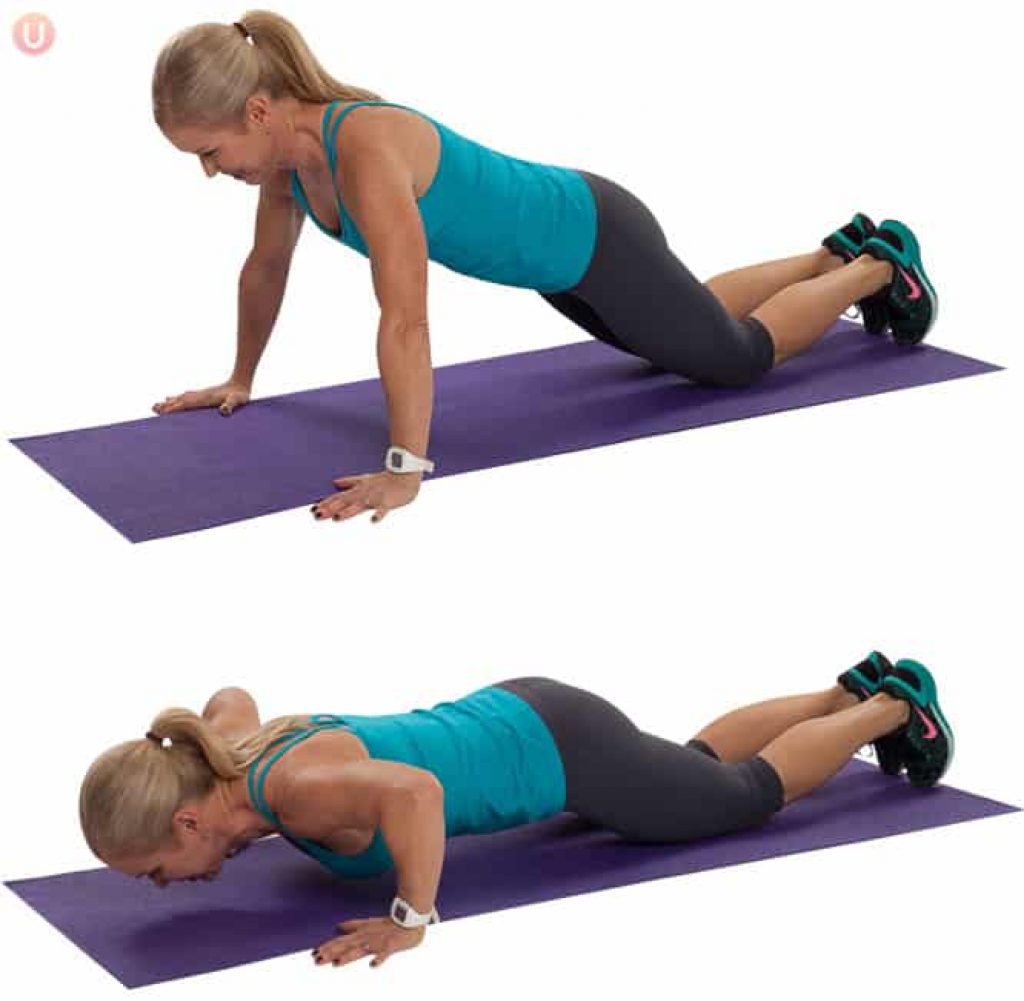
How to Do Push Ups From Knees

To do push ups from knees, start by getting into a plank position with your hands shoulder-width apart and your knees on the ground. Your body should form a straight line from your head to your knees. Keep your core tight and your elbows close to your body.
Lower your body towards the ground by bending your elbows, keeping your back straight and your core engaged. Keep your head and neck in a neutral position.
Push yourself back up to the starting position by straightening your arms. Repeat for the desired number of reps.
Benefits of Push Ups From Knees
Push ups from knees are a great way to build upper body strength, especially for beginners or those with weaker upper body muscles. They target the chest, triceps, shoulders, and core muscles.
Push ups from knees also help improve posture and stability, as well as increase bone density and reduce the risk of osteoporosis.
Push Up From Knees Variations

There are several variations of push ups from knees that you can try to make the exercise more challenging:
- Wide stance push ups: Place your knees wider apart to target the chest muscles more.
- Triceps push ups: Keep your elbows close to your body to target the triceps muscles more.
- Shoulder tap push ups: After each push up, tap your left shoulder with your right hand and vice versa to engage your core and shoulder muscles more.
Tips for Doing Push Ups From Knees

Here are some tips to help you do push ups from knees correctly and safely:
- Keep your core tight and your back straight throughout the exercise.
- Don't let your hips sag or your elbows flare out.
- Breathe in as you lower your body towards the ground, and breathe out as you push yourself back up.
- Start with a lower number of reps and gradually increase as you get stronger.
- Listen to your body and stop if you feel any pain or discomfort.
Conclusion
Push ups from knees are a great way to build upper body strength and endurance, especially for beginners or those with weaker upper body muscles. They target the chest, triceps, shoulders, and core muscles, and can be done anywhere without any equipment. Remember to keep your core tight and your back straight throughout the exercise, and start with a lower number of reps before gradually increasing. Give push ups from knees a try and see how they can help you achieve your fitness goals!
Related video of Push Ups From Knees: A Beginner's Guide to Building Upper Body Strength

Are you looking for an exercise that can help you strengthen your abs? Look no further than jumping jacks! This classic exercise is not only excellent for cardiovascular health, but it can also help you tone and strengthen your core muscles. In this article, we'll explore the benefits of jumping jacks for your abs and how to properly perform them to get the most out of your workout.
The Benefits of Jumping Jacks for Abs

Jumping jacks are a great exercise for your abs because they engage your entire core, including your rectus abdominis (six-pack muscles), obliques, and transverse abdominis (deep core muscles). By jumping and bringing your legs out wide, you're also engaging your hip muscles and glutes.
Additionally, jumping jacks are a high-intensity exercise that can help you burn calories and lose weight. When you have less body fat, your abs are more visible and defined. However, keep in mind that spot reduction (losing fat in one specific area) is not possible. You'll need to combine jumping jacks with a healthy diet and other exercises to see results throughout your body.
How to Perform Jumping Jacks

To perform jumping jacks, follow these steps:
- Stand with your feet together and your arms at your sides.
- Jump your feet out wide while bringing your arms up overhead.
- Jump your feet back together while bringing your arms back down to your sides.
- Repeat for the desired number of repetitions.
You can modify jumping jacks to make them easier or harder by adjusting the speed and range of motion. For example, you can slow down the movement or jump higher to increase the intensity.
Tips for a Safe and Effective Workout

When performing jumping jacks, it's important to keep these tips in mind:
- Start with a warm-up to prepare your body for exercise.
- Wear supportive shoes to protect your feet and ankles.
- Engage your core muscles throughout the exercise to protect your lower back.
- Keep your movements controlled and avoid locking your joints.
- Listen to your body and take breaks as needed.
Conclusion
In conclusion, jumping jacks are an excellent exercise for your abs because they engage your entire core and can help you burn calories. By adding this exercise to your workout routine and combining it with healthy habits, you can strengthen your abs and see results throughout your body. Remember to always prioritize safety and listen to your body to get the most out of your workout.
Related video of Are Jumping Jacks Good For Abs?
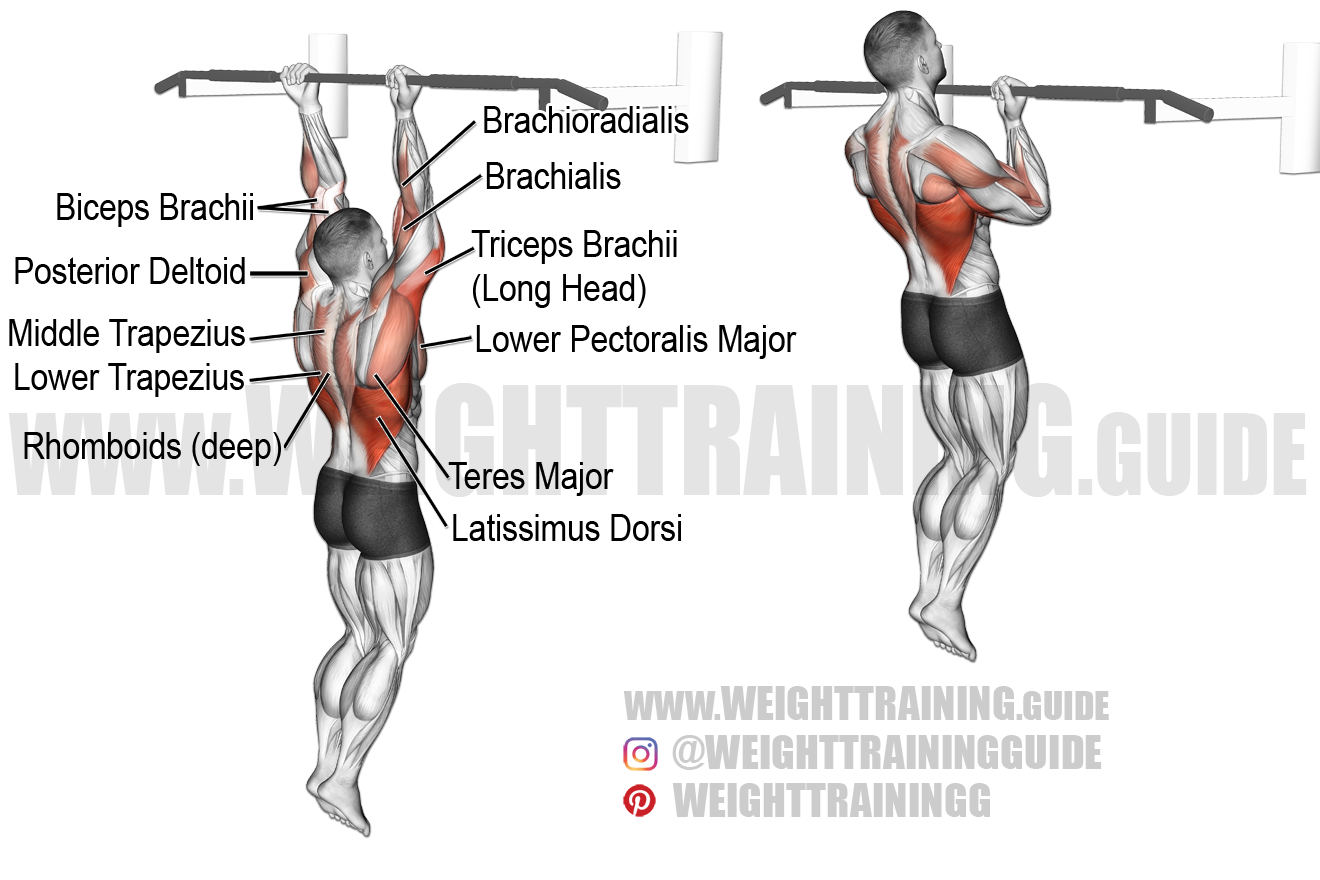
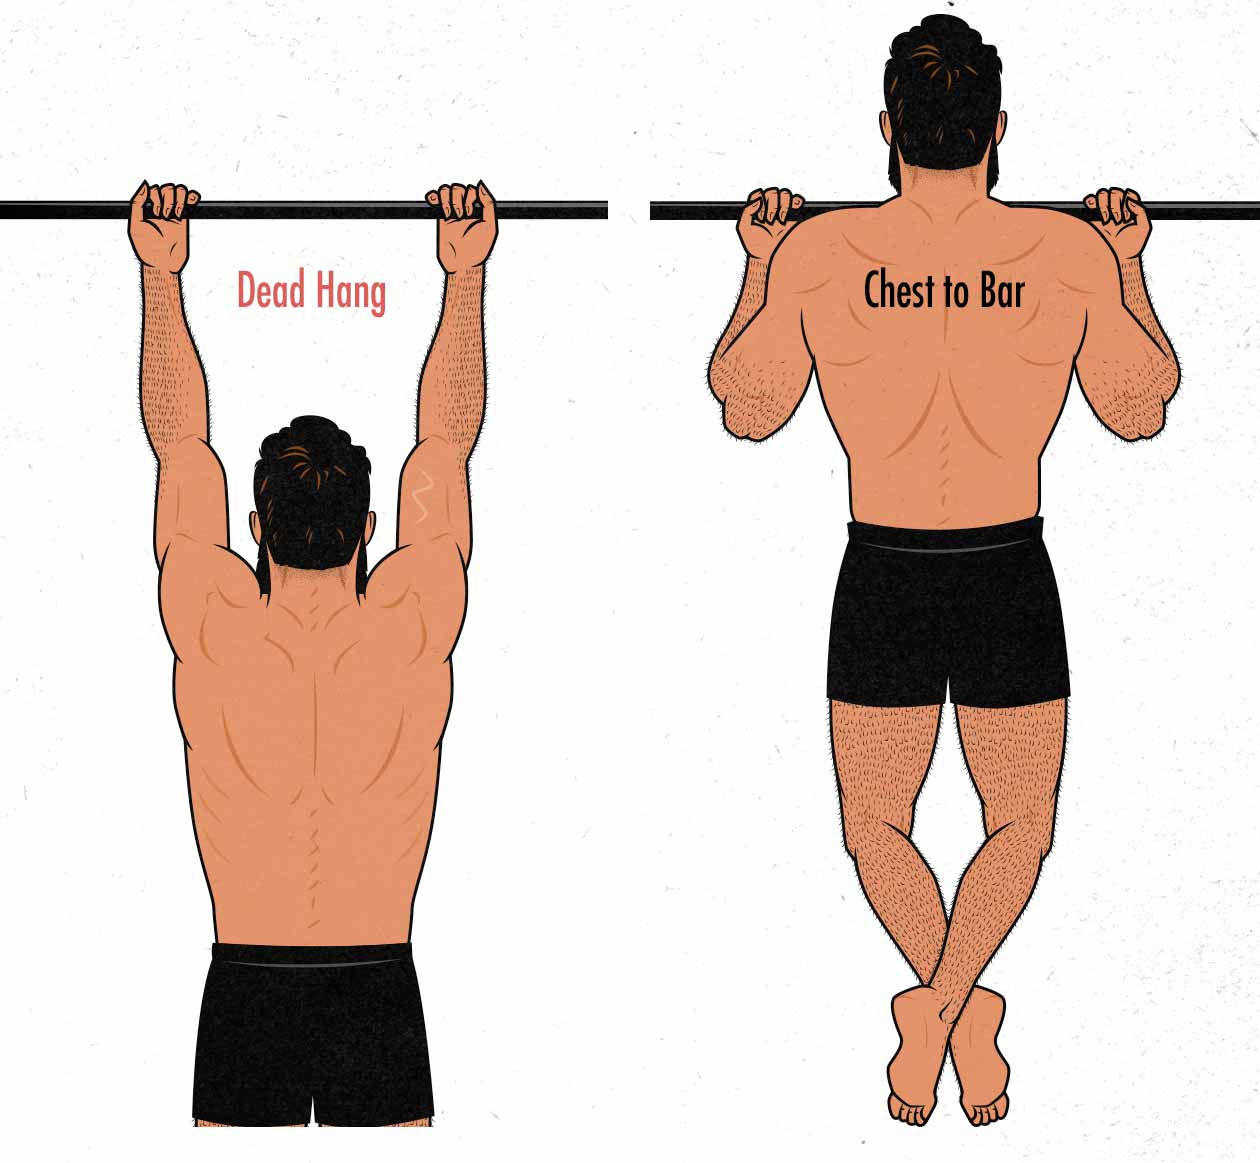
Chin-ups are a classic exercise that targets the muscles of the upper back and arms. They're also an effective way to build strength and improve your overall fitness level. In this article, we'll take a closer look at the chin-up muscle target and how you can get the most out of this exercise.
What muscles do chin-ups work?

Chin-ups primarily target the muscles of the upper back and arms, including the latissimus dorsi (lats), biceps, and forearms. These muscles work together to pull your body up towards the bar and control your descent back down.
In addition to the primary muscles targeted during chin-ups, this exercise also engages your core muscles, including your abs and lower back. This is because your core muscles must work to stabilize your body as you perform the movement.
How to perform chin-ups
To perform a chin-up, start by grasping a horizontal bar with an underhand grip, with your hands shoulder-width apart. Hang from the bar with your arms fully extended and your feet off the ground. This is your starting position.
Next, pull your body up towards the bar, keeping your elbows close to your sides. Aim to bring your chin up over the bar, or as close as possible. Pause briefly at the top of the movement, then slowly lower your body back down to the starting position.
Repeat this movement for as many reps as desired, aiming to maintain proper form throughout.
Tips for maximizing your chin-up workout
Here are some tips to help you get the most out of your chin-up workout:
- Start with an assisted chin-up machine or use resistance bands to make the exercise easier if you're a beginner.
- Focus on proper form, keeping your elbows close to your sides and your core engaged throughout the movement.
- Vary your grip to target different muscle groups. Try a wide grip, narrow grip, or neutral grip (palms facing each other) to challenge your muscles in new ways.
- Incorporate chin-ups into your overall fitness routine, pairing them with other upper body exercises like push-ups and rows.
Conclusion
Chin-ups are a challenging but effective exercise for building upper body strength and improving your overall fitness. By targeting the muscles of the upper back and arms, as well as engaging your core, this exercise can help you achieve your fitness goals. Remember to start slowly and focus on proper form, and don't be afraid to challenge yourself with new variations and techniques.
Related video of Chin Up Muscle Target

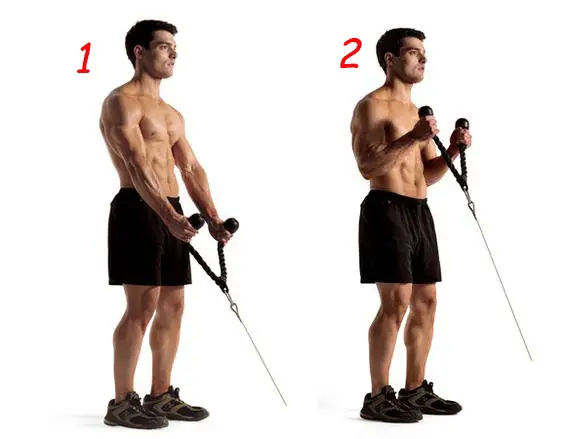
If you're looking for an effective arm workout, look no further than the cable rope hammer curl. This exercise targets the biceps and forearms, providing a complete upper arm workout in just one exercise. In this article, we'll take a closer look at the cable rope hammer curl, how to perform it correctly, and some tips to maximize your results.
What is a Cable Rope Hammer Curl?

The cable rope hammer curl is a variation of the traditional bicep curl exercise. Instead of using dumbbells or a barbell, the cable rope hammer curl involves using a cable machine with a rope attachment. The rope attachment allows for a neutral grip, which targets the brachialis muscle in addition to the biceps and forearms.
How to Perform a Cable Rope Hammer Curl

To perform a cable rope hammer curl, follow these steps:
- Attach a rope to a cable machine and set the weight to a comfortable level.
- Stand facing the machine with your feet shoulder-width apart.
- Grasp the rope with an underhand grip, palms facing each other.
- Keeping your elbows close to your body, curl the rope towards your shoulders.
- Pause at the top of the movement, then slowly lower the rope back to the starting position.
- Repeat for the desired number of repetitions.
Tips for Maximizing Your Results
Here are some tips to get the most out of your cable rope hammer curl workout:
- Start with a lighter weight and focus on proper form to avoid injury.
- Keep your elbows close to your body throughout the movement.
- Squeeze your biceps and forearms at the top of the movement for maximum contraction.
- Exhale as you curl the rope towards your shoulders, and inhale as you lower it back down.
- Vary the grip width to target different areas of the biceps and forearms.
- Incorporate other bicep and forearm exercises into your workout routine for a complete arm workout.
The Benefits of Cable Rope Hammer Curls

There are several benefits to incorporating cable rope hammer curls into your workout routine:
- Targets multiple muscle groups in the upper arm for a complete workout.
- Provides a neutral grip, which targets the brachialis muscle in addition to the biceps and forearms.
- Allows for maximum contraction and tension on the biceps and forearms.
- Can be easily modified to target different areas of the biceps and forearms.
- Helps to improve grip strength and forearm endurance.
In Conclusion
The cable rope hammer curl is an effective exercise for targeting the biceps and forearms. By incorporating this exercise into your workout routine and following the tips outlined in this article, you can maximize your results and achieve strong, toned arms in no time.
Related video of Cable Rope Hammer Curl: The Ultimate Arm Workout

For those who are looking to tone their core and hips, the side plank hip raise is an excellent exercise to include in your workout routine. This exercise is great for targeting the obliques, hips, and glutes. In this article, we will provide you with the ultimate guide to performing the side plank hip raise.
What is a Side Plank Hip Raise?

The side plank hip raise is a variation of the traditional side plank exercise. It involves lifting and lowering the hips while maintaining a side plank position. This exercise is challenging and requires a lot of strength and stability.
How to Perform a Side Plank Hip Raise?

To perform a side plank hip raise, follow the steps below:
- Start by lying on your side with your elbow directly under your shoulder.
- Engage your core and lift your hips off the ground, forming a straight line from your head to your feet.
- Lower your hips down towards the ground, but do not let them touch the ground.
- Repeat for the desired number of repetitions.
- Switch sides and repeat.
Common Mistakes to Avoid

When performing the side plank hip raise, it is important to avoid these common mistakes:
- Letting your hips sink towards the ground instead of keeping them lifted.
- Allowing your shoulders to slump forward instead of keeping them stacked.
- Not engaging your core and glutes enough.
- Letting your elbow drift away from your shoulder.
Variations of the Side Plank Hip Raise

There are several variations of the side plank hip raise that you can try to make the exercise more challenging or to target different muscle groups:
- Add a leg lift: Lift the top leg while lowering the hips, then lower the leg back down when lifting the hips.
- Add a knee tuck: Bring the top knee towards the chest while lowering the hips, then extend the leg back out when lifting the hips.
- Add a dumbbell: Hold a dumbbell in your top hand while performing the side plank hip raise to increase the resistance.
Benefits of the Side Plank Hip Raise

The side plank hip raise offers several benefits, including:
- Toning the obliques, hips, and glutes.
- Improving core strength and stability.
- Improving balance and coordination.
- Reducing the risk of injury in the lower back and hips.
Conclusion
The side plank hip raise is an excellent exercise for toning the core and hips. By following the steps outlined in this article, you can perform the exercise with proper form and avoid common mistakes. Remember to start with the basic version of the exercise and gradually work your way up to more challenging variations. Incorporate the side plank hip raise into your workout routine for a stronger and more toned core and hips.
Related video of Side Plank Hip Raise: The Ultimate Guide

Squats on the wall are a great exercise to incorporate into your workout routine. This exercise targets your glutes, quads, and hamstrings, and is especially beneficial if you sit for long periods during the day. In this article, we will discuss how to perform squats on the wall and their benefits.
How to Perform Squats on the Wall

Start by standing with your back against a wall, with your feet shoulder-width apart. Slowly slide down the wall until your knees are at a 90-degree angle. Hold this position for 30 seconds to one minute, then stand back up. Repeat this exercise for 10-15 reps.
It's important to keep your back straight and your knees over your ankles during the exercise. If you feel any pain or discomfort, stop immediately and consult with a professional.
Benefits of Squats on the Wall

Squats on the wall have many benefits, including:
1. Improved Posture: Squats on the wall help to strengthen your core and back muscles, which can improve your posture.
2. Increased Flexibility: This exercise helps to improve flexibility in your lower body, which can help reduce the risk of injury during other exercises.
3. Stronger Glutes, Quads, and Hamstrings: Squats on the wall target these important muscles which can improve your overall strength and balance.
4. Improved Blood Circulation: Squats on the wall can help improve blood circulation in your legs, which can reduce swelling and inflammation.
5. Easy to Perform: Squats on the wall are a low-impact exercise that can be performed anywhere, making it easy to incorporate into your workout routine.
Tips for Performing Squats on the Wall

Here are some tips to get the most out of your squats on the wall:
1. Start Slow: If you're new to this exercise, start slow and gradually increase the number of reps over time.
2. Focus on Form: It's important to maintain proper form during the exercise, so make sure your back is straight and your knees are over your ankles.
3. Breathe: Remember to breathe throughout the exercise. Inhale as you slide down the wall and exhale as you stand up.
4. Use a Timer: Use a timer or stopwatch to ensure you are holding the squat position for the recommended 30 seconds to one minute.
Conclusion
Squats on the wall are an effective and easy-to-perform exercise that can provide many benefits. Incorporating this exercise into your workout routine can help improve your posture, flexibility, and overall strength. Remember to start slow, focus on form, and consult with a professional if you experience any pain or discomfort.
Related video of Squats On The Wall: How to Do Them and Their Benefits
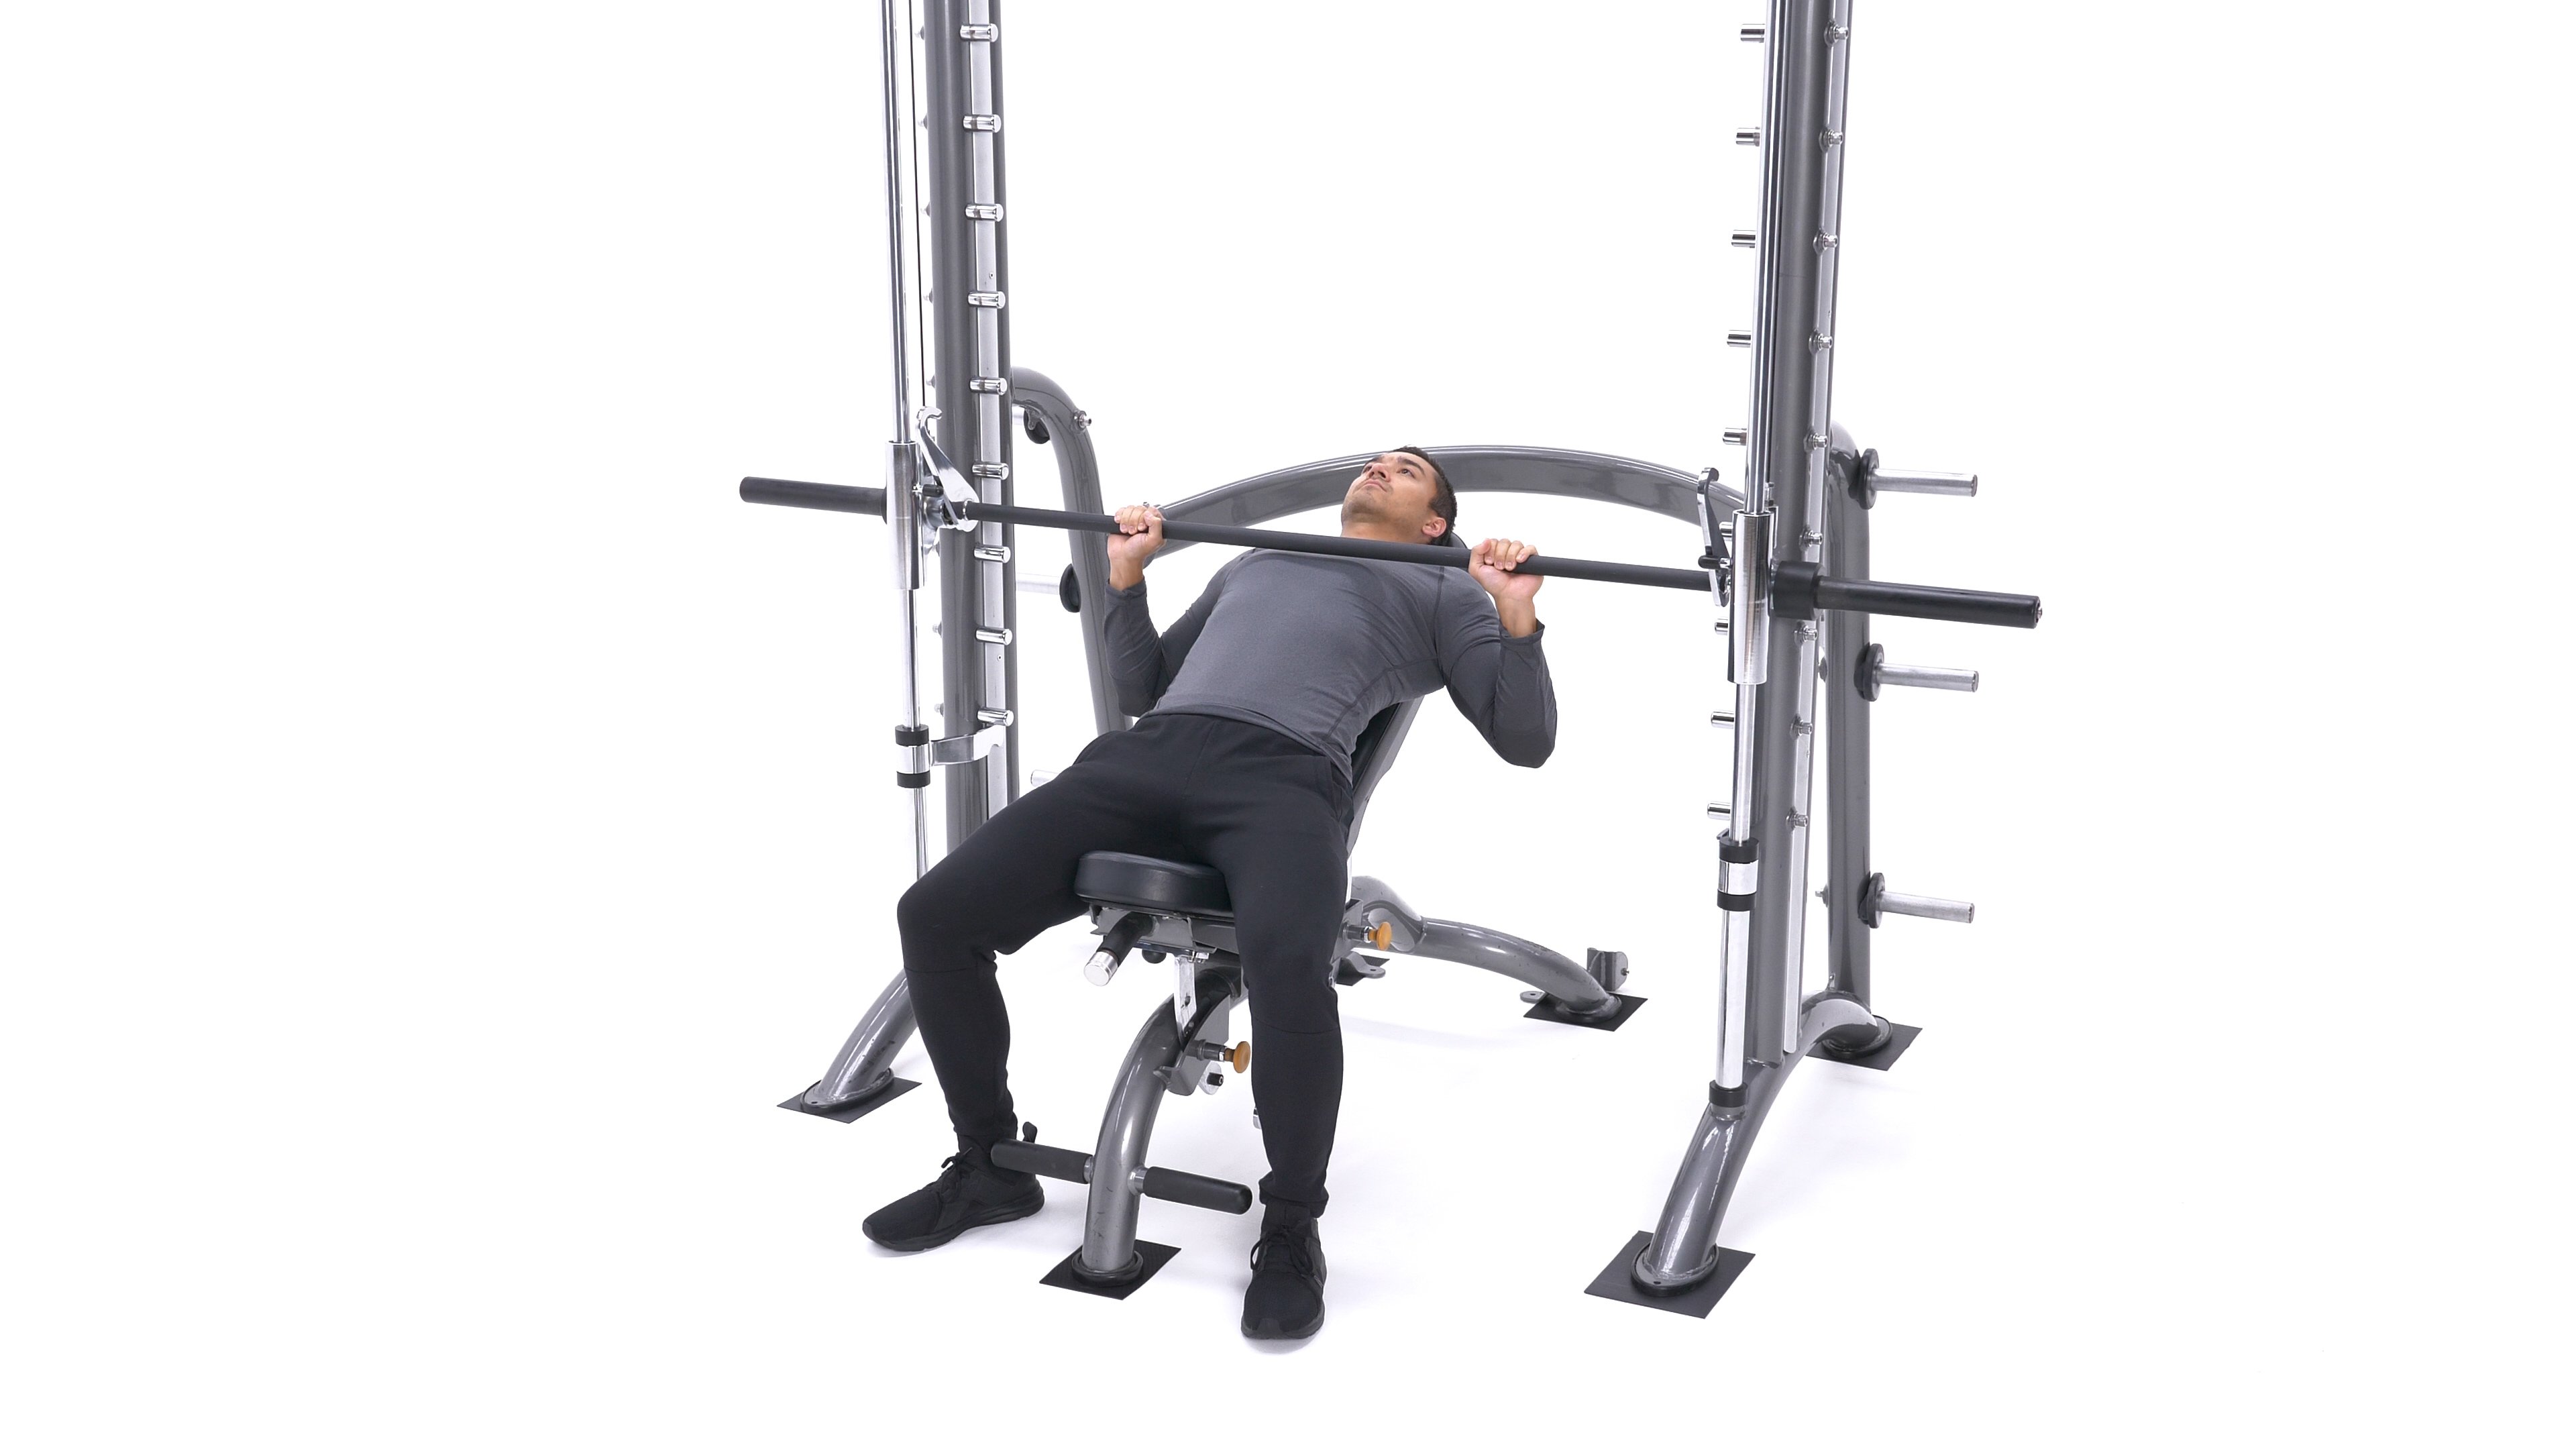
When it comes to building upper chest muscles, the Smith machine incline bench press is one of the most effective exercises. It is a variation of the traditional bench press that targets the upper portion of the chest muscles.
What is the Smith Machine?
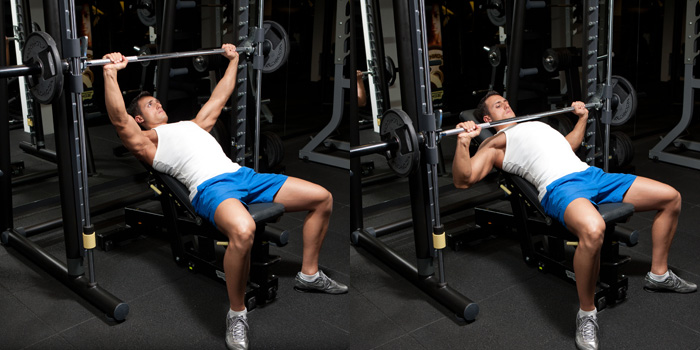
The Smith machine is a piece of gym equipment that consists of a barbell fixed within steel rails. This design allows for a vertical motion of the weight, while the rails guide the barbell to keep it in a straight path.
How to Perform the Smith Machine Incline Bench Press?

To perform the Smith machine incline bench press, follow these steps:
- Position the bench at a 45-degree angle on the Smith machine.
- Lie on the bench with your feet flat on the ground.
- Grip the barbell with a slightly wider than shoulder-width grip.
- Unrack the barbell and lower it to your chest, keeping your elbows tucked in.
- Push the barbell back up, extending your arms fully at the top of the movement.
Benefits of the Smith Machine Incline Bench Press

The Smith machine incline bench press has several benefits:
- Targets the upper chest muscles, which can be difficult to develop with other exercises.
- Allows for a full range of motion, which can increase muscle activation.
- Isolates the chest muscles, reducing the involvement of other muscle groups.
- Is safer than the traditional bench press, as the barbell is guided by the rails.
Variations of the Smith Machine Incline Bench Press

There are several variations of the Smith machine incline bench press that can target different parts of the chest muscles:
- Close-grip Smith machine incline bench press: Targets the inner portion of the chest muscles.
- Wide-grip Smith machine incline bench press: Targets the outer portion of the chest muscles.
- Reverse-grip Smith machine incline bench press: Targets the lower portion of the chest muscles.
Tips for Performing the Smith Machine Incline Bench Press

Follow these tips to perform the Smith machine incline bench press safely and effectively:
- Warm up with lighter weights before increasing the load.
- Maintain proper form throughout the exercise.
- Breathe in on the way down and out on the way up.
- Avoid locking out your elbows at the top of the movement.
- Use a spotter if you are lifting heavy weights.
Conclusion
The Smith machine incline bench press is a highly effective exercise for building upper chest muscles. By following the proper technique and incorporating variations of the exercise, you can target different parts of the chest muscles and achieve your fitness goals.
