
If you are looking for a challenging exercise that can help you build your leg muscles and improve your overall strength, then the crossed arms front squat may be the right choice for you. This exercise is a variation of the traditional front squat, which involves holding the barbell in front of your body with your arms crossed over it. In this article, we will guide you through the proper form and technique of the crossed arms front squat, as well as its benefits and variations.
The Proper Form and Technique

The crossed arms front squat requires a lot of core stability, balance, and flexibility. It targets your quadriceps, hamstrings, glutes, and lower back muscles, as well as your core and upper back muscles. To perform this exercise correctly, follow these steps:
- Start by standing with your feet shoulder-width apart and your toes pointing slightly outward.
- Hold the barbell in front of your body with your arms crossed over it, just below your collarbone.
- Engage your core and lift your chest up, keeping your back straight and your shoulders down and back.
- Lower yourself down by bending your knees and hips, keeping your weight on your heels and your knees in line with your toes.
- Go down as far as you can while maintaining proper form, ideally until your thighs are parallel to the ground.
- Push through your heels and stand back up, exhaling as you do so.
- Repeat for the desired number of repetitions.
Remember to keep your elbows up and your wrists straight throughout the exercise, and to avoid leaning forward or rounding your back. You can also use a weightlifting belt or knee sleeves for extra support and protection.
The Benefits of Crossed Arms Front Squat

The crossed arms front squat has several benefits for your body and fitness, such as:
- Building leg muscle mass and strength, especially in the quadriceps, hamstrings, and glutes.
- Improving core stability, balance, and posture.
- Involving upper back muscles in the exercise, which can help improve your overall back health and posture.
- Offering a challenging and effective variation to the traditional front squat, which can help you break through plateaus and improve your performance in other exercises.
However, it is important to note that the crossed arms front squat may not be suitable for everyone, especially if you have a history of back or knee injuries or limitations. Always consult with a qualified fitness professional or healthcare provider before starting a new exercise program.
Variations of Crossed Arms Front Squat

If you want to add more challenge or variety to your crossed arms front squat routine, you can try these variations:
- Pausing at the bottom of the squat for a few seconds before standing back up.
- Performing the exercise with a wider or narrower stance.
- Using dumbbells, kettlebells, or a sandbag instead of a barbell.
- Performing the exercise on one leg at a time (pistol squat) for extra balance and stability work.
Remember to always start with lighter weights and focus on proper form before progressing to heavier weights or more challenging variations.
Conclusion
The crossed arms front squat is a challenging and effective exercise that can help you build your leg muscles, improve your core stability and posture, and break through plateaus in your fitness journey. Remember to always prioritize proper form and technique, and to consult with a qualified professional if you have any doubts or concerns.
Related video of Crossed Arms Front Squat: How to Perfect Your Form and Build Your Leg Muscles

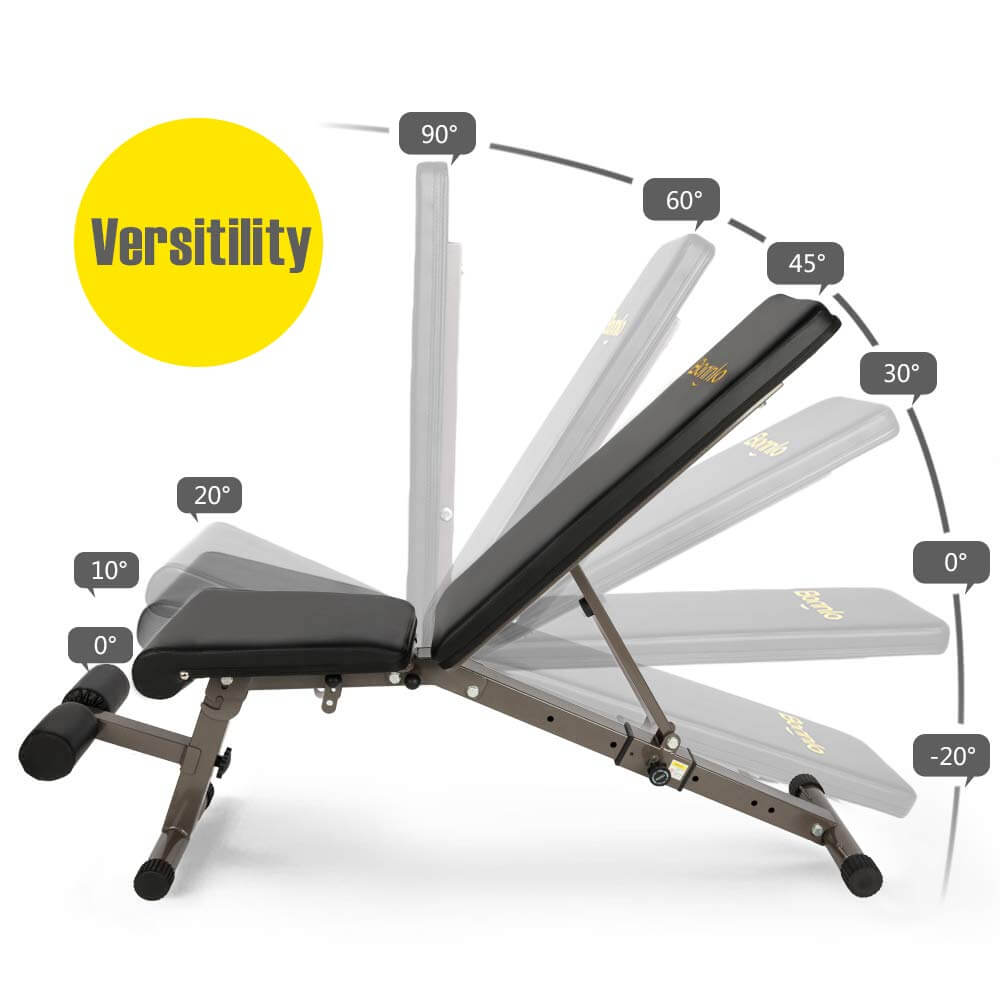
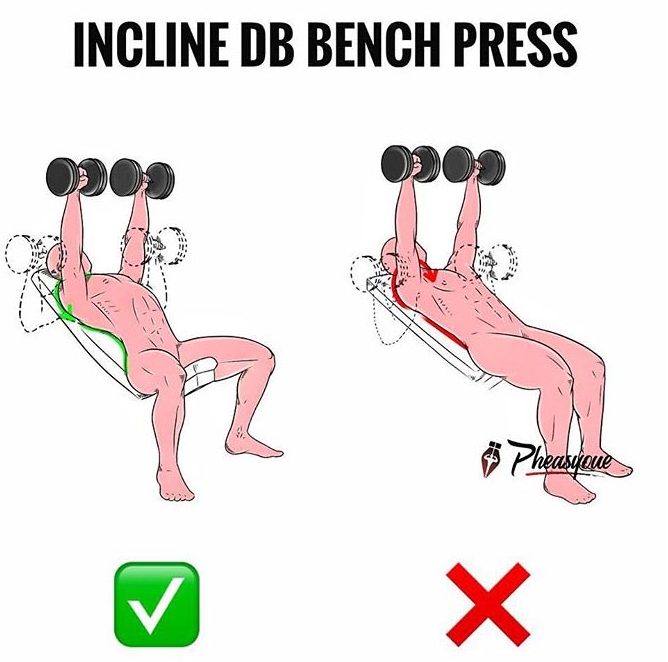
If you are looking to build upper chest muscles, the 30 or 45 degree incline bench could be an excellent addition to your workout routine. This bench is designed to allow you to perform exercises at an angle, which targets your upper chest muscles more effectively. In this article, we will discuss the benefits and usage of the 30 or 45 degree incline bench.
Benefits of 30 or 45 Degree Incline Bench

The 30 or 45 degree incline bench is an excellent tool for building upper chest muscles. This bench is designed to target the upper portion of the chest muscles, which is often difficult to develop with traditional chest exercises. The incline bench allows you to target the upper chest muscles more effectively, which can help you achieve a more balanced and defined chest.
Another benefit of the incline bench is that it can help you improve your overall strength and endurance. By targeting the upper chest muscles, you will be able to lift heavier weights and perform more reps, which can help you build muscle mass and improve your overall fitness level.
The incline bench can also help you improve your posture and reduce the risk of injury. By strengthening your upper chest muscles, you will be able to maintain better posture throughout the day, which can help reduce the risk of back and neck pain. Additionally, the incline bench can help reduce the risk of shoulder injuries by strengthening the muscles that support the shoulder joint.
Usage of 30 or 45 Degree Incline Bench
There are several exercises that you can perform on the 30 or 45 degree incline bench. One of the most common exercises is the incline bench press. This exercise is similar to the traditional bench press, but it is performed at an angle, which targets the upper chest muscles more effectively. To perform this exercise, lie on the bench with your feet flat on the floor and your back flat against the bench. Grasp the barbell with an overhand grip and slowly lower it towards your chest. Pause for a moment and then push the barbell back up to the starting position.
Another exercise that you can perform on the incline bench is the incline dumbbell fly. This exercise is designed to target the upper chest muscles and improve your overall upper body strength. To perform this exercise, lie on the bench with your feet flat on the floor and your back flat against the bench. Hold a dumbbell in each hand and raise your arms straight above your chest. Slowly lower the dumbbells out to the sides, keeping your arms straight. Pause for a moment and then raise the dumbbells back up to the starting position.
The incline bench can also be used for other exercises, such as incline push-ups, incline dumbbell press, and incline dumbbell row. These exercises can help you target your upper chest muscles more effectively and improve your overall strength and endurance.
Conclusion
The 30 or 45 degree incline bench is an excellent tool for building upper chest muscles and improving your overall fitness level. By targeting the upper chest muscles more effectively, you will be able to build a more balanced and defined chest. Additionally, the incline bench can help you improve your posture and reduce the risk of injury. To get the most out of your workout, be sure to incorporate a variety of exercises on the incline bench and gradually increase the weight and intensity of your workouts.
Related video of30 Or 45 Degree Incline Bench: Benefits and Usage

Internal rotation of the hip is a fundamental movement that everyone needs to perform on a daily basis. From walking to sitting, internal rotation of the hip is vital for maintaining proper body alignment and avoiding injuries.
What is Internal Rotation of the Hip?
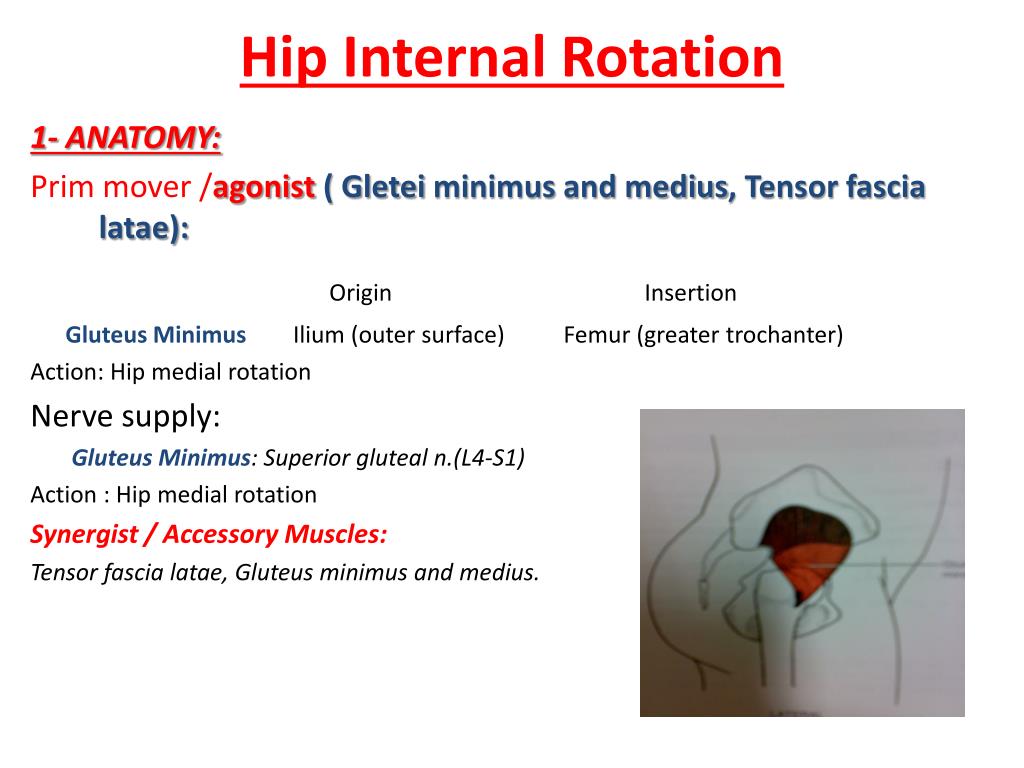
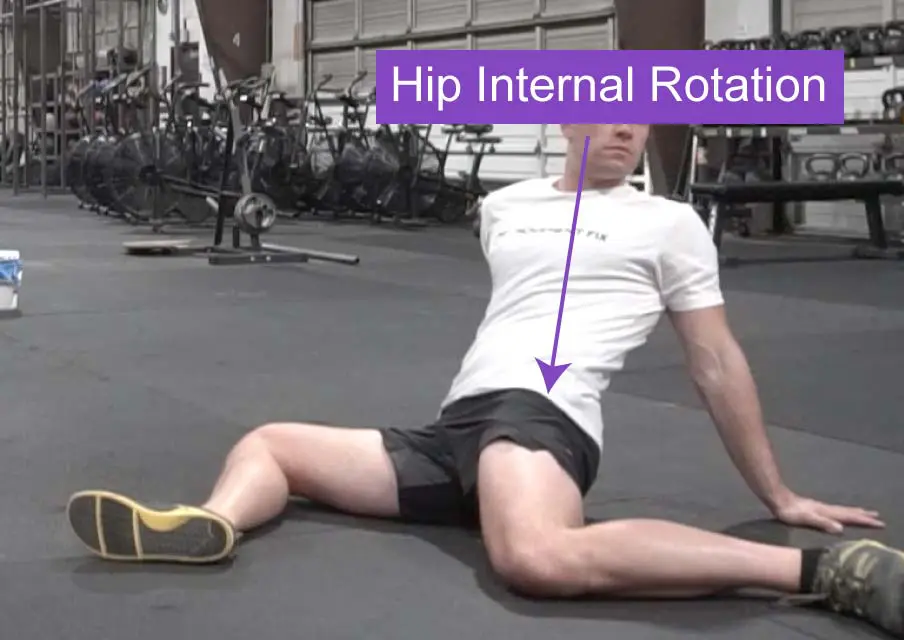
Internal rotation of the hip is the movement of the thigh bone (femur) inward towards the center of the body. This movement occurs at the hip joint, which is a ball-and-socket joint that connects the thigh bone to the pelvis.
The muscles responsible for internal rotation of the hip include the gluteus medius, gluteus minimus, tensor fasciae latae, and the anterior fibers of the gluteus maximus.
Why is Internal Rotation of the Hip Important?
Internal rotation of the hip is essential for maintaining proper body alignment and preventing injuries. It is required for activities such as walking, running, and sitting.
If the internal rotators of the hip are weak, other muscles in the body may compensate, leading to imbalances and potential injuries, such as lower back pain, hip pain, and knee pain.
Exercises for Internal Rotation of the Hip

There are numerous exercises that can help strengthen the internal rotators of the hip. Some examples include:
- Clamshells
- Side-lying leg lifts
- Bridge with a ball squeeze
- Squats with a resistance band
It is important to consult with a healthcare professional before starting any new exercise program, especially if you have a history of hip or knee injuries.
Stretching the Internal Rotators of the Hip

In addition to strengthening exercises, stretching is also essential for maintaining hip mobility and preventing injuries. Some effective stretches for the internal rotators of the hip include:
- Seated butterfly stretch
- Pigeon pose
- Figure four stretch
It is essential to hold each stretch for at least 30 seconds and repeat on both sides. Stretching should be done after a proper warm-up to prevent injury.
Conclusion
Internal rotation of the hip is a crucial movement that is required for daily activities. Strengthening and stretching the internal rotators of the hip can help maintain proper body alignment and prevent potential injuries. Consult with a healthcare professional before starting any new exercise program, especially if you have a history of hip or knee injuries.
Related video of Muscles Hip Internal Rotation: What You Need to Know

Crunch with med ball is a great exercise that targets your abs and helps in building core strength. It involves using a medicine ball to add resistance to the traditional crunch exercise. In this article, we will discuss the benefits of this exercise, how to perform it correctly, and some tips to keep in mind while doing it.
Benefits Of Crunch With Med Ball

The crunch with med ball exercise has a lot of benefits. Here are some of the benefits of this exercise:
- It helps in building core strength.
- It targets your abs and helps in toning them.
- It helps in improving your posture.
- It helps in improving your balance and stability.
- It helps in burning calories and reducing belly fat.
How To Perform Crunch With Med Ball

Here are the steps to perform the crunch with med ball exercise:
- Lie down on your back with your knees bent and your feet flat on the floor.
- Hold the med ball with both hands and extend your arms towards the ceiling.
- Engage your core muscles and lift your upper body off the ground while crunching towards your knees.
- Hold the crunch for a few seconds and then slowly lower your upper body back to the starting position.
- Repeat the exercise for the desired number of reps.
Tips To Keep In Mind While Doing Crunch With Med Ball

Here are some tips to keep in mind while doing the crunch with med ball exercise:
- Start with a light med ball and gradually increase the weight as you progress.
- Keep your neck and shoulders relaxed during the exercise.
- Breathe in while lowering your upper body and breathe out while crunching towards your knees.
- Engage your core muscles throughout the exercise.
- Avoid pulling your neck or head while doing the exercise.
Conclusion
The crunch with med ball is a great exercise to add to your ab workout routine. It helps in building core strength, toning your abs, and improving your posture, balance, and stability. With the right technique and consistency, you can achieve great results with this exercise. So, start incorporating it into your workout routine and enjoy the benefits!
Related video of Crunch With Med Ball
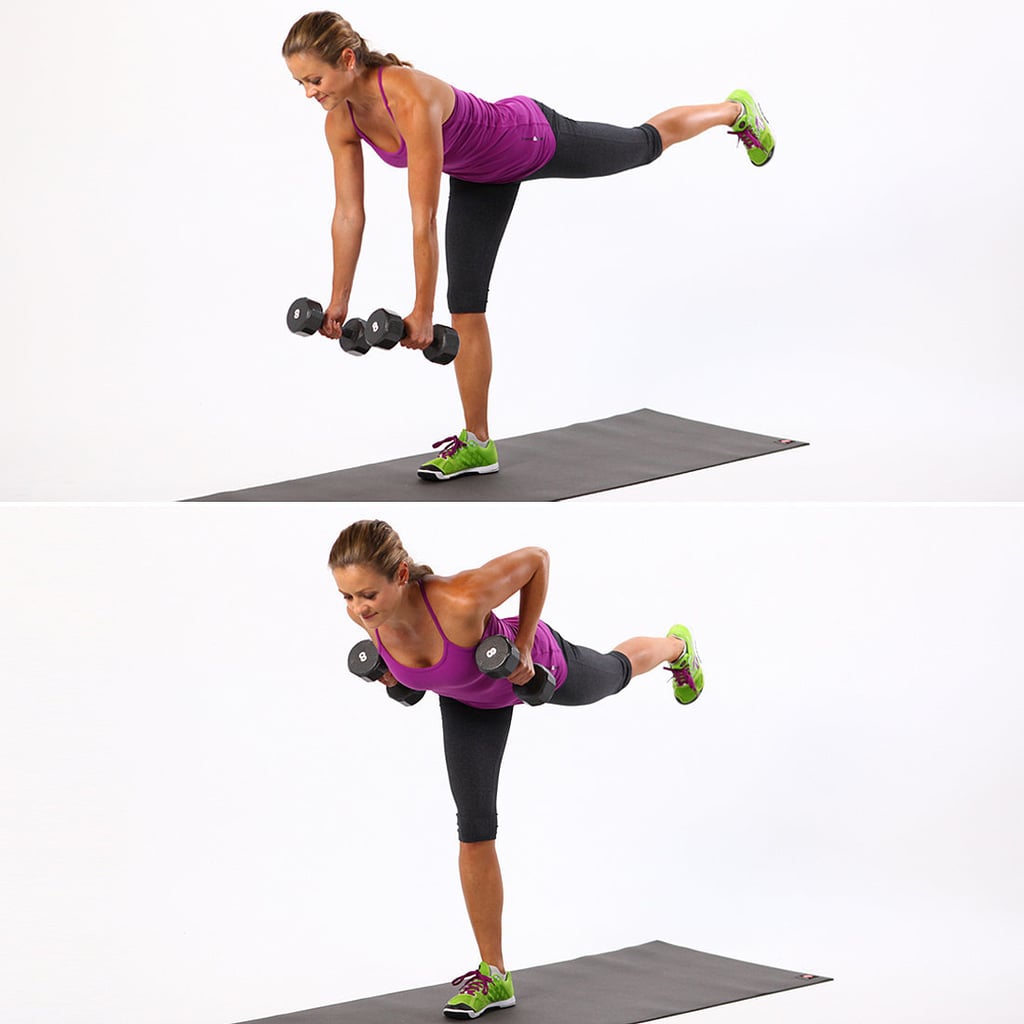
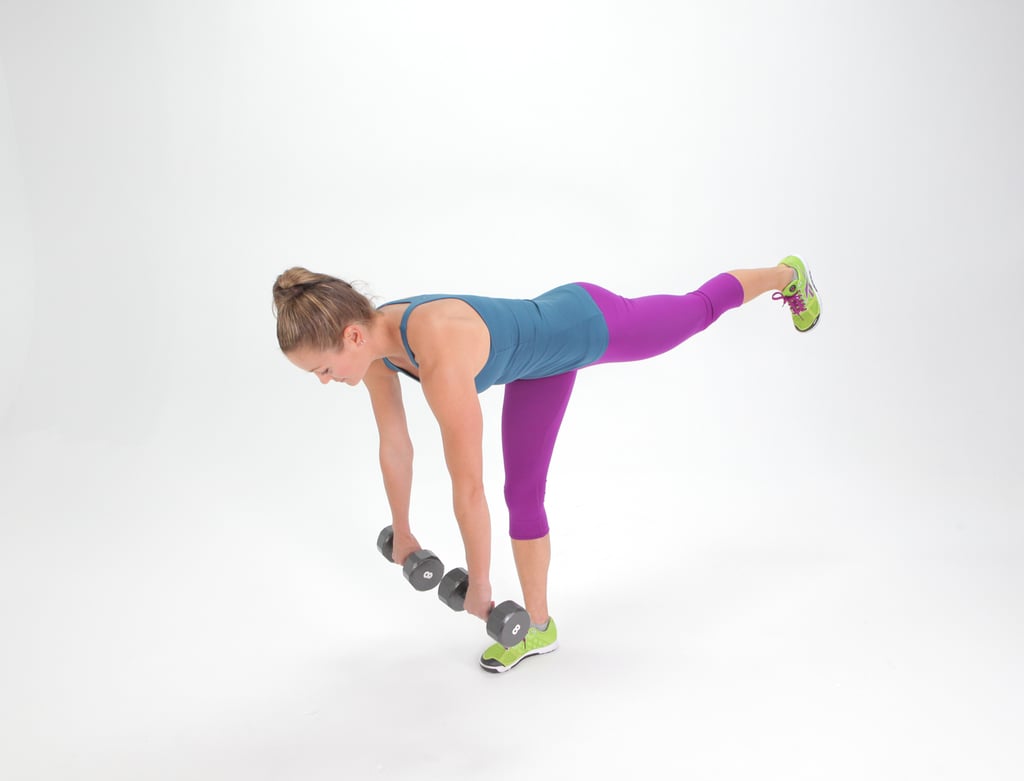
Single Leg Romanian Deadlift with Dumbbells is a great exercise for those who want to improve their balance, strength, and flexibility. It's a kind of deadlift that targets the glutes, hamstrings, and lower back muscles. This exercise is usually done using a barbell, but in this article, we will discuss the version that uses dumbbells.
How to Do Single Leg Romanian Deadlift With Dumbbells?

To perform Single Leg Romanian Deadlift with Dumbbells, you need to follow these steps:
- Stand straight with your feet hip-width apart and hold a dumbbell in each hand.
- Lift one foot off the ground and balance on the other foot.
- Bend forward from your hips, keeping your back straight, and lower the weights towards the ground.
- Pause for a moment when you feel a stretch in your hamstring muscles.
- Raise your body back to the starting position and repeat the exercise on the other leg.
It's essential to keep your back straight throughout the exercise to prevent any injuries. Also, make sure to engage your core muscles to improve your balance.
Benefits of Single Leg Romanian Deadlift With Dumbbells

Single Leg Romanian Deadlift with Dumbbells has numerous benefits. Some of them are:
- It targets the glutes, hamstrings, and lower back muscles, which are essential for daily activities like walking, running, and lifting.
- It improves balance and stability, which can help prevent falls and injuries.
- It increases flexibility in the hamstrings and lower back muscles.
- It's a great exercise for athletes who need to improve their performance in sports like running, jumping, and kicking.
- It can be done at home or in the gym, making it an accessible exercise for everyone.
Common Mistakes to Avoid When Doing Single Leg Romanian Deadlift With Dumbbells

Here are some common mistakes people make when performing Single Leg Romanian Deadlift with Dumbbells:
- Not keeping the back straight throughout the exercise.
- Not engaging the core muscles to improve balance.
- Not using the right weight of dumbbells.
- Not keeping the lifted foot close to the ground while lowering the weights.
- Not pausing for a moment when feeling the stretch in the hamstring muscles.
Make sure to avoid these mistakes to get the most out of this exercise and prevent any injuries.
Variations of Single Leg Romanian Deadlift With Dumbbells

Here are some variations of Single Leg Romanian Deadlift with Dumbbells:
- Using kettlebells instead of dumbbells.
- Adding a knee raise when lifting the weight back up.
- Performing the exercise on an unstable surface like a bosu ball or a balance board to improve balance and stability.
- Doing the exercise with both legs instead of one leg at a time.
Adding variations to your workout routine can challenge your muscles and prevent boredom.
Conclusion
Single Leg Romanian Deadlift with Dumbbells is a great exercise that targets the glutes, hamstrings, and lower back muscles. It's easy to perform and can be done at home or in the gym. Make sure to avoid common mistakes and add variations to your workout routine to challenge your muscles and prevent boredom. Start with a light weight of dumbbells and gradually increase the weight as your muscles get stronger. Enjoy the benefits of this exercise and improve your balance, strength, and flexibility.
Related video of Single Leg Romanian Deadlift With Dumbbells
Single Leg Dumbbell Deadlift: Benefits, Muscles Worked and How to Do It
The Single Leg Dumbbell Deadlift is a strength training exercise that targets the lower body, specifically the hamstrings, glutes, and lower back muscles. This exercise is a great way to build strength, improve balance and stability, and prevent injuries. In this article, we will discuss the benefits of the Single Leg Dumbbell Deadlift, the muscles worked, and how to do it properly.
The Benefits of the Single Leg Dumbbell Deadlift
The Single Leg Dumbbell Deadlift offers a number of benefits, including:
- Improved balance and stability
- Increased strength in the lower body muscles
- Better posture and alignment
- Reduced risk of injury
Additionally, the Single Leg Dumbbell Deadlift is a unilateral exercise, meaning that it works one leg at a time. This can help to correct any muscle imbalances between the left and right sides of the body.
Muscles Worked in the Single Leg Dumbbell Deadlift

The Single Leg Dumbbell Deadlift primarily targets the hamstrings, glutes, and lower back muscles. However, it also engages the quadriceps, calves, and core muscles to a lesser extent.
The hamstrings are responsible for extending the hip and flexing the knee, while the glutes are responsible for hip extension and external rotation. The lower back muscles, specifically the erector spinae, are responsible for spinal extension and rotation.
How to Do the Single Leg Dumbbell Deadlift
Here's how to properly perform the Single Leg Dumbbell Deadlift:
- Start by standing with your feet hip-width apart, holding a dumbbell in your left hand.
- Lift your right foot off the ground and extend it back behind you, keeping your knee straight.
- Hinge forward at the hips, lowering the dumbbell towards the ground while lifting your right leg off the ground.
- Keep your back straight and your core engaged throughout the movement.
- Lower the dumbbell as far as you can while maintaining proper form.
- Slowly return to the starting position, bringing your right leg back down to the ground.
- Repeat for the desired number of repetitions, then switch sides.
Tips for Performing the Single Leg Dumbbell Deadlift

Here are some tips to keep in mind when performing the Single Leg Dumbbell Deadlift:
- Start with a light weight and focus on proper form before increasing the weight.
- Keep your shoulders back and down throughout the movement.
- Avoid rounding your back or hunching your shoulders.
- Engage your core muscles to help stabilize your body and maintain proper form.
- Keep your gaze forward and avoid looking down at the ground.
Conclusion
The Single Leg Dumbbell Deadlift is a highly effective exercise for targeting the lower body muscles, improving balance and stability, and preventing injuries. By following the proper form and incorporating this exercise into your strength training routine, you can enjoy the many benefits of the Single Leg Dumbbell Deadlift for years to come.
Related video of Single Leg Dumbbell Deadlift
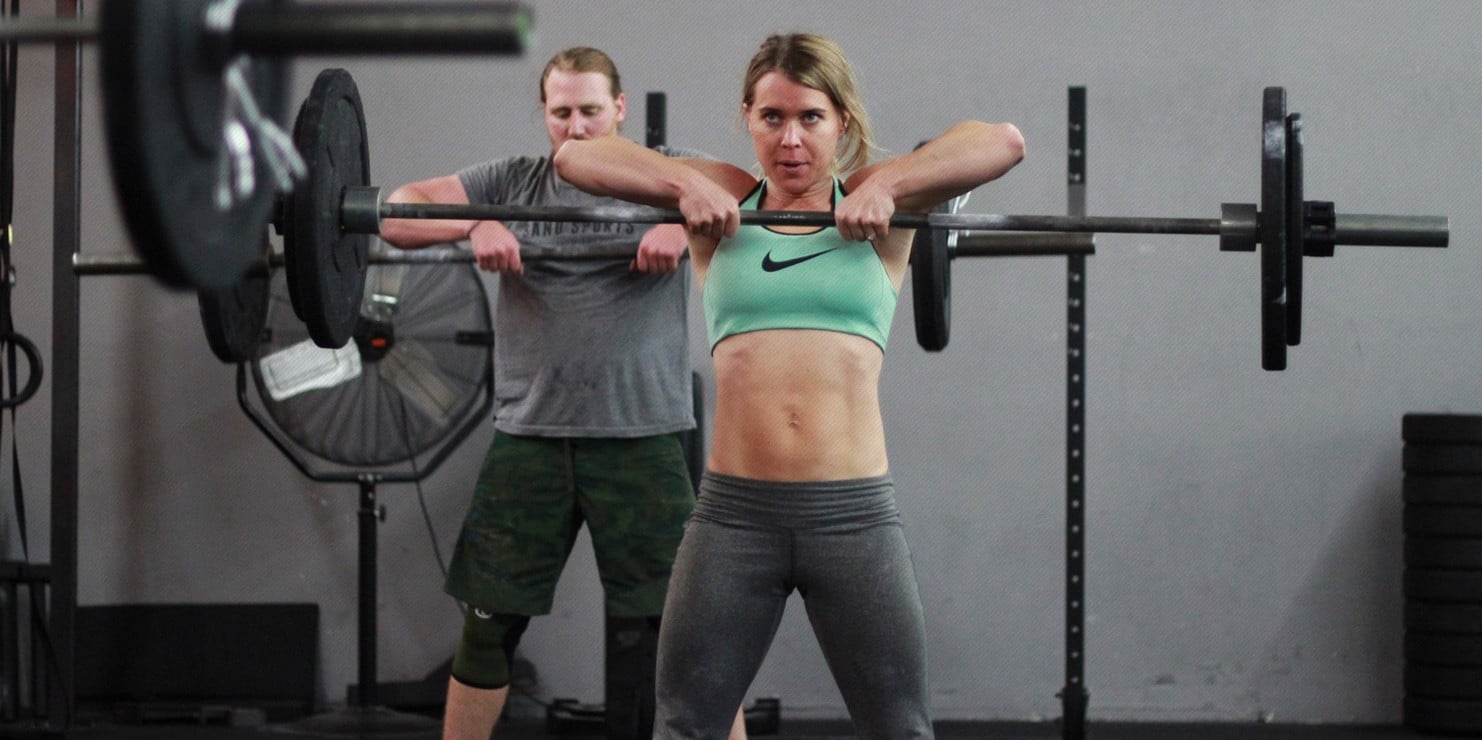
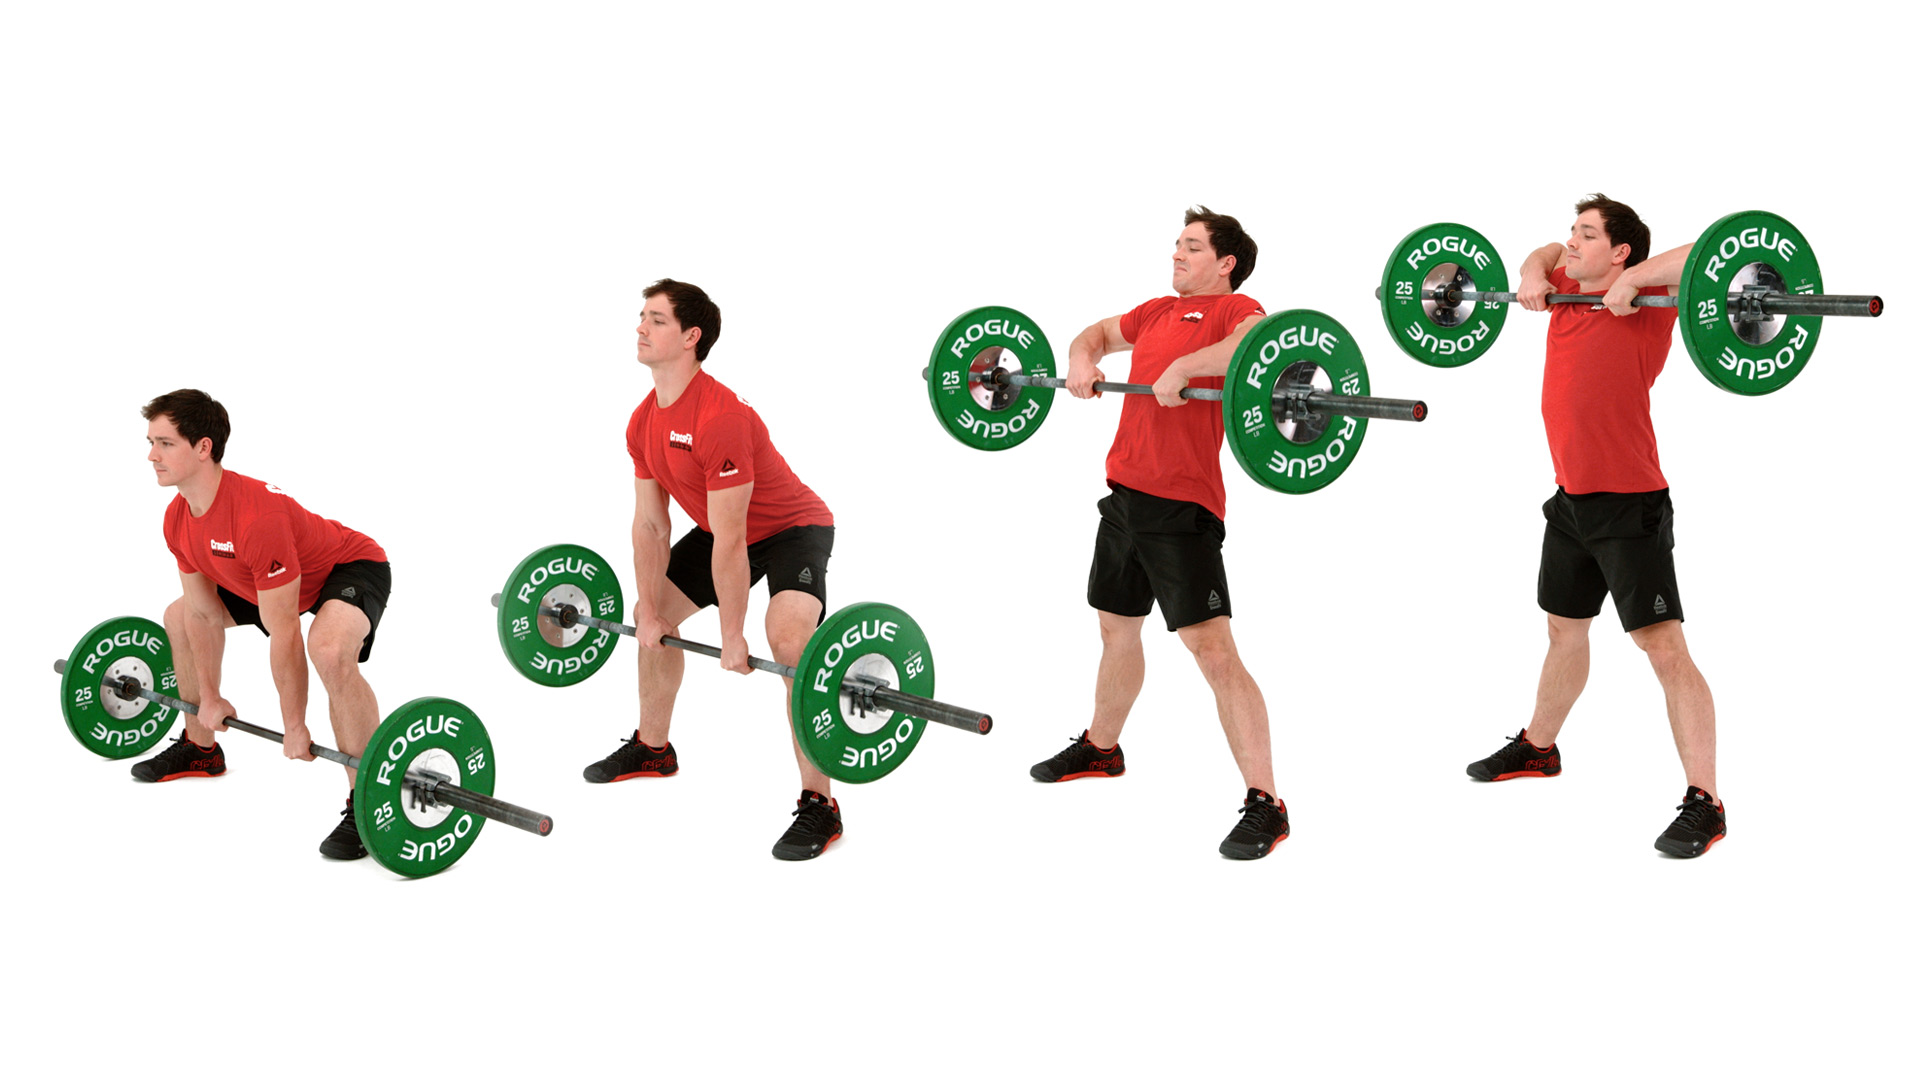
Sumo Deadlift High Pulls, also known as SDHP, is a full-body workout that targets multiple muscles. It is an explosive exercise that requires a lot of power and strength. SDHP is a combination of two exercises, the Sumo Deadlift and the High Pull. It is a great exercise for building muscle mass, strength, and power. In this article, we will discuss everything you need to know about Sumo Deadlift High Pulls.
What is Sumo Deadlift High Pulls?
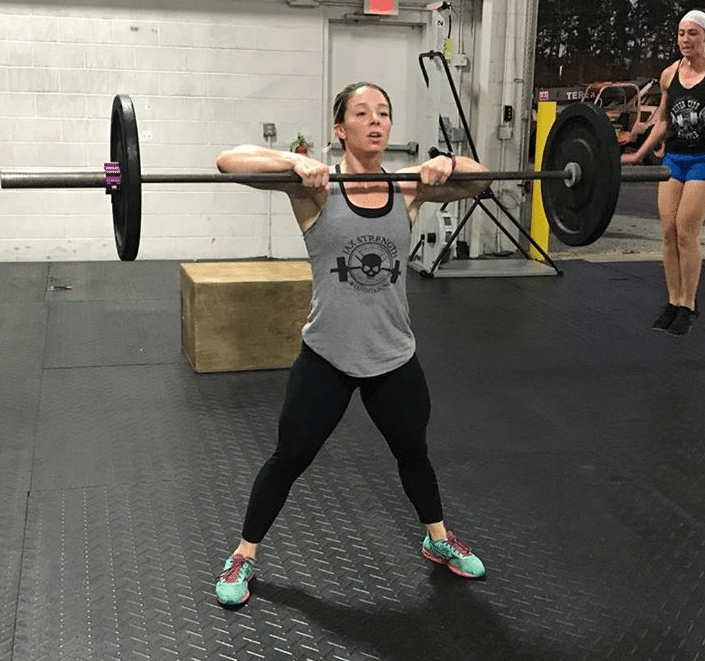
The Sumo Deadlift is a variation of the conventional deadlift. In the Sumo Deadlift, the feet are placed wider than shoulder-width apart, and the toes are pointed outwards. This stance allows for a more upright torso, which reduces the stress on the lower back. The High Pull is a weightlifting exercise that targets the upper body. It involves pulling the barbell or weight up to the chest level.
The Sumo Deadlift High Pulls combines these two exercises to create a full-body workout. It involves lifting the barbell from the ground to the chest level in a fluid motion. The exercise targets multiple muscles including the legs, back, shoulders, and arms.
Benefits of Sumo Deadlift High Pulls
Sumo Deadlift High Pulls offer a wide range of benefits including:
- Full-body workout: SDHP targets multiple muscles in the body, making it a great full-body workout.
- Improves power and strength: SDHP requires a lot of power and strength, which helps to improve overall fitness levels.
- Burns calories: SDHP is a high-intensity exercise that burns a lot of calories in a short period of time.
- Increases muscle mass: SDHP is a great exercise for building muscle mass in the legs, back, shoulders, and arms.
- Improves cardiovascular endurance: SDHP is a high-intensity exercise that helps to improve cardiovascular endurance.
How to Do Sumo Deadlift High Pulls

Follow these steps to perform Sumo Deadlift High Pulls:
- Stand with your feet wider than shoulder-width apart, and toes pointed outwards.
- Place your hands on the barbell with a wider than shoulder-width grip.
- Lower your hips and bend your knees until your shins touch the bar.
- Keep your chest up and your back straight.
- Drive through your heels and lift the barbell off the ground until it reaches your knees.
- As the barbell passes your knees, pull it up towards your chest using your upper body.
- Lower the barbell back down to the ground in a controlled manner.
- Repeat for the desired number of reps.
It is important to maintain proper form throughout the exercise to prevent injury. Keep your chest up, back straight, and drive through your heels to lift the barbell off the ground. Pull the barbell up towards your chest using your upper body, and lower it back down to the ground in a controlled manner.
Sample Sumo Deadlift High Pulls Workout

Here is a sample Sumo Deadlift High Pulls workout:
- Warm-up: 5-10 minutes of cardio
- Sumo Deadlift High Pulls: 3 sets of 10 reps
- Push-ups: 3 sets of 10 reps
- Single-leg Romanian Deadlift: 3 sets of 10 reps per leg
- Bent-over Rows: 3 sets of 10 reps
- Cool-down: Stretching
This workout targets multiple muscle groups and can be performed 2-3 times per week for best results.
Conclusion
Sumo Deadlift High Pulls are a great full-body workout that targets multiple muscle groups. It is an explosive exercise that requires a lot of power and strength. SDHP offers a wide range of benefits including improving power and strength, burning calories, increasing muscle mass, and improving cardiovascular endurance. Follow the steps outlined in this article to perform Sumo Deadlift High Pulls with proper form, and incorporate them into your workout routine for best results.
Related video of Sumo Deadlift High Pulls: The Ultimate Guide for a Full-Body Workout

Do you want to achieve toned and defined abs? If so, you need to focus on more than just crunches and sit-ups. One area that is often overlooked is the hip dips. In this article, we will discuss the best hip dips exercise abs.
What are Hip Dips?

Hip dips are the inward curve that occurs between the hip bone and the top of the thigh. This is a natural occurrence and is caused by the shape of the pelvis. Some people have more pronounced hip dips than others.
While hip dips are a natural part of the body, many people want to minimize their appearance. This is where hip dips exercise abs come in.
Why Do Hip Dips Occur?

Hip dips occur because of the shape of the pelvis. The angle of the pelvis determines the amount of space between the hip bone and the top of the thigh. If the angle is more acute, there will be less space and more pronounced hip dips.
Hip dips can also be more pronounced in individuals with a higher percentage of body fat. Losing weight can help reduce the appearance of hip dips.
The Best Hip Dips Exercise Abs

There are several exercises that can help reduce the appearance of hip dips and tone the abs. Here are the best hip dips exercise abs:
1. Plank

The plank is an excellent exercise for toning the abs and reducing the appearance of hip dips. To perform a plank, start in a push-up position with your arms straight and your body in a straight line. Hold this position for as long as you can.
2. Side Plank

The side plank is a variation of the plank that targets the obliques and helps reduce the appearance of hip dips. To perform a side plank, lie on your side with your elbow under your shoulder and your legs straight. Lift your hips off the ground and hold this position for as long as you can.
3. Bicycle Crunch

The bicycle crunch is an effective exercise for toning the abs and reducing the appearance of hip dips. To perform a bicycle crunch, lie on your back with your hands behind your head and your legs in a tabletop position. Bring your right elbow to your left knee while straightening your right leg. Repeat on the other side.
4. Leg Raises

Leg raises are a great exercise for targeting the lower abs and minimizing the appearance of hip dips. To perform leg raises, lie on your back with your hands under your hips and your legs straight. Lift your legs up to a 90-degree angle and then lower them back down.
Conclusion
If you want to reduce the appearance of hip dips and achieve toned abs, you need to incorporate hip dips exercise abs into your workout routine. The exercises listed above are effective and can be done at home without any equipment. Remember to combine these exercises with a healthy diet and cardio for optimal results.
Related video of Hip Dips Exercise Abs: The Ultimate Guide

Are you looking to target specific muscles in your upper body during your workout routine? Incline dumbbell press is an effective exercise that can help you work out various muscles in your chest, shoulders, and arms. In this article, we will discuss the muscles that are targeted during an incline dumbbell press workout.
Chest Muscles
Incline dumbbell press is a great exercise to target your chest muscles. The incline position of the bench allows you to focus more on your upper chest muscles, also known as the clavicular head of the pectoralis major. This muscle group is responsible for the movement of your arms towards the center of your body, such as hugging or clapping. By performing incline dumbbell press, you can strengthen and develop your upper chest muscles.
Shoulder Muscles

Incline dumbbell press is also effective in targeting your shoulder muscles. During the exercise, your shoulders are engaged in stabilizing your arms as you lift the dumbbells. The anterior deltoid, which is the front part of your shoulder muscles, is activated during incline dumbbell press. This muscle group is responsible for the movement of your arms towards the front of your body, such as reaching for something in front of you. By targeting your anterior deltoid with incline dumbbell press, you can improve your shoulder strength and stability.
Triceps Muscles

Incline dumbbell press also works out your triceps muscles. The triceps muscles are located at the back of your upper arm and are responsible for the extension of your arms. During incline dumbbell press, your triceps muscles help to stabilize your arms as you lift the dumbbells. By incorporating incline dumbbell press in your workout routine, you can strengthen and tone your triceps muscles.
Biceps Muscles

Although incline dumbbell press primarily works out your chest, shoulders, and triceps muscles, your biceps muscles are also activated during the exercise. Your biceps muscles are located at the front of your upper arm and are responsible for the flexion of your arms. During incline dumbbell press, your biceps muscles help to stabilize your arms as you lift the dumbbells. By performing incline dumbbell press, you can work out your biceps muscles indirectly.
Upper Back Muscles

Incline dumbbell press also engages your upper back muscles. The muscles in your upper back are responsible for the retraction of your shoulder blades. During incline dumbbell press, your upper back muscles help to stabilize your shoulder blades as you lift the dumbbells. By incorporating incline dumbbell press in your workout routine, you can strengthen and improve the function of your upper back muscles.
Conclusion

Incline dumbbell press is an effective exercise that targets various muscles in your upper body. By performing incline dumbbell press, you can strengthen and develop your chest, shoulders, triceps, biceps, and upper back muscles. Incorporating incline dumbbell press in your workout routine can help you achieve your fitness goals and improve your overall upper body strength and stability.
Related video of What Muscles Do Incline Dumbbell Press Work

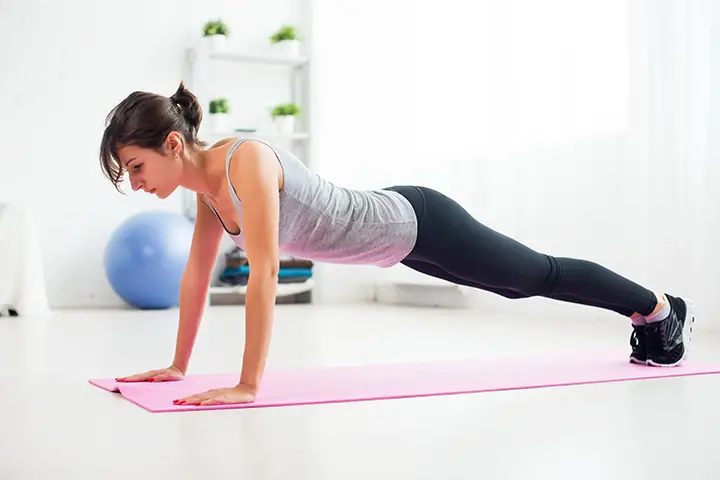
Push ups are a popular exercise that can help build strength in the upper body. While most people associate push ups with working the chest and arms, they can also be a great way to work your shoulders. By adjusting your hand placement and body position, you can target different areas of your shoulders and get a challenging workout.
Standard Push Up

The standard push up is a great way to work your shoulders, as well as your chest and triceps. To perform a standard push up, start in a plank position with your hands slightly wider than shoulder-width apart. Lower your body until your chest touches the ground, then push back up to the starting position. Make sure to keep your elbows close to your body and your core engaged.
Wide Grip Push Up

The wide grip push up is a variation of the standard push up that targets the shoulders more directly. To perform a wide grip push up, place your hands wider than shoulder-width apart. Lower your body until your chest touches the ground, then push back up to the starting position. This exercise will challenge your shoulder muscles and help to build strength and definition.
Pike Push Up

The pike push up is an advanced exercise that targets the shoulders, particularly the front deltoids. To perform a pike push up, start in a downward dog position with your hands and feet on the ground. Lower your head towards the ground, keeping your elbows close to your body. Push back up to the starting position, making sure to keep your core engaged throughout the exercise.
Decline Push Up
The decline push up is a challenging exercise that targets the shoulders, as well as the chest and triceps. To perform a decline push up, place your feet on a raised surface such as a bench or step. Lower your body until your chest touches the ground, then push back up to the starting position. This exercise requires significant upper body strength and is best suited for advanced athletes.
Shoulder Tap Push Up

The shoulder tap push up is a great way to challenge your shoulder stability and build strength in your shoulders. To perform a shoulder tap push up, start in a standard push up position. Lower your body until your chest touches the ground, then push back up to the starting position. Once you are back in the starting position, lift one hand off the ground and tap your opposite shoulder. Repeat on the other side, and continue alternating sides with each repetition.
Conclusion
Push ups are a versatile exercise that can be adapted to target different areas of the body. By incorporating these variations into your workout routine, you can build strength and definition in your shoulders. Remember to always use proper form and technique, and gradually increase the difficulty of your workouts over time. With consistent effort and dedication, you can achieve your fitness goals and improve your overall health and well-being.
