
Reverse grip dumbbell row is an excellent exercise for building a strong and muscular back. It targets the latissimus dorsi, rhomboids, and trapezius muscles, which are responsible for pulling and stabilizing the shoulders. This exercise is suitable for both beginners and advanced lifters, and it can be done with a variety of weights and equipment.
How to perform the reverse grip dumbbell row

To perform the reverse grip dumbbell row, follow these steps:
- Stand with your feet shoulder-width apart and knees slightly bent.
- Hold a dumbbell in each hand with an underhand grip (palms facing up).
- Bend forward at the waist, keeping your back straight and your hips back.
- Let your arms hang straight down from your shoulders, with your elbows slightly bent.
- Exhale and pull the dumbbells up towards your chest, keeping your elbows close to your sides.
- Squeeze your shoulder blades together at the top of the movement.
- Inhale and slowly lower the dumbbells back down to the starting position.
- Repeat for the desired number of reps.
It's important to keep your back straight and your shoulders down throughout the exercise. Avoid using momentum to lift the weights, and focus on using your back muscles to pull the dumbbells up.
Variations of the reverse grip dumbbell row

There are several variations of the reverse grip dumbbell row that you can try to add variety to your workout and target different areas of your back. Here are a few examples:
- Single-arm dumbbell row: Perform the exercise with one arm at a time to isolate each side of your back.
- T-bar row: Use a T-bar machine or a barbell to perform the exercise with a neutral grip (palms facing each other).
- Cable row: Use a cable machine with a V-bar attachment to perform the exercise with a neutral grip.
- Inverted row: Use a bar or suspension trainer to perform the exercise with your bodyweight.
Each variation offers a unique challenge and can help you build a well-rounded and strong back.
Benefits of the reverse grip dumbbell row

The reverse grip dumbbell row offers several benefits for your back and overall fitness. Here are some of the main advantages:
- Builds a strong and muscular back: The exercise targets the major muscles of your back, including the lats, rhomboids, and traps.
- Improves posture and spinal health: By strengthening your back muscles, you can improve your posture and reduce the risk of back pain and injury.
- Enhances pulling strength: The exercise strengthens your pulling muscles, which can help you perform other exercises such as pull-ups and rows more effectively.
- Increases grip strength: Holding onto the dumbbells with an underhand grip can help improve your grip strength and forearm muscles.
Overall, the reverse grip dumbbell row is a great exercise for anyone looking to build a strong and healthy back.
Conclusion
The reverse grip dumbbell row is a simple yet effective exercise that can help you build a strong and muscular back. By following the proper form and technique, you can target the major muscles of your back and improve your overall fitness. Try incorporating this exercise into your workout routine and see the results for yourself!
Related video of Reverse Grip Dumbbell Row

Introduction
When it comes to building a strong and muscular upper body, the incline bench press is one of the most effective exercises you can do. But what degree should the bench be set at for optimal results? In this article, we'll explore the science behind incline bench angles and help you determine the best degree for your workout.The Basics of Incline Bench Press
Before we dive into the specific angles, let's review the basics of incline bench press. This exercise involves lying on a bench that is angled upwards, usually between 30 and 45 degrees. You then lift a barbell or dumbbells from your chest up towards the ceiling, targeting your upper chest, shoulders, and triceps.30-Degree Incline Bench
The 30-degree incline bench is the lowest angle you should use for incline bench press. This angle targets the clavicular head of the pectoralis major, which is the upper portion of the chest. This is the ideal angle for bodybuilders who want to focus on building a bigger upper chest.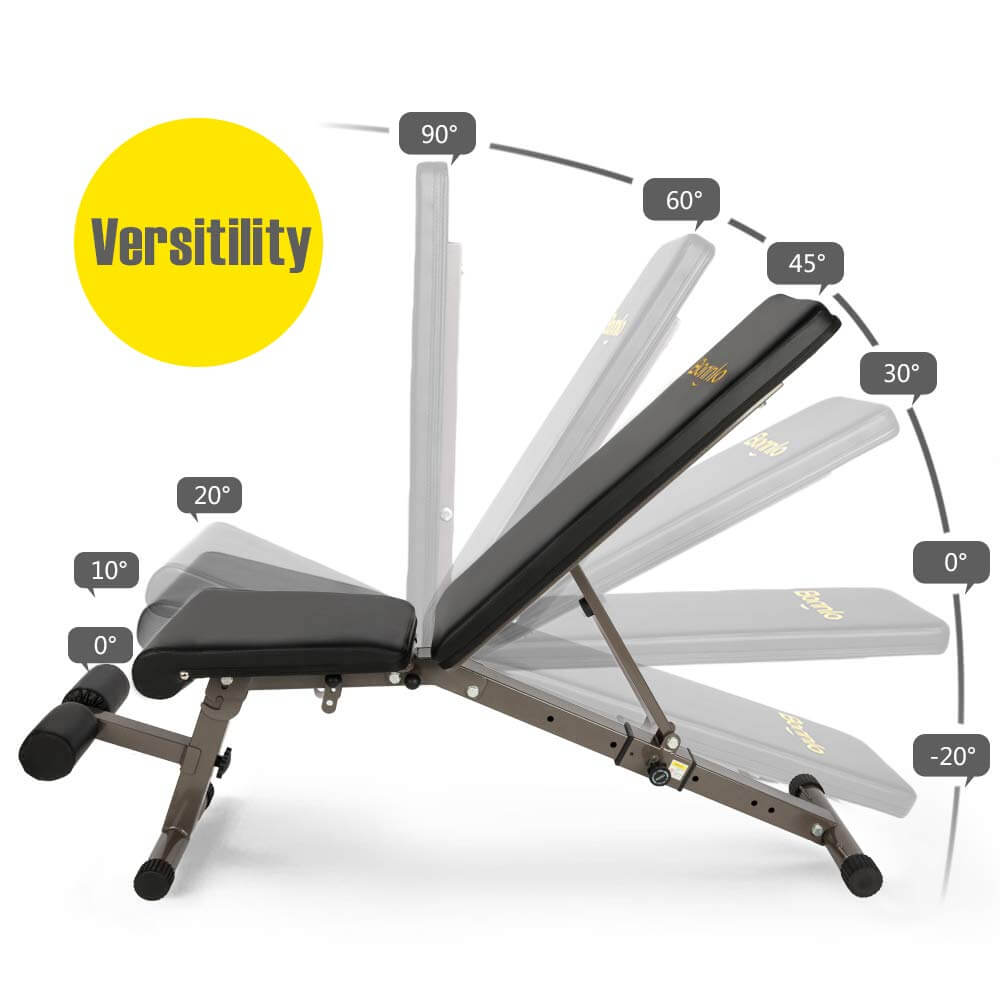
45-Degree Incline Bench
The 45-degree incline bench is the most common angle used for incline bench press. This angle targets both the upper chest and the front deltoids, making it a great all-around exercise. This is the ideal angle for athletes who want to improve their overall upper body strength and power.
60-Degree Incline Bench
The 60-degree incline bench is the highest angle you should use for incline bench press. This angle primarily targets the front deltoids, making it a good exercise for bodybuilders who want to isolate this muscle group. However, it is not recommended for athletes who want to improve their overall upper body strength and power.
Choosing the Right Angle
So, which angle is right for you? It depends on your goals and fitness level. If you're a bodybuilder who wants to build a bigger upper chest, start with the 30-degree incline bench. If you're an athlete who wants to improve your overall upper body strength and power, the 45-degree incline bench is your best bet. If you want to isolate your front deltoids, the 60-degree incline bench is the way to go.Proper Technique
No matter what angle you choose, it's important to use proper technique when performing incline bench press. Keep your feet flat on the ground, your back flat against the bench, and your elbows tucked in close to your body. Use a slow and controlled motion to lift the weight, and exhale as you push it up.Frequency and Volume
In addition to choosing the right angle and using proper technique, it's important to consider frequency and volume when performing incline bench press. Aim to perform this exercise 1-2 times per week, with 3-4 sets of 8-12 reps per workout. Gradually increase the weight as you get stronger, but always prioritize proper form over heavy weights.Conclusion
Incline bench press is a versatile and effective exercise that can help you build a strong and muscular upper body. By choosing the right angle, using proper technique, and incorporating the right frequency and volume, you can maximize your results and achieve your fitness goals.Related video of What Degree Should Incline Bench Be?

When it comes to building a strong and defined upper body, the dumbbell incline press is one of the most effective exercises you can do. However, if you want to take your chest and shoulder gains to the next level, you need to try the pause dumbbell incline press.
What is the Pause Dumbbell Incline Press?

The pause dumbbell incline press is a variation of the traditional incline press in which you pause at the bottom of the movement for a few seconds before pressing the weight back up. This pause eliminates the stretch reflex that occurs when you lower the weight, making the exercise more challenging and effective.
How to Perform the Pause Dumbbell Incline Press
To perform the pause dumbbell incline press, you will need an adjustable bench and a set of dumbbells. Here are the steps:
- Set the bench to a 30-45 degree incline.
- Grab a pair of dumbbells and lie on the bench with your feet flat on the floor.
- Hold the dumbbells at shoulder level with your palms facing forward.
- Lower the dumbbells slowly until they are just above your chest.
- Pause for 2-3 seconds.
- Press the dumbbells back up to the starting position.
- Repeat for the desired number of reps.

Tips for Success
Here are some tips to help you get the most out of your pause dumbbell incline press:
- Start with a lighter weight than you would use for the traditional incline press.
- Focus on keeping your shoulders back and down throughout the movement.
- Breathe deeply and exhale forcefully as you press the weight up.
- Keep your elbows close to your body to target your chest muscles.
- Don't let the dumbbells touch at the top of the movement to keep tension on your chest.
- Try to pause for a full 3 seconds to really challenge your muscles.
Benefits of the Pause Dumbbell Incline Press

The pause dumbbell incline press offers several benefits over the traditional incline press:
- Increased time under tension for greater muscle growth.
- Improved mind-muscle connection as you focus on the pause.
- Elimination of the stretch reflex for more effective chest and shoulder activation.
- Greater challenge for your stabilizer muscles.
- Improved shoulder health as you avoid bouncing the weight at the bottom of the movement.
Conclusion
If you're looking for a way to take your chest and shoulder gains to the next level, try incorporating the pause dumbbell incline press into your workout routine. With proper form and execution, this exercise can help you build a stronger, more defined upper body.
Related video of Pause Dumbbell Incline Press: The Ultimate Guide

Are you looking for ways to strengthen your hips? Seated band hip abductions are a great exercise to add to your routine. This exercise targets the glutes, hips, and thighs, helping to improve balance, stability, and overall lower body strength. In this article, we'll take a closer look at how to perform seated band hip abductions and the benefits of doing them regularly.
What Are Seated Band Hip Abductions?

Seated band hip abductions are a resistance exercise that involves using a resistance band to work the hip abductor muscles. The hip abductor muscles are responsible for moving your legs away from your body, and they also help with maintaining balance and stability. Seated band hip abductions are done while sitting down, making them a low-impact exercise that can be done by people of all fitness levels.
How to Perform Seated Band Hip Abductions

To perform seated band hip abductions, you'll need a resistance band and a chair or bench to sit on. Here's how to do it:
- Start by sitting on a chair or bench with your back straight and your feet flat on the ground.
- Place the resistance band around your ankles and hold onto the ends with your hands.
- Keeping your feet together, slowly lift your right leg out to the side, using the resistance band to provide resistance.
- Pause for a second, then slowly lower your leg back down to the starting position.
- Repeat with your left leg.
- Do 10-15 reps on each leg, and 2-3 sets.
The Benefits of Seated Band Hip Abductions

There are several benefits to adding seated band hip abductions to your exercise routine:
- Improved hip strength: Seated band hip abductions target the hip abductor muscles, which are important for maintaining balance and stability. By strengthening these muscles, you can improve your overall hip strength and reduce your risk of injury.
- Better posture: Strong hip abductor muscles can also help improve your posture by helping to align your hips and pelvis.
- Increased flexibility: Seated band hip abductions can also help improve your hip flexibility, which can be beneficial for activities like running, dancing, and yoga.
- Low-impact exercise: Seated band hip abductions are a low-impact exercise that can be done by people of all fitness levels, making them a great addition to any workout routine.
Tips for Getting the Most Out of Seated Band Hip Abductions

To get the most out of your seated band hip abductions, keep these tips in mind:
- Use proper form: Make sure to keep your back straight and your feet flat on the ground throughout the exercise. Focus on using your hip abductor muscles to lift your legs, rather than using momentum.
- Start with a lighter resistance band: If you're new to resistance training, start with a lighter resistance band and work your way up as your strength improves.
- Don't rush: Take your time with each repetition, focusing on using your muscles to lift your legs and controlling the movement as you lower them back down.
- Incorporate other hip exercises: To get the most benefit for your hips, consider adding other exercises that target the hip muscles, such as squats, lunges, and leg lifts.
Conclusion
Seated band hip abductions are a great exercise to add to your workout routine if you're looking to improve your hip strength, posture, and flexibility. By using a resistance band, you can target the hip abductor muscles and work towards a stronger, more stable lower body. Remember to use proper form, start with a lighter resistance band, and take your time with each repetition. With regular practice, you'll soon start to see the benefits of this simple yet effective exercise.
Related video of Seated Band Hip Abductions: A Guide to Strengthening Your Hips

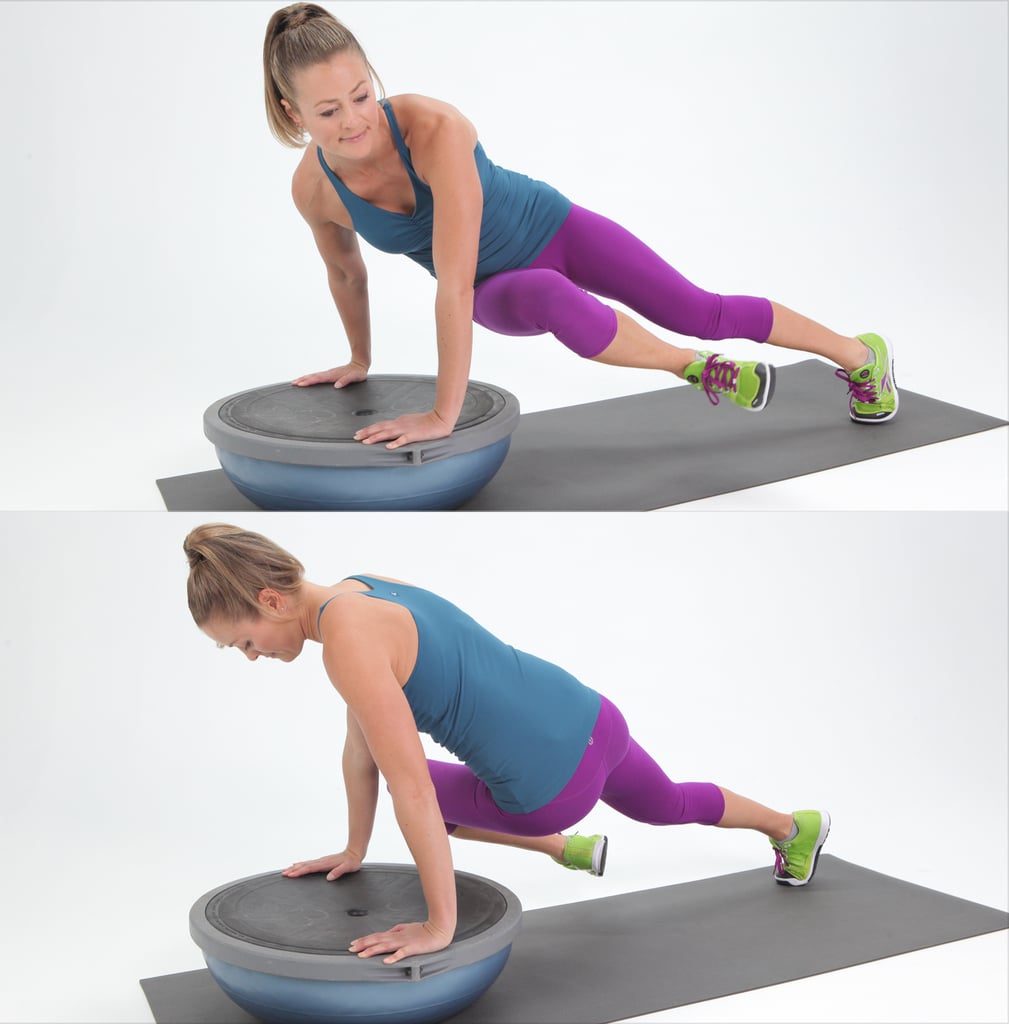
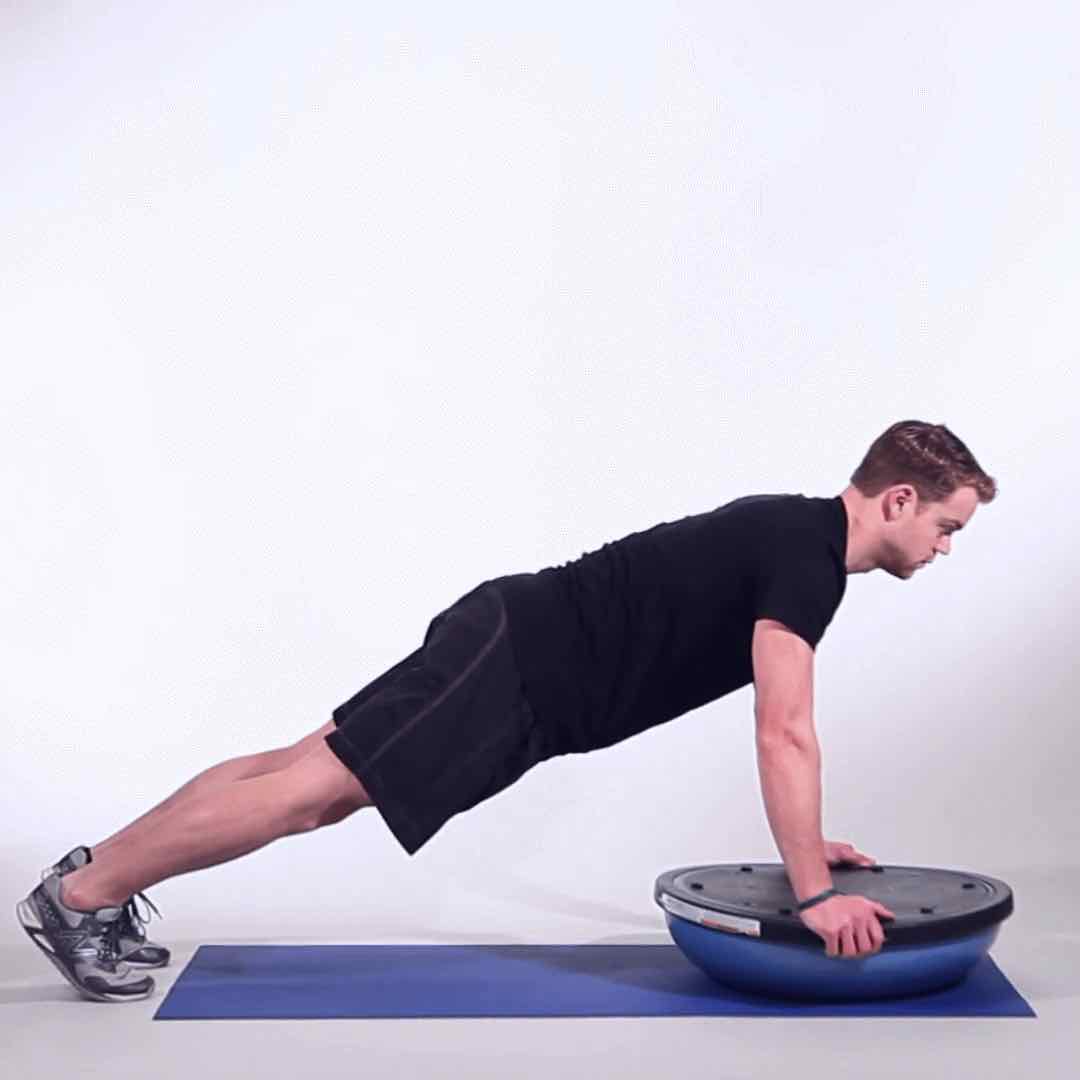
Are you looking for a new and challenging way to work your core muscles? Look no further than the plank on Bosu ball! This exercise combines the benefits of a traditional plank with the added challenge of balancing on an unstable surface. In this article, we'll explore the benefits of the plank on Bosu ball and how to perform it correctly.
What Is A Plank On Bosu Ball?
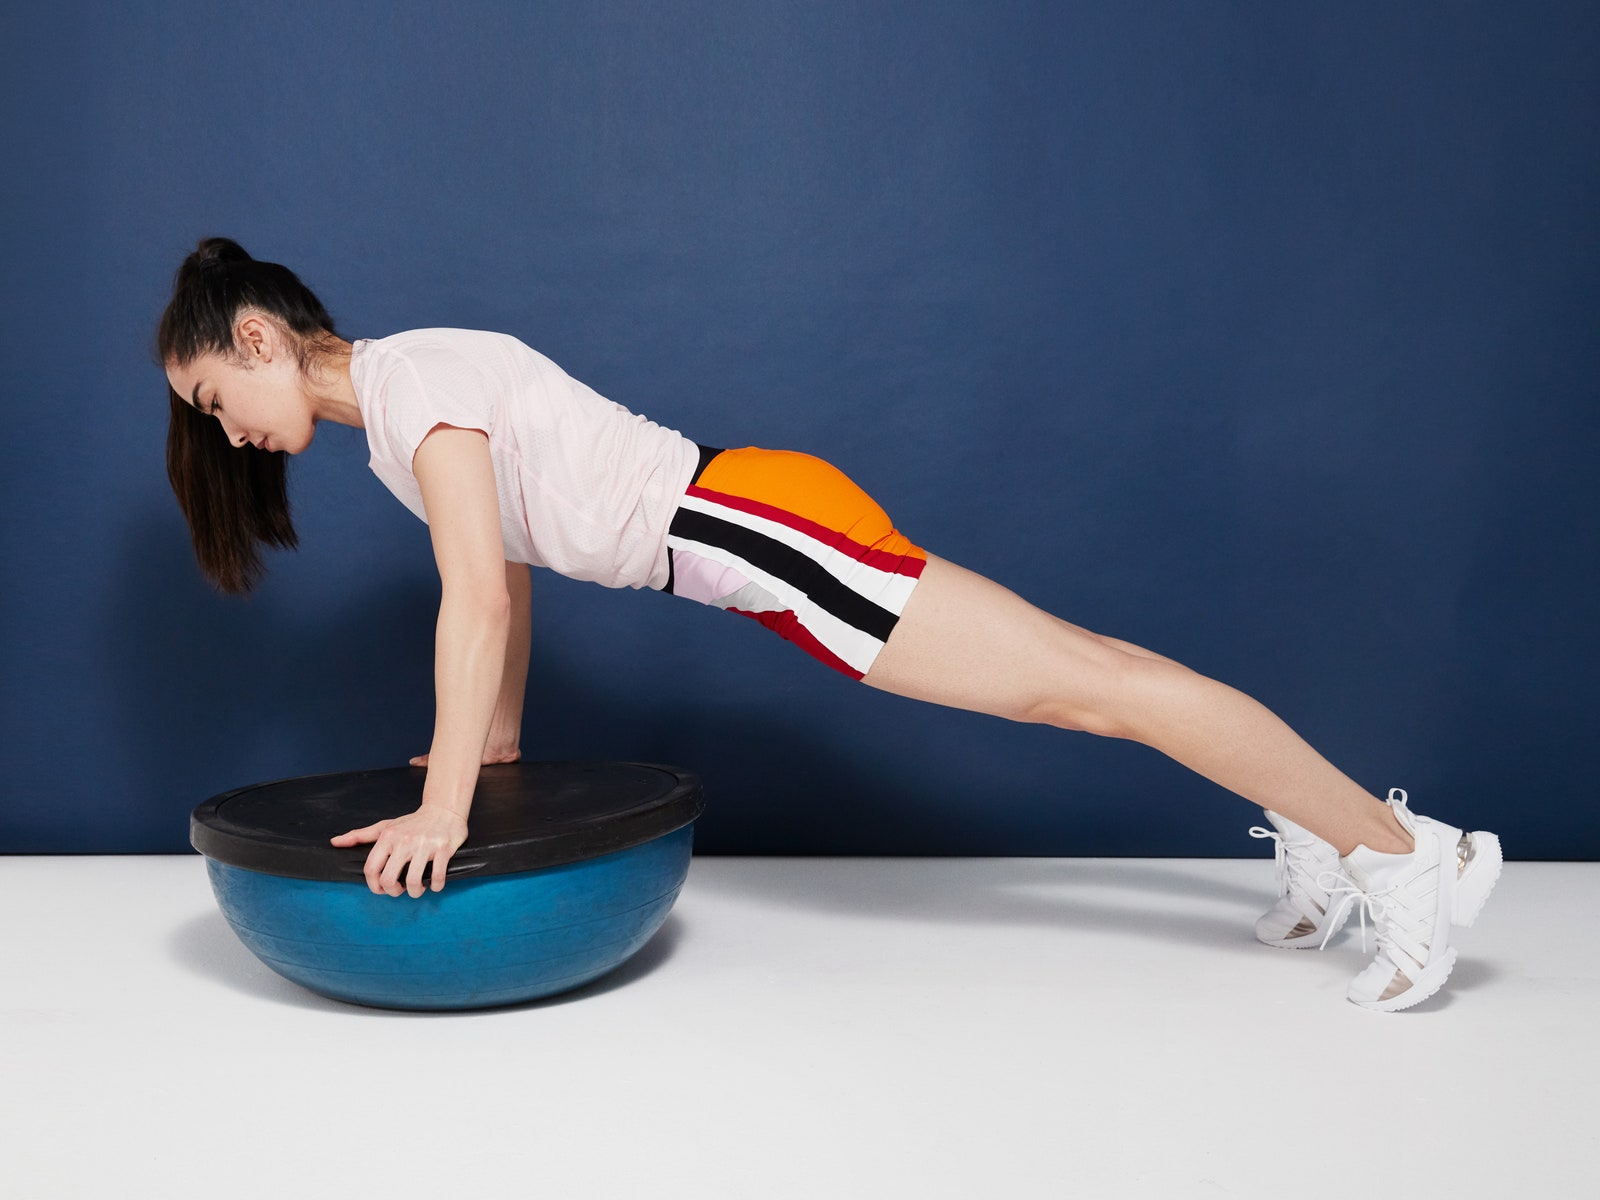
A plank on Bosu ball is a variation of the traditional plank exercise. Instead of holding a plank on the floor, you place your forearms on a Bosu ball and hold yourself in a plank position while balancing on the ball. The Bosu ball is a half-circle stability ball with a flat platform on one side and a domed surface on the other.
What Are The Benefits Of A Plank On Bosu Ball?
The plank on Bosu ball provides several benefits for your core muscles:
- Improves balance and stability
- Strengthens the core muscles, including the rectus abdominis, transverse abdominis, and obliques
- Engages the glutes, shoulders, and back muscles
- Increases overall core strength and endurance
How To Perform A Plank On Bosu Ball

Here's how to perform a plank on Bosu ball correctly:
- Place the Bosu ball flat side up on the floor.
- Place your forearms on the flat surface of the ball and extend your legs behind you, keeping your feet hip-width apart.
- Engage your core muscles and lift your body up into a plank position. Your body should form a straight line from your head to your heels.
- Hold this position for 30-60 seconds, or as long as you can maintain proper form.
- To release, gently lower your knees to the floor and come out of the plank position.
Tips For Proper Form

Follow these tips to ensure you perform the plank on Bosu ball with proper form:
- Keep your core muscles engaged throughout the exercise.
- Don't let your hips sag or lift too high - your body should form a straight line.
- Keep your shoulders relaxed and away from your ears.
- Breathe deeply and evenly throughout the exercise.
Who Can Perform A Plank On Bosu Ball?
The plank on Bosu ball is a challenging exercise that requires a certain level of core strength and stability. It's best for intermediate to advanced fitness levels. If you're new to planks or unstable surface training, start with a traditional plank on the floor before attempting the plank on Bosu ball.
In Conclusion
The plank on Bosu ball is a challenging and effective way to work your core muscles. By adding an unstable surface to the traditional plank exercise, you engage more muscles and improve your balance and stability. Follow the tips for proper form and start with a traditional plank if you're new to this exercise. With consistency and practice, you'll improve your core strength and endurance in no time!
Related video of Plank On Bosu Ball: How It Benefits Your Core Muscles

If you're looking for an exercise that can help you improve your lower back and hamstring strength, you might want to try the single leg good morning. This exercise is a variation of the traditional good morning, which is a classic exercise that targets the lower back and hamstrings. But unlike the traditional version, the single leg good morning requires you to balance on one leg, which makes it more challenging and effective for improving your overall strength and stability.
What Is the Single Leg Good Morning?

The single leg good morning is an exercise that involves bending forward from the hips while balancing on one leg. To perform the exercise, you stand on one leg with your knee slightly bent and your other leg extended behind you. You then hinge forward from your hips, keeping your back straight and your core engaged, until your torso is parallel to the ground. You then return to the starting position and repeat the movement for several reps before switching legs.
Benefits of the Single Leg Good Morning

The single leg good morning offers a number of benefits, including:
- Improved lower back and hamstring strength
- Increased core stability
- Better balance and coordination
- Reduced risk of lower back injury
- Improved athletic performance
Because the exercise requires you to balance on one leg, it also engages your stabilizer muscles, which can help improve your overall balance and coordination. Plus, because it targets the lower back and hamstrings, it can help reduce your risk of lower back injury and improve your athletic performance.
How to Perform the Single Leg Good Morning

To perform the single leg good morning, follow these steps:
- Stand on one leg with your knee slightly bent and your other leg extended behind you.
- Hinge forward from your hips, keeping your back straight and your core engaged, until your torso is parallel to the ground.
- Pause briefly at the bottom of the movement, then return to the starting position.
- Repeat the movement for several reps before switching legs.
Remember to keep your core engaged and your back straight throughout the movement. You should also focus on maintaining your balance and stability as you perform the exercise.
Variations of the Single Leg Good Morning

If you're looking for ways to make the single leg good morning more challenging or to target different areas of your lower body, you can try these variations:
- Hold a weight in one hand as you perform the exercise to increase the resistance.
- Perform the exercise on an unstable surface, such as a balance board or BOSU ball, to increase your core engagement.
- Perform the exercise with your back foot elevated on a step or bench to target your glutes more.
- Perform the exercise with a resistance band wrapped around your waist to increase the resistance.
Remember to start with the basic version of the exercise before progressing to more challenging variations. And always focus on maintaining proper form and technique throughout the movement.
Conclusion

The single leg good morning is a great exercise for improving your lower back and hamstring strength, as well as your overall balance and stability. By adding this exercise to your workout routine, you can reduce your risk of lower back injury, improve your athletic performance, and enhance your overall fitness level.
Related video of Single Leg Good Morning: A Great Exercise for Your Lower Back and Hamstrings

The barbell clean & press is a compound exercise that targets multiple muscle groups, including the shoulders, back, legs, and core. It's a popular exercise for strength and conditioning athletes, as well as bodybuilders, and it's a great way to build explosive power.
The Benefits of Barbell Clean & Press
There are many benefits of the barbell clean & press, including:
- Increased muscle mass and strength
- Improved explosive power
- Better overall fitness and conditioning
- Improved posture and core strength
- Increased bone density and joint health
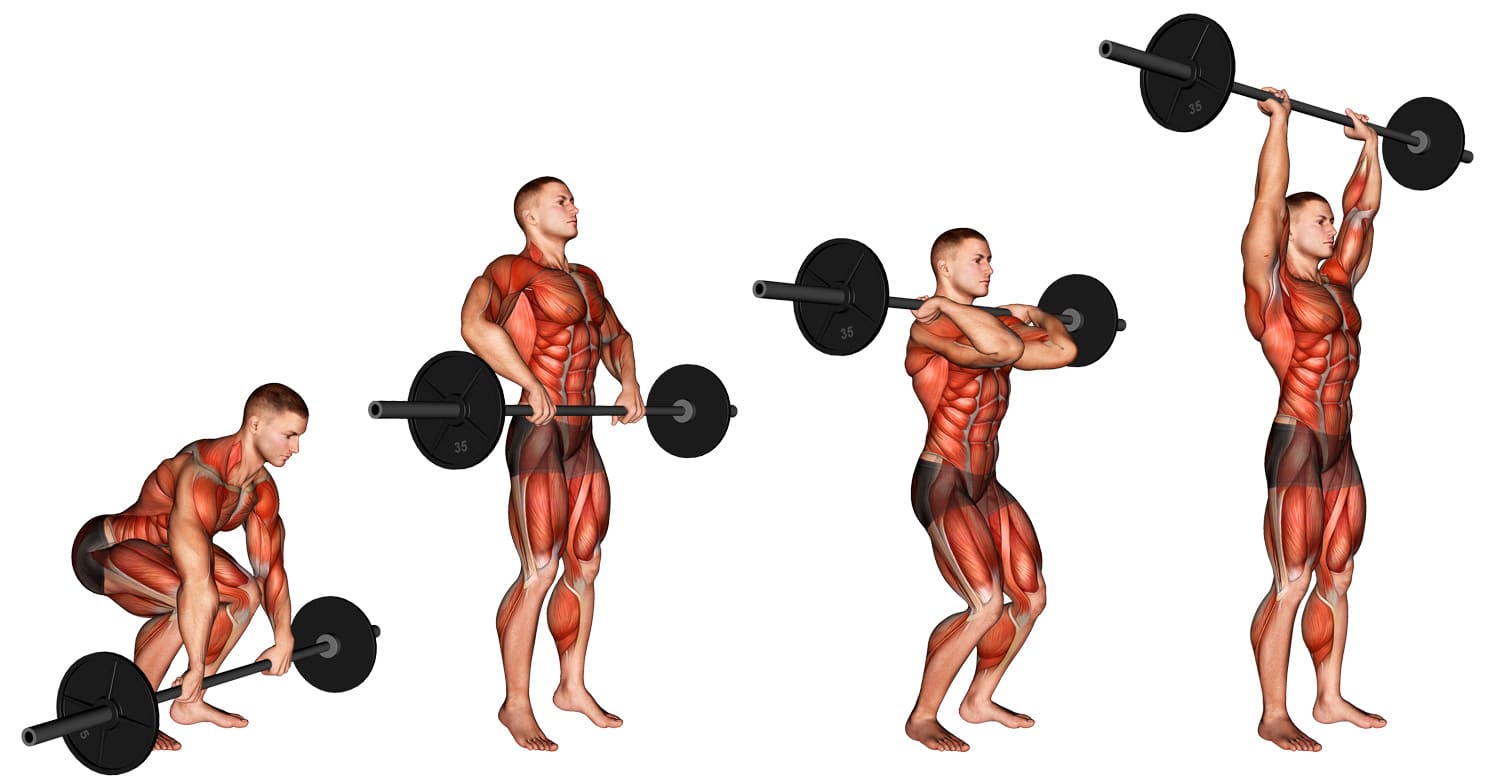
How to Perform the Barbell Clean & Press

Here's how to perform the barbell clean & press:
- Begin with the barbell on the floor in front of you, with your feet shoulder-width apart.
- Bend down and grasp the bar with an overhand grip, with your hands shoulder-width apart.
- Begin to lift the bar off the floor, keeping your back straight and your chest up.
- As the bar reaches your knees, explosively extend your hips and knees, pulling the bar up to your shoulders.
- Once the bar reaches your shoulders, bend your knees slightly and use your legs to help press the bar overhead.
- Lower the bar back down to your shoulders, then back down to the floor.
- Repeat for the desired number of reps.
Tips for Proper Form

Here are some tips for proper form when performing the barbell clean & press:
- Keep your back straight and your chest up throughout the movement.
- Use your legs and hips to generate power, not your back.
- Make sure the bar stays close to your body throughout the movement.
- Use an overhand grip on the bar for better grip strength.
- Don't use too much weight, as this can compromise your form and increase your risk of injury.
Variations of the Barbell Clean & Press

There are several variations of the barbell clean & press that you can try, including:
- Hang clean & press
- Power clean & press
- Clean & push press
- Clean & jerk
Common Mistakes to Avoid

Here are some common mistakes to avoid when performing the barbell clean & press:
- Using too much weight
- Rounding your lower back
- Not using your legs to generate power
- Letting the bar drift away from your body
- Not using a full range of motion
Conclusion
The barbell clean & press is a powerful exercise that can help you build strength, power, and overall fitness. By following proper form and technique, you can maximize the benefits of this exercise while minimizing your risk of injury. Whether you're a strength and conditioning athlete, a bodybuilder, or just looking to improve your overall fitness, the barbell clean & press is a must-try exercise.
Related video of Barbell Clean & Press: A Complete Guide

The dumbbell lateral step up is a lower body exercise that targets multiple muscle groups, including the quadriceps, hamstrings, glutes, and calves. It is a unilateral movement that involves stepping up onto a raised platform while holding a dumbbell in one hand, which adds an extra challenge to the exercise.
Benefits of Db Lateral Step Up

The Db lateral step up offers a range of benefits, including:
- Improving balance and stability
- Strengthening the lower body muscles
- Activating the core muscles
- Increasing flexibility and mobility
- Burning more calories compared to traditional step-ups
Variations of Db Lateral Step Up

Here are some variations of the Db lateral step up:
- Reverse lunges with a lateral step up
- Side lunges with a lateral step up
- Curtsy lunges with a lateral step up
- Single-leg lateral step up
- Weighted lateral step up
Proper Form for Db Lateral Step Up

Follow these steps to perform the Db lateral step up correctly:
- Stand with feet hip-width apart, holding a dumbbell in your right hand by your side.
- Place your left foot on a raised platform, such as a step or bench, and step up, straightening your left leg to lift your body up.
- As you step up, simultaneously lift your right leg to a 90-degree angle, bringing your knee up to hip height.
- Lower your right leg back down to the starting position.
- Step back down with your left foot and repeat the movement for the desired number of reps.
- Switch sides and perform the exercise with your left hand holding the dumbbell and your right foot stepping up onto the platform.
Make sure to keep your core engaged and your back straight throughout the exercise. Avoid leaning forward or rounding your shoulders.
Sample Db Lateral Step Up Workout

You can add the Db lateral step up to your leg day routine or do it as a standalone exercise. Here's a sample workout:
- Warm-up: 5-10 minutes of cardio and dynamic stretching.
- Db lateral step up: 3 sets of 10 reps per leg.
- Reverse lunges with a lateral step up: 3 sets of 10 reps per leg.
- Curtsy lunges with a lateral step up: 3 sets of 10 reps per leg.
- Weighted lateral step up: 3 sets of 10 reps per leg.
- Cool-down: 5-10 minutes of static stretching.
Conclusion
The Db lateral step up is a challenging exercise that can help you build strength, balance, and stability in your lower body. Remember to use proper form, start with lighter weights, and gradually increase the weight as you get stronger. Incorporate the Db lateral step up into your workout routine and see the results for yourself!
Related video of Db Lateral Step Up: Benefits, Variations, and Proper Form

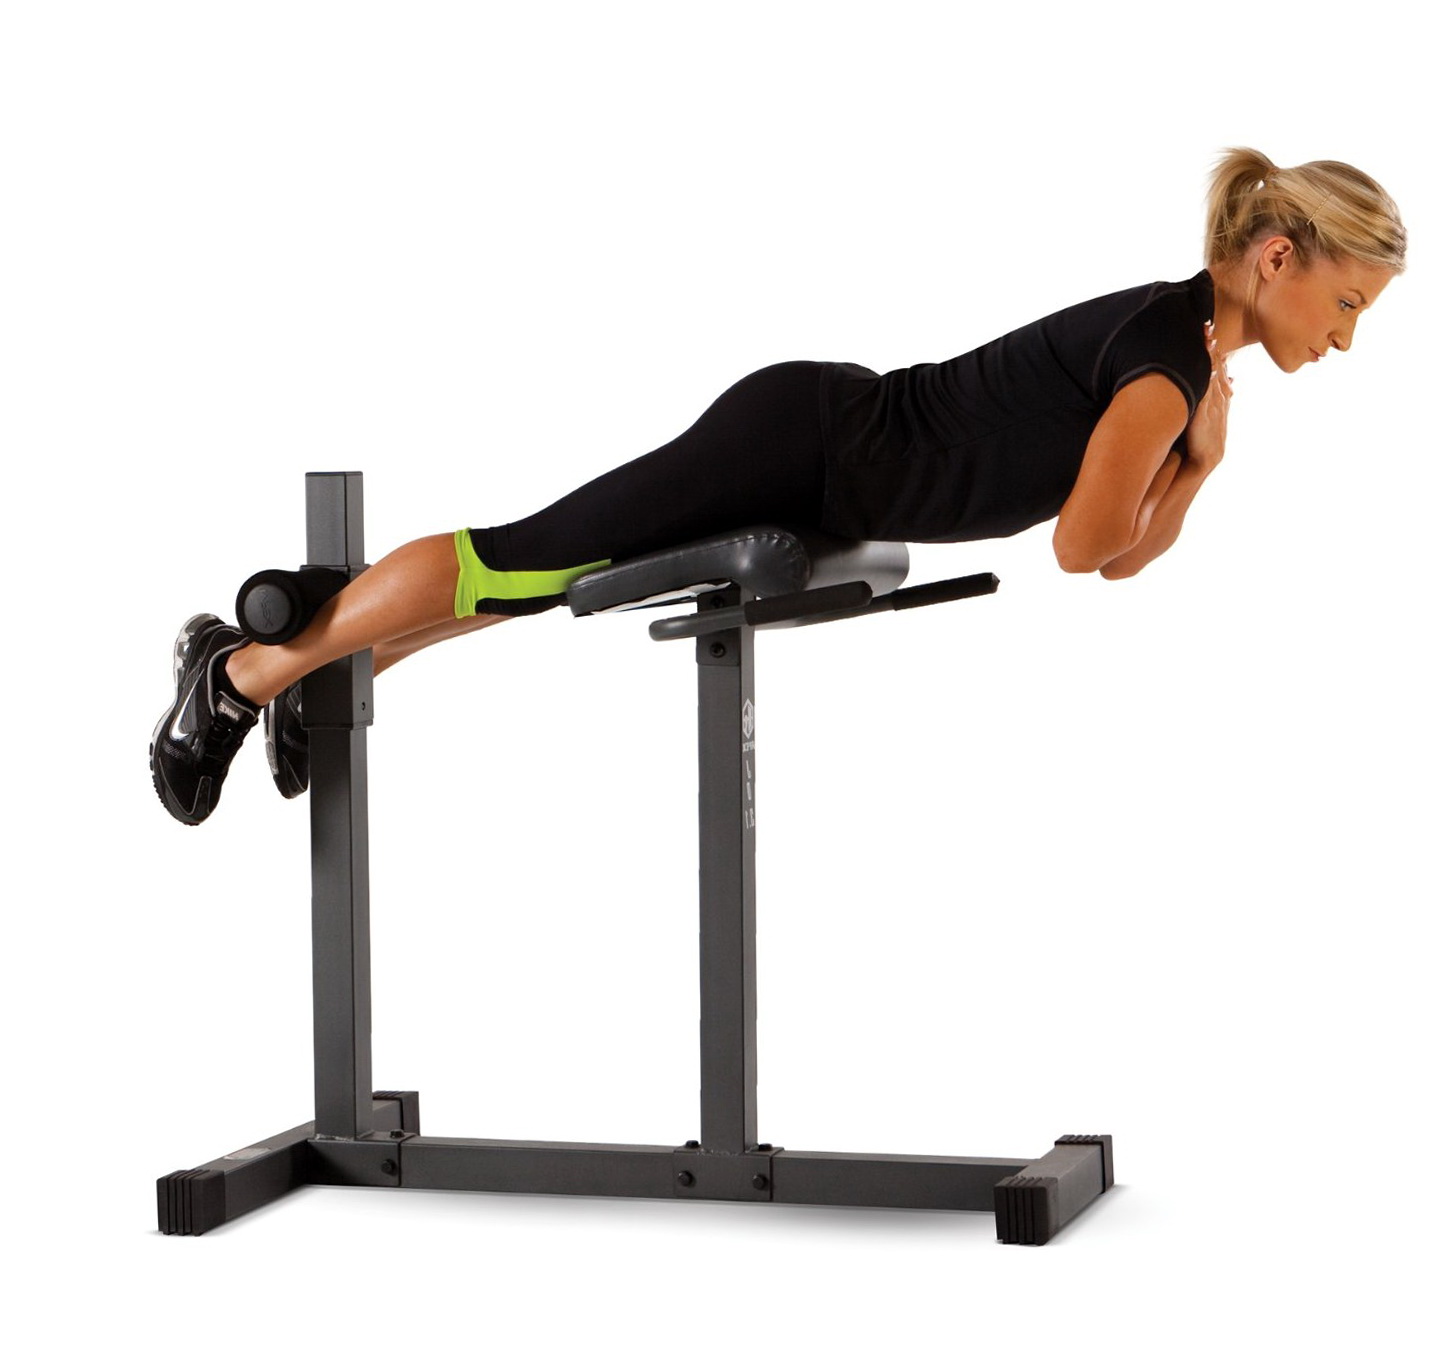
Back extension is a great exercise to strengthen the muscles of the back and improve posture. It is a simple exercise that can be done at home without any equipment. This article will guide you on how to do back extension at home.
What is Back Extension?

Back extension is an exercise that involves extending the spine backwards. This exercise primarily targets the erector spinae muscles, which are located in the lower back. These muscles help in maintaining posture and supporting the spine. Back extension also targets the glutes, hamstrings and core muscles.
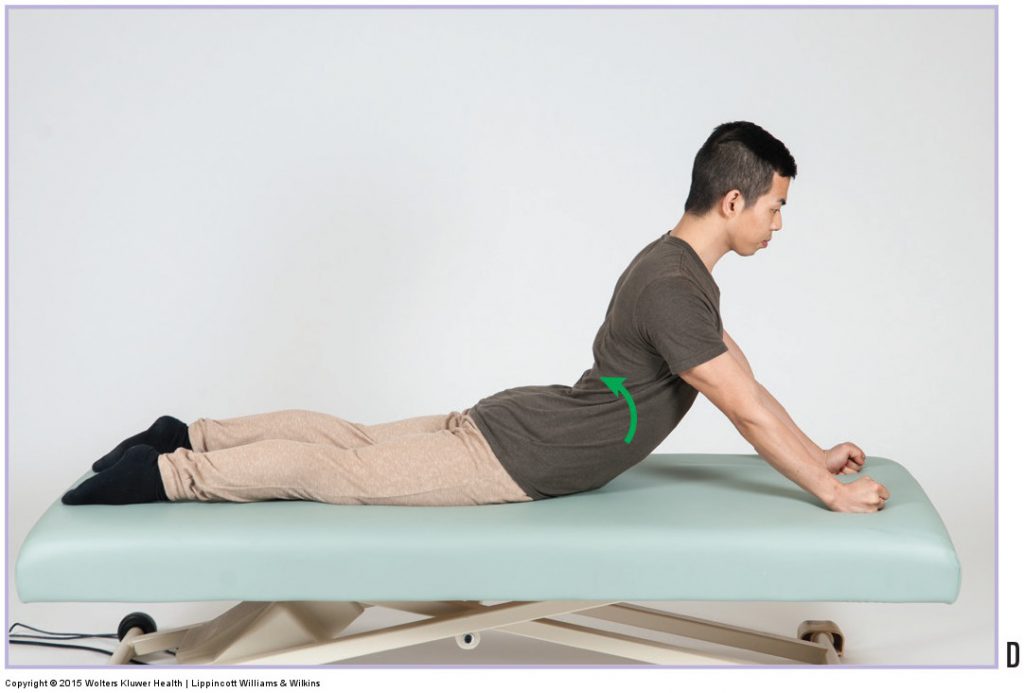
How to do Back Extension at Home?
Here are the steps to do back extension at home:
- Lie face down on a mat with your hands beside your chest and palms facing down.
- Engage your core and lift your upper body off the ground by extending your spine. Keep your neck in a neutral position.
- Hold the position for a couple of seconds and then lower your body back to the starting position.
- Repeat for 10-15 reps.
Common Mistakes to Avoid

Here are some common mistakes to avoid while doing back extension:
- Don't lift your hips off the ground.
- Don't lift your shoulders up too high.
- Don't strain your neck by looking up too high.
- Don't hold your breath while doing the exercise.
Variations of Back Extension

Here are some variations of back extension that you can try:
- Superman: This exercise involves lifting both your arms and legs off the ground while performing back extension.
- Swimming: This exercise involves lifting opposite arm and leg off the ground while performing back extension.
- Weighted back extension: This exercise involves holding a weight plate or dumbbell while performing back extension.
Benefits of Back Extension

Here are some benefits of back extension:
- Strengthens the muscles of the back, glutes and hamstrings.
- Improves posture and reduces back pain.
- Improves spinal flexibility.
- Enhances athletic performance.
Precautions to Take
Here are some precautions to take while doing back extension:
- Avoid doing back extension if you have a back injury or pain.
- Consult a doctor before performing back extension if you have a medical condition.
- Start with a few reps and gradually increase the number of reps.
- Don't overdo the exercise, as it can lead to muscle soreness or injury.
Conclusion
Back extension is a simple exercise that can be done at home without any equipment. It is a great exercise to strengthen the muscles of the back and improve posture. Remember to follow the correct technique and avoid common mistakes while doing back extension. You can try different variations of back extension to challenge yourself and enhance your athletic performance. Take precautions and consult a doctor before performing back extension if you have a medical condition or back injury.
Related video of Back Extension At Home
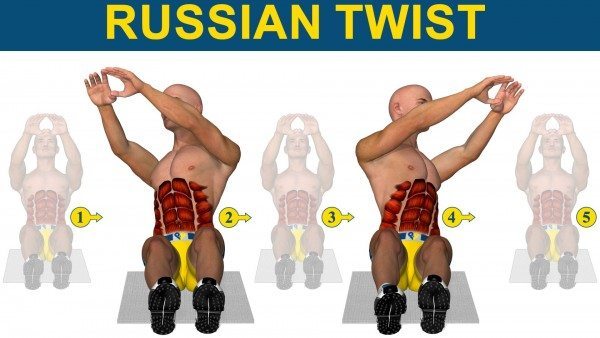
Russian twists are a popular exercise for developing the core muscles. The exercise involves twisting the torso from side to side while holding a weight or medicine ball. The movement engages the muscles of the abs, obliques, and lower back.
The Muscles Involved in Russian Twists
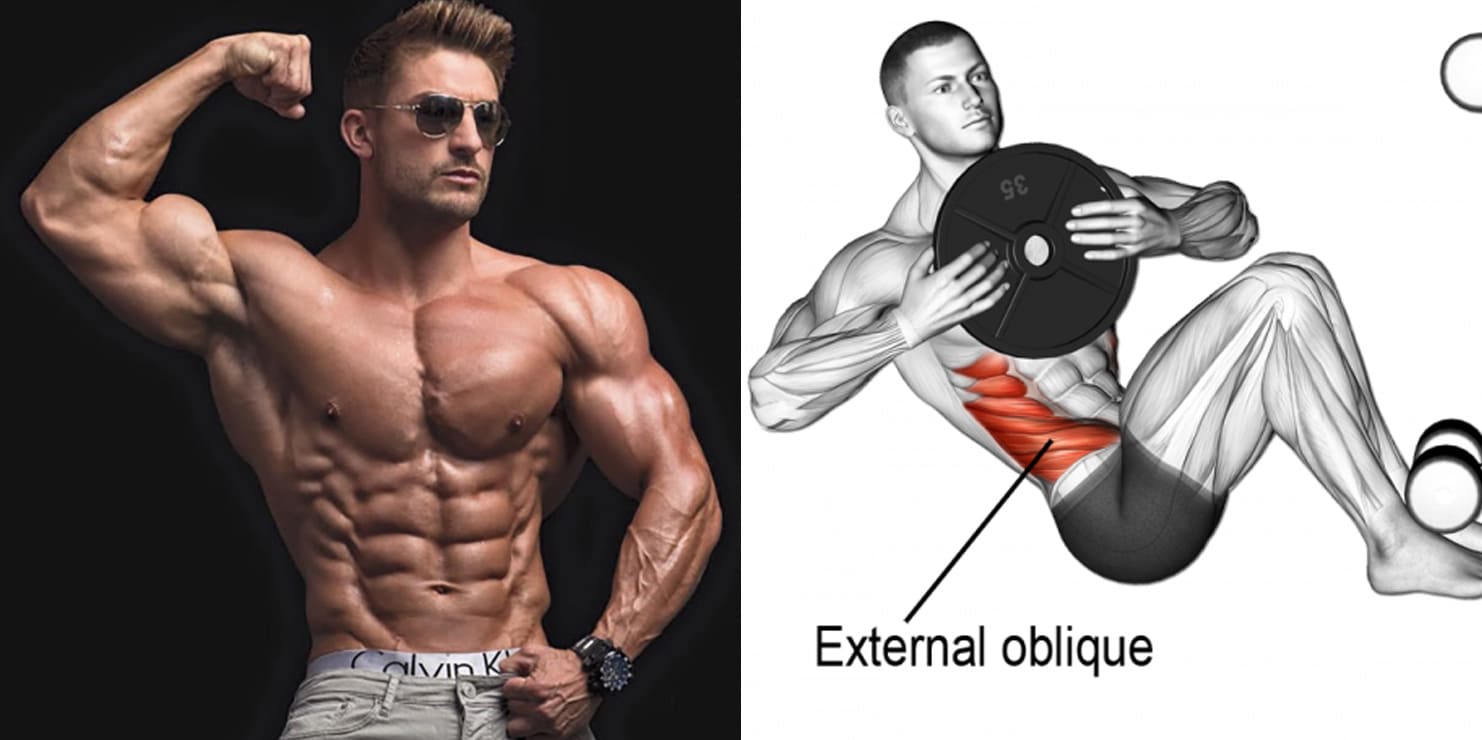
The primary muscles involved in Russian twists are the rectus abdominis, obliques, and erector spinae. The rectus abdominis is the muscle that runs from the ribcage to the pelvis and is responsible for flexing the spine. The obliques are located on the sides of the abdomen and are responsible for twisting the torso. The erector spinae is a group of muscles that run along the spine and are responsible for extending the spine.
How to Perform Russian Twists
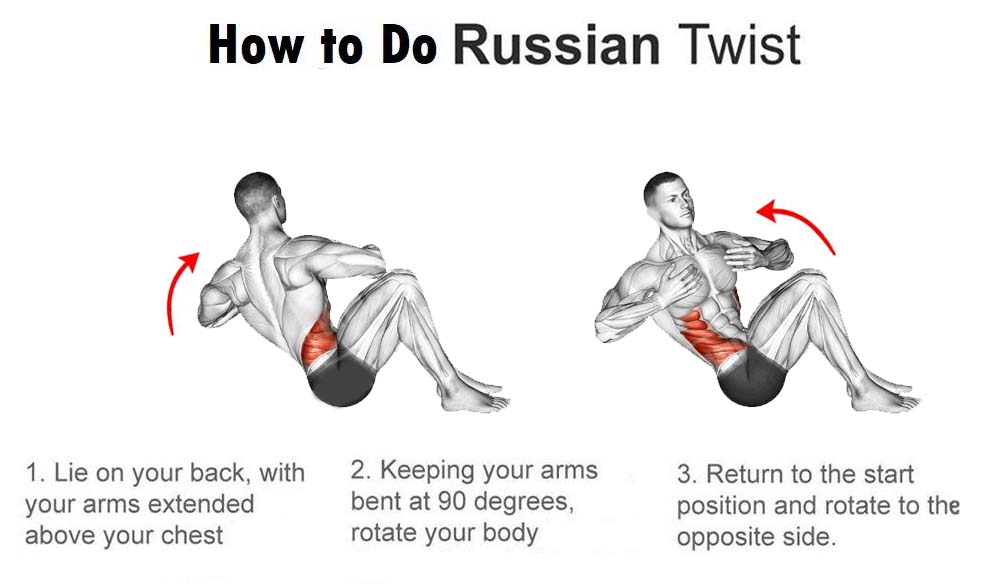
To perform Russian twists, follow these steps:
- Start by sitting on the floor with your knees bent and your feet flat on the ground.
- Lean back slightly and lift your feet off the ground, balancing on your sit bones.
- Hold a weight or medicine ball with both hands and extend your arms in front of you.
- Twist your torso to the right, bringing the weight or medicine ball to the outside of your right hip.
- Twist back to center and then twist to the left, bringing the weight or medicine ball to the outside of your left hip.
- Repeat for the desired number of repetitions.
Variations of Russian Twists

There are several variations of Russian twists that can be performed to target different muscles:
- Weighted Russian twists: Holding a weight or medicine ball increases the resistance and targets the abs and obliques.
- Twisting sit-ups: Adding a sit-up to the twist engages the rectus abdominis.
- Side plank twists: Holding a side plank position while twisting engages the obliques and stabilizer muscles.
- Single-leg Russian twists: Lifting one leg off the ground while twisting engages the lower abs and hip flexors.
Benefits of Russian Twists

Adding Russian twists to your workout routine can provide several benefits:
- Improved core strength and stability
- Increased rotational power and agility
- Better posture and spinal alignment
- Reduced risk of lower back pain
- Enhanced athletic performance in sports that require twisting and turning
Precautions and Tips

Before performing Russian twists, keep in mind the following precautions and tips:
- Start with a light weight or no weight at all to avoid straining your back or neck.
- Keep your back straight and your abs engaged throughout the exercise.
- Avoid twisting too far or too fast, as this can cause injury.
- Breathe steadily throughout the exercise, exhaling as you twist and inhaling as you return to center.
- If you have a history of lower back pain or injury, consult with a doctor or physical therapist before performing Russian twists.
Conclusion
Russian twists are an effective and versatile exercise for strengthening the core muscles. By engaging the abs, obliques, and lower back, the exercise can improve core strength, stability, and rotational power. However, it's important to perform the exercise with proper form and precautions to avoid injury. Consult with a professional if you have any concerns or questions about performing Russian twists.
